How to make an air heat exchanger for a chimney: a review on the example of a stove-potbelly stove
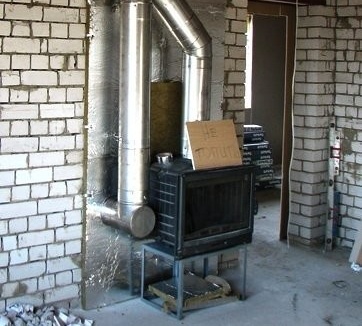
Heating appliances that use the fuel combustion process to produce heat cannot function without a flue duct. The device removes toxic products of combustion, which can be dangerous to humans. However, the flue gases leaving the pipe into the atmosphere literally carry away a large amount of heat that could be used to heat the room. To correct this drawback, you can install a heat exchanger in the chimney. The device can significantly increase the efficiency of the heating device.
The principle of operation and the design of the heat exchanger
There are several different models of heat exchangers. Their design, as well as the principle of operation, are generally similar. The heat exchanger has a hollow body equipped with outlet and inlet pipes. A so-called braking device designed for flue gases is installed inside the housing. Most often, this is a system of dampers with cutouts mounted on the axles. Elements have the ability to rotate, creating a zigzag gas duct of various lengths. Adjusting the position of the dampers allows you to choose the optimal ratio of heat transfer and draft in the flue, without violating the norms of safe operation. There are also simpler options without an adjustable damper system.

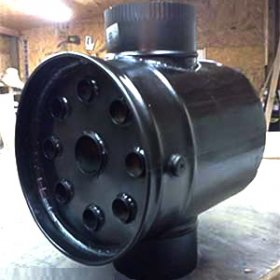
The heat exchanger device for the Bulleryan furnace. Cold air through the holes in the bottom of the device enters the structure, heats up from the combustion products passing through the chimney, and goes out
Through the openings located in the lower part of the device, cooler air is drawn in by the principle of convection. It passes through the internal space, where the flue gases passing through the gas duct heat it. Through the upper holes, the heated air is discharged into the heated room. Thus, it is possible to increase the efficiency of the heating device and significantly reduce the amount of fuel consumed by it. Experiments were carried out that showed that the fuel consumption of a stove-potbelly stove with a heat exchanger installed in the chimney decreased three times.
However, in order to achieve this effect, you should choose the right device. Do not forget that, giving up its heat in the flue, the combustion products cool quickly enough. This leads to a decrease in the temperature difference in the chimney and, accordingly, a drop in draft in the system. To prevent the occurrence of this unpleasant effect, adjustments are made using dampers or optimal design dimensions are selected.
How to make such a heat exchanger on your own?
Home craftsmen can make a heat exchanger on a chimney with their own hands. The technology of its manufacture is quite simple. Consider it on the example of a design for a stove-potbelly stove. For work you will need:
- sheet metal measuring 350x350 mm two pieces;
- eight pieces of pipe with a diameter of 32 mm or 1.25 inches long 300 mm;
- a pipe with a diameter of 57 mm or 2.25 inches with a length of 300 mm;
- 20 liter metal bucket
We begin work with the manufacture of end caps. To do this, take sheet metal and cut out two circles with a radius of 150 mm. We mark holes for pipes on them. In the center of each part should be the largest pipe with a diameter of 57 mm, at an equal distance from it in a circle we place eight elements with a diameter of 32 mm. The distance from the center of the plug to the center of each of the eight pipes should be 100 mm. We check the markup and make holes.

For precision heat exchanger assembly, a template of 20 mm thick plywood should be made. By installing parts in it, it will be much easier to assemble the device
For accuracy of assembly, it is recommended to make a template, it is made of plywood 20 mm thick. Pieces of pipes are alternately inserted into the prepared holes and reliably welded to a flat part. First, we work with one plug, then we turn the structure over and repeat the operation with another. As a result, we get the “core” of the heat exchanger, prepared for installation in the housing.

Pipe fragments are welded to the plugs. The result is the core of the heat exchanger, ready for installation in the housing
For the body of the heat exchanger, you can use a steel bucket in which technical fluids are sold. It must be well cleaned of residual contents. In this case, it is best to burn the bucket and carefully walk along the walls with a wire brush. We cut the bottom with an angle grinder. Now you need to connect the outlet and inlet pipes. These are fragments of a regular chimney purchased in a store.
On the housing we plan a place for the inlet pipe. It should be centered on the side of the structure. We cut a hole with scissors for metal. We try on a branch pipe. On the bottom of the chimney we make notches. We insert the pipe prepared in this way into the workpiece of the body and use the hammer to bend the notches, fixing the part in place. Outside we fasten the part to the base with welding tacks. Inlet fitting completed. Similarly, the installation of the output is carried out. It should be located on the opposite side of the housing.

We insert the prepared “core” of the heat exchanger into the body, fix it by welding and be sure to seal all joints with a refractory sealant. Paint the dried construction with a special paint
We install a heat exchanger in the prepared case and securely fix it with welding tacks. We carefully coat all seams with special refractory sealant. We leave the product to dry for a day. Now the finished heat exchanger can be painted with special paint or oven varnish. We mount the finished device on the chimney of the potbelly stove. To enhance the effect, you can install a fan near the heat exchanger, which will enhance air circulation. The device can be portable or stationary mounted on the device. The second option is more practical and convenient.

To improve air circulation in the device, a conventional fan is used. It can be portable. As in the photo, but it is much more convenient to fix the device using brackets directly on the heat exchanger
Well, as they say, it is better to see once. Therefore, we offer you to watch a video with an example of creating a similar design:
The chimney air heat exchanger is an extremely useful design that makes it possible to seriously increase the efficiency of using heating appliances. The increased system efficiency allows you to reduce fuel consumption and, accordingly, save on heating. The heat exchanger can be done on its own, however, this is quite complicated and painstaking work, which can only be done by quite experienced home craftsmen.