Infrared film underfloor heating: overview of the heating system + installation instructions
Every home should be warm. This can be done in different ways: using centralized, stove and other types of heating. Increasingly, homeowners are choosing infrared film as their heating system. warm floor, practical and very effective option.
The principle of operation and advantages of such a system
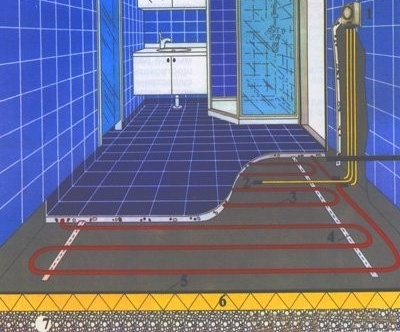
The heating system itself is far from new. Until recently, two varieties of construction were widely used: water and electric floors. In the first case, hot water circulating in pipes laid under the flooring was used as a heat carrier. In the second room, an electric cable was also heated, also laid under the floor.
Each of them is not easy enough to install and has significant drawbacks, which can not be said about the new infrared heating floor system. Its main difference is in the application for heating infrared radiation, which allows heating objects in the room, from which heat spreads into the air.

Infrared heating floor is the best solution for heat in the house, but no system of underfloor heating can replace complete heating!
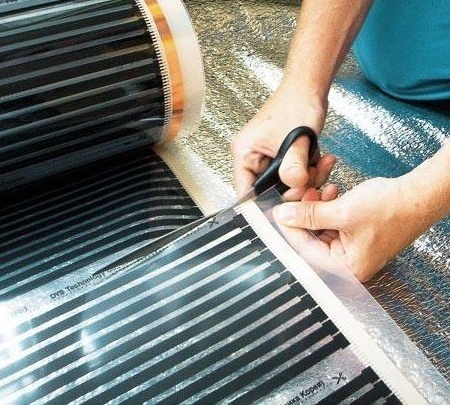
The basis for the radiation is a special carbon paste sealed inside the polyester film. Therefore, the system is also called infrared carbon floor heating. The principle of operation of the design is quite simple: a voltage is applied to the emitters through copper conductors, which activates them. Silver spraying does not allow the joints of current-carrying contacts to burn. Connect the system to the electrical network through a thermostat. Infrared heating floors have many advantages:
- Low power consumption due to the very high thermal conductivity of carbon fiber. The cost of electricity is significantly lower than when heating the room in other ways.
- The ability to install almost any known topcoat, even under a stretch ceiling. They can be mounted on vertical, inclined at any angle and horizontal surfaces.
- Easy to install. Mandatory laying in tile adhesive or screed is not required. If necessary, the installation of an infrared film underfloor heating can be carried out independently without problems.
- High reliability, which is ensured by parallel connection of elements. If the heating strip area is damaged, the rest continue to function properly.
- The ability to quickly dismantle and re-install, which is especially convenient when moving or any redevelopment of the room.
- Maximum safety for humans.
Learn about the advantages and disadvantages of installing underfloor heating under linoleum:https://aquatech.tomathouse.com/en/otoplenie/teplyj-pol/vodyanoj-infrakrasnyj-teplyj-pol-pod-linoleum.html.
The procedure for installation and installation
Installation work is quite simple. They are carried out in several stages.
Stage # 1 - ground preparation
The infrared heating floor is quite demanding on the state of the surface on which it is laid. It should be absolutely clean and even. The permissible height difference is not more than 3 mm. Professionals recommend using a level to check the horizontal surface. If necessary, the surface is leveled, dried well and thoroughly cleaned of dust. For these purposes, it is better to use a vacuum cleaner. Only after this begins the installation of a warm infrared floor.
The first to install a waterproofing layer, necessary to protect the system from moisture. The next is the thermal insulation. Some "craftsmen" believe that this is unnecessary. However, the insulating layer avoids heat loss from radiation going down, and thereby increase the efficiency of the system and reduce power consumption. Materials for thermal insulation are different. Professionals recommend laying technical cork in the event that tiles are selected for the finish coating. Under the remaining floor coverings, you can mount any special insulation. The material is laid metallized side up, straightened and glued with tape at the joints.

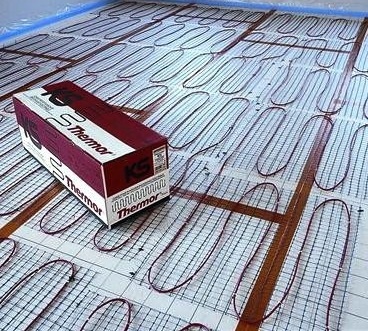
Layout of infrared underfloor heating under linoleum or carpet
Stage # 2 - laying out the layout
Immediately before starting the installation, determine the location of the thermostat, it is considered optimal 15 cm from the floor level. Then make up a film-laying pattern. At the same time, it is necessary to take into account that the system is not mounted under stationary large furniture and household appliances. The first row is laid at a distance of not less than 10 and not more than 40 cm from the walls. Another nuance: if it is planned that the heating floor will be the only heating system, it should occupy at least 70% of the area of the room, if it is additional heating, then 40%.
Stage # 3 - installation and connection of the system
Polyester infrared film is laid out on thermal insulation in accordance with the drawn up scheme. If necessary, it can be cut along the intended lines. The heating floor is laid with the copper sides of the contacts down towards the wall on which the thermostat is located. The clamps are connected to the edge of the copper strip, then the wires are connected. The sections of the film cuts and the junction of the clamps and wires are necessarily insulated with special bitumen mastic. It should be borne in mind that a large length of panels of heating elements implies a smaller number of contacts. However, the maximum strip length must not exceed eight meters. Some contact clamps are placed on a current-carrying surface, and the rest are inside the film.
First, a thermal sensor is connected to the underside of the film, which must be well insulated. After finishing laying the material and connecting all the wires and contacts, the temperature controller is installed. It is best to connect it permanently, although it can be installed as a standard electrical appliance using an outlet. Practice shows that the main part of the wires connecting the film to the thermostat is better to skip under the baseboard. Then the infrared warm floor is connected to the mains.

For safety reasons, the installation of an infrared warm floor should be carried out at a distance of not less than half a centimeter from one to another panel

Infrared underfloor heating strips are connected in parallel

It is possible that you will have a different junction box, but the principle of wiring is usually the same
More details can be seen in the video:
Stage # 4 - post-installation testing
Before proceeding with the installation of flooring, it is necessary to test the system. Normal functioning is characterized by the absence of sparking, overheating at the contact junction areas, the film should warm up evenly.If the test is successful, the heating floor is covered with an additional layer of plastic film and installation of the finish flooring begins.
If you plan to lay the laminates on top of the underfloor heating system, then pay attention to the step-by-step instructions in our next article:https://aquatech.tomathouse.com/en/otoplenie/teplyj-pol/teplyj-pol-pod-laminat.html.
It is safe to say that do-it-yourself infrared floor heating is quite real. Even if there is no styling skill, you can first familiarize yourself with the installation instructions attached to the system, find specialized sites on the Internet and study all the necessary information. Properly installed heating infrared floor will bring warmth and comfort to every home.