Water leakage sensor: how to correctly mount a flood detection system
Many happy owners of comfortable housing often forget about the extremely unpleasant problems that tend to appear where you are not waiting for. We are talking about elementary leaks. Their appearance, most often, is associated with unpleasant trials with neighbors, damage to property and, accordingly, serious unplanned expenses. In addition, there is also the risk of electric shock if moisture enters the power grid. The only way to solve all these problems is a properly installed water leakage sensor. Rather, an entire system assembled from these devices.
Content
How does such a system work?
Modern industry produces two types of such sensors. These are wired devices that connect to the controller using a wire, and wireless devices that send a radio signal. Regardless of the type of device, they are equipped with two electrodes. If the sensor is immersed in water, its poles are closed and the device sends a signal to the controller. That, in turn, redirects it to the valves of the locking equipment and immediately blocks the water supply. The whole procedure takes no more than 15 seconds.
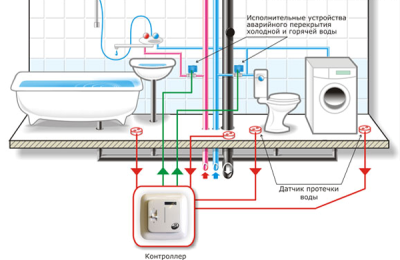
The water leakage sensor is triggered when moisture gets on it. The signal is transmitted to a controller that shuts off the water supply. All operations take less than 15 seconds.
The water will be turned off until the accident is resolved. After that, it is enough to perform a few simple operations and the device is ready to work. A properly connected and normally functioning system fully guarantees reliable protection against sudden leaks in water supply or heating.
To save money, some craftsmen recommend assembling a water leakage sensor with their own hands. Unfortunately, this is almost impossible. The device itself is quite simple, but making it absolutely safe is difficult. A homemade device threatens electric shock to everyone who lives in the house.
What is included in the leakage protection system?
There are many variations of housing leakage protection systems. The most common are Neptune, Aquastorozh and Gidrolock (for more details, see the end of the article). The principles of their work are similar. They are designed to work with ball valves on an electric actuator with a diameter of 1 ”, ½” or ¾ ”. Devices can not only block water, but also give a light or sound signal. They are also easily compatible with smart home systems and can be integrated into them.
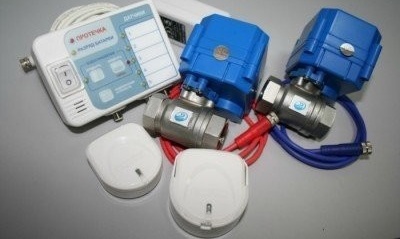
Any water leakage protection system includes a leakage sensor, a control device, a controller, and an electric ball valve
Let's talk in more detail about one of these devices, about Neptune devices. They are available in different variations, however, is present in all:
- Controller. Designed to process the signal from the sensors and supply control voltage to ball valves with electric drive. In addition, the device is responsible for powering all sensors, as well as for sound or light warning of an accident. The controller can be mounted in any place convenient for the user except for those where water can get on it. Available in various designs.
- Water leakage sensor. If moisture gets in, the device sends a signal to the controller. It is connected only to a safe power source, therefore, if accidentally touched, the plates are safe for others. It is installed in places where leaks are most likely: near washing machines, bathtubs, showers, sinks, etc. The manufacturer usually recommends wiping the sensor plates with a damp sponge at least every 3 months. This operation is carried out for prophylaxis and in order to check the operability of the entire system.
- Electric ball valve. The unit is designed to block heating or water supply in case of leakage. The device reliably holds water until the accident is eliminated. The device is installed immediately after the inlet valves in the water drawer. For its installation, it is best to involve a plumber specialist, since the connection is carried out only with a 3x0.5 PVA power cable or its analogue through a junction box.
The number of system elements may vary depending on the particular location of its installation.
Rules for conducting competent installation
Before proceeding with the installation of the system, you should draw up a detailed layout of all its elements, on which you will need to mark the location of each device. In accordance with it, it is checked once again whether the connecting wires included in the kit are sufficient to set the length, if provided for by the design of the devices. The installation itself is carried out in the following sequence:
- We mark the installation sites of sensors, cranes and controller.
- According to the connection diagram, we lay the installation wires.
- We cut in ball valves.
- Install the sensors.
- Mount the controller.
- We connect the system.
Let us dwell in more detail on the most important stages.
Stage # 1 - Insert Ball Valve
As already noted, the installation of an electric ball valve is best entrusted to a specialist. The device is mounted after manual valves at the pipeline inlet. It is strictly forbidden to install structures instead of cranes at the input.
In front of the unit, it is recommended to install water purifying filters on the pipeline. So the devices will last longer. It is also necessary to ensure uninterrupted power for them. In operating mode, the device consumes about 3 watts, at the time of opening / closing the valve - about 12 watts.
Stage # 2 - Sensor Installation
The device can be installed in two ways:
- Floor mounting. This method is recommended by the manufacturer. It involves inserting the device into a tile or floor covering in areas of likely water accumulation with possible leakage. The contact plates of the sensor in this case are displayed on the floor surface so that they are raised to a height of the order of 3-4 mm. This setting eliminates false positives. The wire to the device is fed in a special corrugated pipe.
- Installation on the floor surface. In this case, the device is laid directly on the surface of the floor with the contact plates down.
Installing a water leak detector with your own hands is quite simple, especially if the second method is used.
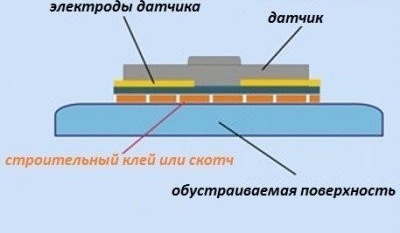
Manufacturers recommend installing a water leakage sensor in the floor. So that the panel with contacts is raised by 3-4 mm. This eliminates the possibility of false alarms.
Stage # 3 - controller installation
Power to the controller must be supplied from the power cabinet. Zero and phase are supplied to the device according to the connection diagram. To install the device, you must perform the following operations:
- We are preparing a hole in the wall for mounting the controller box.
- We will ditch the recesses for the power wires from the installation site to the power cabinet, to each sensor and to the ball valve.
- We install the mounting box on the place prepared in the wall.
- We are preparing the device for installation. We remove its front cover by alternately pressing on the latches on the front of the device with a thin slotted screwdriver. We remove the frame and connect all the wires in accordance with the diagram. We install the prepared controller in the mounting box and fix it with at least two screws.
- We assemble the device. Carefully install the frame. We put on the front cover and press on it until both latches work.
If the system is assembled correctly, after pressing the power button, it starts to work. This is usually indicated by a glowing indicator on the controller. When a leak occurs, the display color changes from green to red, a buzzer sounds and the tap blocks the water supply.
To eliminate the emergency, the manual valves of the pipeline are closed and the power to the controller is turned off. Then the cause of the accident is eliminated. The leakage sensors are wiped dry, the power to the controller is turned on, and the water supply is opened.
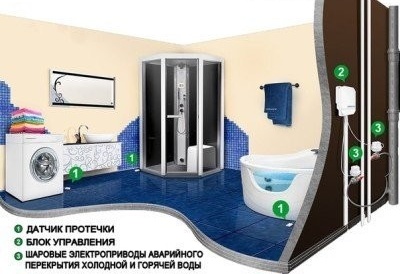
A properly installed leakage protection system reliably protects from all sorts of troubles associated with water leakage
Video reviews of the Neptune and Aquastorozh systems
The leakage protection system eliminates a lot of problems and unnecessary costs. The cost of damages is not comparable with the cost of the device. The installation of devices is best entrusted to specialists who competently and quickly carry out the installation.
As practice shows, self-made structures do not always fulfill their functions, in addition, they are potentially dangerous. You should not save on the safety of your loved ones, it is best to purchase and install a certified reliable device.

5 comments