How to fix the sink to the wall: a step-by-step detailed analysis of installation works
The layout of the water supply system in the house will be incomplete without connecting all plumbing fixtures. The main thing is to consider their optimal placement in the room, to provide free access to the wiring nodes, flexible connections for prevention and repair. Each model has its own design nuances, which means it is installed differently. In many cases, installation works are shown, which necessarily require fixing the sink to the wall, be it a kitchen or a bathroom. This type of layout is the most common, familiar, has its advantages, because allows you to rationally use free meters of area under the sink and keep this area clean.
What does the market offer?
Each type of installation has its own specifics, it requires certain knowledge on mounting and connecting the sink to the general system. The variety of designs on the market is striking:
- sink on the stand;
- bowl on the shelf;
- model "tulip";
- installation on a pedestal;
- wall mount on brackets.
But, still the most popular method of fastening is still mounting the sink on the wall.
It is necessary to select a sink model in which the connections for hot and cold water, the drain for the sewer, are identical to the location of these communications in the room.
What tools will be needed?
You can independently perform such work, having at hand the necessary tool:
- a screwdriver;
- gas key;
- drill;
- drill bit for concrete work with a winning tip;
- spanners;
- building level;
- marker;
- a hammer.
For threaded connections, stock up on the seal with tape “Fum” (or tow), as well as fixing material.

In stores, it is better to buy special sets of fasteners for mounting the sink. Having preferred branded products, you can not worry about the reliability of the installation
Stages of installation work
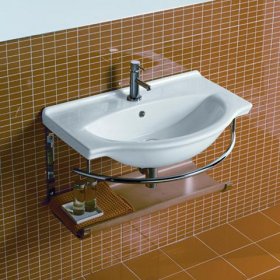
Overlapping water, both cold and hot. Then you need to decide what place in the interior of the room is reserved for the bowl, given the connection of cold and hot water to the mixer. After that, the shell prepared for installation is tried on the spot, and its position is finally selected.
Correctly determine the size of the bowl and the height of its installation. It is necessary to choose a model so that it does not take up extra square meters of the room, but at the same time, has sufficient dimensions that overlap the spray sector of the water stream. This can be a standard width of 50-65 cm models. The most “ergonomic” installation height is 0.8 m from the floor. And the distance in front of the washbasin is preferably left within 0.8-0.9 m.

Photo guide to installing the washbasin on the wall - in principle, everything is clear without further ado
At the selected height, armed with a ruler, pencil and level, the central horizontal is indicated along which installation work will be carried out. This will be the upper limit of the installation of the plumbing fixture.
It is very important to know the thickness of the side walls of the bowl. They must withstand the brackets. The measured thickness is laid down from a horizontal line on both sides of the sink and is fixed with a mark.
The resulting marks are connected by a horizontal line indicating the mounting height of the brackets.
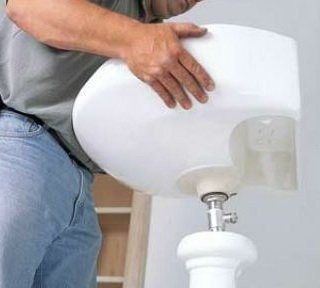
Next, we work with the cup: turn it over and fix the brackets on the sides. It is better to do this work together: one - carries out manipulations with the sink, exposing it horizontally; another - puts the necessary marks.
Having put the bowl horizontally, a marker is marked through the recesses on the back of the place for mounting fixtures. In this case, it is necessary to ensure that all lines, places under the brackets coincide. According to these designations, holes with a diameter slightly smaller than the diameter of the fixing screws or dowels are drilled with a drill.
Plastic or kapron bushings (plugs can be used) are driven into drilled places, screws are screwed into them. Brackets are mounted on them, on which, in turn, a sink bowl is mounted. Places of its further fastening to the wall are marked with a marker, drilled, and the bowl is erected in its place.
The final step is to connect a siphon, the outlet end of the pipe of which is inserted into the sewer socket; mixer installation and water supply connection.
Slightly "having acquired" fasteners, the shell is finally exposed horizontally in level, after which the final reliable fixation of all fasteners is carried out.
Important “little things” to pay attention to
Ideally, all the necessary fasteners are in the repair kit that came with the product. But this must be monitored when buying a plumbing product. If the manufacturer did not provide fasteners or their quality does not satisfy, then it is better to purchase them in advance.
To prevent moisture from entering the gap between the wall and the sink, the latter is sealed with silicone. Having completed the installation work, the tightness of the drainage section of the system must be checked with the help of the volume of water that has filled the siphon. If a leak is detected, the threaded connections are tightened tightly and insulated with an additional sealant.

Installation of the sink is carried out after finishing work. In this case, special attention is paid to the mounting holes
Fixing plumbing equipment to the wall only pays off when the wall surface is solid and reliable. Otherwise, a support frame should be provided.
The water supply to the bowl and the siphon can be closed with a cabinet or cabinet, which is also a place for storing toiletries. An increase in the free space under the sink can be achieved using a flat siphon. The correct installation of the bowl is evidenced by its stable state without reeling and movement.
Qualified installation of the sink guarantees not only its constant functionality, but also extends the life of the sink. Therefore, before starting installation, ask the advice of an experienced plumber.


1 comment