How to glue the toilet: instructions for getting rid of cracks in plumbing
Sanitary ware seems very durable and reliable. However, in fact, it is fragile and can very easily be damaged. The “disrespectful” attitude to equipment leads to the appearance of surfaces of low-aesthetic cracks and chips. The owner, depending on the degree of destruction, decides to replace the device or is looking for a way to glue the toilet. The latter option can be considered solely as a temporary measure, because cracked equipment loses its operational characteristics. However, the possibility of repair and its complexity depend on the nature of the defect, so each case is considered individually.
Content
Why do damage appear and how to avoid them?
As practice shows, the “honorable” first place among the causes of cracks and chips is the fall of various objects into the toilet. Most often, these are quite weighty spray cans with household chemicals, tools, etc. The tightness of urban apartments makes every square centimeter use with maximum efficiency. Many install lockers under the necessary little things directly above the equipment. The slightest carelessness in this case will lead to damage to the toilet. It’s better to take this fact into account and try to arrange the cabinets so that objects that accidentally fall out of them do not fall into the equipment. If this is not possible, always close the lid.

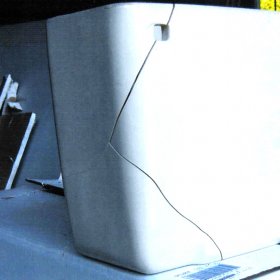
The toilet seems very durable, but it is a deceptive impression. Sanitary ware is fragile and with the slightest carelessness of the owner acquires chips and cracks
Sudden changes in temperature are detrimental to faience. They provoke internal stresses of the material and its uneven expansion. Both of these factors lead to cracking. To avoid this, you should remember a simple rule: hot water is not poured into the toilet. This also applies to the battery flushing process. The temperature of the coolant in the radiators in the cold can reach 80-90C. Sending such water directly to a plumbing fixture is a very bad idea. In an extreme case, if there are no other options for draining the water from the batteries, you need to take a hard hose and push it through the drain of the device to the sewer pipe.
The third cause of damage is improper assembly. Unevenly tightened bolts, as well as excessive efforts during their installation, can lead to cracks. Moreover, the latter can appear only after some time, sometimes quite long. When installing the equipment, distortions and excessive forces should be avoided. During installation, pair bolts must be tightened alternately over a couple of revolutions, trying to avoid possible distortions.It must also be remembered that the lever arm of the adjustable wrench increases the applied force by several times. What is dangerous for fragile sanitary ware. Especially carefully you need to "pull" the turnkey brass bolts.

Bolts that are “tightened” during the installation phase of equipment can eventually cause chips and cracks.
The rules for gluing plumbing
The process of bonding the toilet is quite simple. The main thing is to carefully and thoroughly perform all operations. The procedure is carried out in stages.
Stage # 1 - preparing the surface of the device
Start with stripping. Very carefully and accurately we clean a chip or a damaged surface of the device with a sandpaper. Then wipe thoroughly, thereby freeing from adhering small particles. For better adhesion of the adhesive to the material, the base must be degreased. This can be done with gasoline or acetone. We evaporate all moisture from a fat-free surface, warming it with a hairdryer. Such a preparatory procedure is carried out for cracks and chips of simple shapes.
If the damage has a complex fault relief, a slightly different algorithm is used. Sanding such defects can only do much harm. In the process of working, it is easy to excessively hamper the bulges, as a result of which voids form when glued. Their presence adversely affects the strength of the finished seam. Faults of this form are handled very carefully and superficially. Small debris is blown by a hairdryer, after which the surface is thoroughly degreased and dried.

Faults of complex shape should be handled very carefully. Otherwise, voids will form after gluing, which reduce the reliability of the seam.
Stage # 2 - Seam Bonding
The instructions attached to the glue will help determine the sequence of actions. It should be read and guided by its provisions in the gluing process.
Most often, the procedure is as follows. The adhesive is applied to the surface, where it is left for a while to dry slightly. Then the elements are pressed against each other with force. It should be noted that the result will depend on the force with which the parts were pressed. The larger it is, the more durable the seam will be. For reliable fixation of the elements, you can use an elastic tight braid or a clamp.
Stage # 3 - Finishing
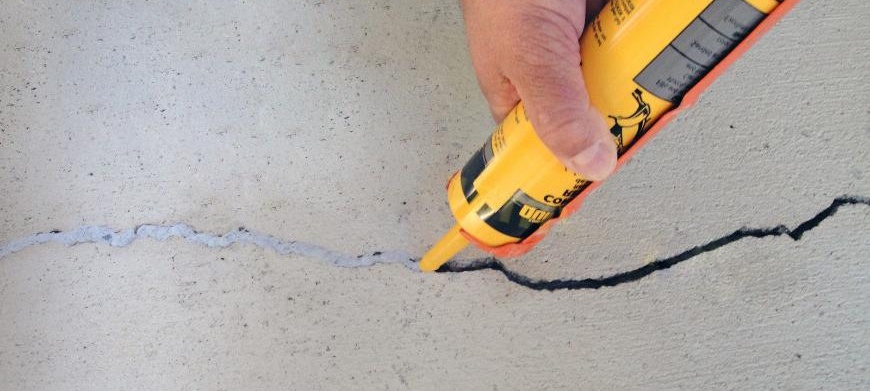
If the seam is located inside the toilet, it requires reinforcement. Once we have dried the seam, we clean it with a sandpaper, thoroughly degrease it and dry it with a hairdryer, then we coat it with glue. We lay on top a strip of soft metal or thin plastic, which will act as an amplifier. Once again, dry the bonding area well.
Outside, the repaired damage is treated with grout, which is specially designed for tile joints. An epoxy based solution may also be used. Such compositions are available in various colors, you need to choose the most suitable tone.
Choosing a suitable adhesive
Many are familiar with the universal adhesive brand BF-2. It can be used in almost any repair work in plumbing. The composition perfectly glues plastic and sanitary ware. Its main feature is the acceleration of the bonding process when heating the joined surfaces. That is why, whenever possible, repaired parts, such as tank caps, are heated in the oven or over the electric stove. Other compositions also proved to be quite good: Rapid, Mars, Unikum, MTs-1, EPO, EPD and others.

On sale you can find many compositions designed for the restoration of plumbing. If desired, the product can be made independently
If for some reason the use of finished adhesives is not possible, they can be replaced with home-made formulations. The basis of such solutions is usually casein. There are several recipes for mixtures:
- Composition number 1. This glue hardens very quickly, so you need to cook it immediately before use. After finishing work on preparing surfaces for gluing. To prepare the composition, 10 parts of chalk, part of quicklime and 2.5 parts of so-called liquid glass are mixed.
- Composition number 2. The adhesive solution is ideal for repairing earthenware or large porcelain items. The composition allows you to make a fairly strong seam, but to make it as invisible as possible is very difficult. To prepare the mixture, six parts of crushed glass and two parts of well-sifted sand are taken into six parts of silicate glue or liquid glass.
- Composition number 3. The adhesive prepared according to this recipe hardens in 2-3 hours, during which it must be put in place. A portion of borax and ten parts of casein are kneaded in two parts of water. After the mixture is well mixed, two more parts of water are added. If a waterproof joint is needed, a few drops of formalin or a solution of aluminum alum are added to the prepared composition.
- Composition No. 4. This glue can be prepared for future use. It must be warmed up before use. The warm mass is applied to prepared surfaces, which immediately strongly compress. Speaking excess composition is immediately deleted. To prepare the glue, take two parts of light shellac, part of turpentine. Substances melt over low heat and mix well. After which the solution is cooled. The hardened composition can be cut into tiles and put away for storage.
- Composition No. 5. Gypsum-based mixture. Glues porcelain elements well. To prepare the adhesive composition you need alum ordinary. A saturated solution is prepared from them, in which burnt gypsum is soaked. It is soaked in alum for a day. Then it is extracted and dried. Dried gypsum is calcined and crushed. The finished powder is diluted with water to a consistency similar to sour cream. The glue is ready.
- Composition No. 6. This solution is used for restoration of marble appliances. It’s very difficult to break them, but dropping a heavy hard object from above can easily damage the surface. In this case, small chips are formed, which are eliminated using this composition. To prepare it in glue water, rub the alabaster. The resulting gruel repair damage. Without additives, the solution has a white color and is suitable only for the repair of white marble. To give the glue the desired shade, add ocher, mashed slate and other fillers. After the putty has completely solidified, it must be polished.
- Composition number 7. Another gypsum based adhesive for marble. The item glued with this composition should stand in a cool place for 5-7 days until it dries completely. To prepare the glue we take one part of gum arabic powder and mix it thoroughly with four parts of crushed gypsum. The resulting mixture is diluted to the consistency of sour cream with a strong solution of borax. The latter is prepared only on the basis of cold water.
- Composition number 8. To perform an inconspicuous repair seam on marble, a mixture will help, the basis of which is the same marble, ground into powder. Grind marble and mix it with the rest of the ingredients. For two parts of the powder, we take a part of natural rubber and two parts of wax. The resulting mixture is heated in a water bath, after which it is ready for use.
Choose the composition for your needs - and soon to the battle!

To avoid cracks when installing the toilet, the paired bolts are twisted alternately, avoiding excessive efforts when tightening

Chips and cracks on the marble surface are formed quite easily. The composition for their restoration can be prepared independently
No one is safe from chips and cracks in the toilet. However, their appearance can be completely prevented by eliminating the most common causes of equipment damage.If damage does appear on the surface of the device, you should consider replacing it. If the nature of the defect is such that it threatens the integrity of the device, there should be no doubt. You need to part with the toilet. If the damage is not large, you can do the restoration. But at the same time remember that repair is only a temporary measure. After all, the device will partially lose not only its attractive appearance, but also its strength.
1 comment