Food waste shredder for sink - a brief overview of the equipment and self-assembly
Cooking in the kitchen is not complete without the appearance of waste that must be disposed of. The trash bin, which for some time has been a mandatory attribute of all kitchens, has been replaced by modern equipment that can grind food waste and send it to the sewer along with household waste. An electric sink chopper helps you instantly get rid of leftover foods that aren’t edible. The recycling device copes with vegetables, fruits, chicken and small fish bones, cereals, watermelon peels, bread and pasta, etc. Using a disposer (grinder) in the kitchen increases the hygiene of the room, eliminating it from unpleasant odors. And the waste, crushed by the dispozer to 3 mm particles, does not clog the sewer pipes.
What is included in the package?
Before installing the equipment, you must prepare the necessary materials and tools.
Usually in a package with a food chopper is:
- special hex key;
- mounting flange of the exhaust outlet with one or two screws, depending on the model of the utilizer;
- threaded outlet;
- rubber gaskets installed under the exhaust outlet and under the neck of the grinder;
- a pneumatic button with a pneumatic hose, if the model has a built-in pneumatic switch.
In addition to the parts that are included with the disposer, additional materials will be required for the installation of the drain pipes, a switch or a pneumatic button (for models without a pneumatic switch).
Important! The package should also contain a technical passport and instructions on the basis of which the device is installed. In addition, the manufacturer of the equipment applies to the accompanying documentation a list of its representative offices, as well as the addresses of the warranty workshops. However, this information may not be useful if you correctly install the chopper under the sink and follow the recommendations for its operation.

Schematic illustration of a connected food waste shredder
What should be considered before installation?
- Disposer is installed under the sink and is connected to the sewage system. Connecting the appliance to the mains is carried out through a grounded 220 V socket, which has moisture protection.
- Do not use a corrugated pipe to connect the equipment to the sewer, because food residues may linger on its walls. This contributes to the appearance of an unpleasant odor. Therefore, when choosing pipes, pay attention to smooth-walled specimens.
- Without any problems, a garbage shredder is installed in the sink, the drain hole of which has a diameter of 89-90 mm. This requirement complies with European standards, which all manufacturers adhere to.If the drain hole in the stainless steel sink does not meet this requirement, then it is increased using a special tool.
Important! Operation of the disposer is absolutely safe. The appliance automatically turns off if a cutlery (fork, spoon or knife) accidentally enters its hole. The resumption of work occurs after the removal of a foreign object from the utilizer, while this operation is very easy.
Installation steps in a detailed approximation
Remember that the detailed instructions must be attached by the manufacturer to each model of the grinder. Follow the step-by-step guidelines in this document. If you do not have basic plumbing and electrical skills, then do not take up the installation of this equipment. It is better to hedge and entrust this work to professionals.
If you are confident in your strengths and abilities, then perform the operations one by one in the following order:
- during preparation for installation, disconnect the sewer pipe from the sink, and then clean all the details of the drain system;
Next, place the rubber gasket provided in the kit under the sink flange;

The main stages of the installation of the waste grinder on the example of the American model (more detailed video instruction at the end of the article)
- attach the dispenser mounting bracket to the sink using the parts supplied by the manufacturer to the device;
then connect the waste shredder for the sink to the mounting bracket;

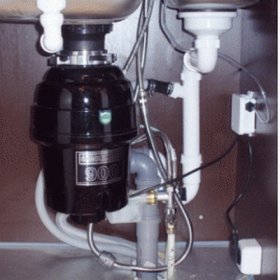
Connection of the food waste grinder to the sewage system
- to connect to the sewer, connect the drain pipe to the utilizer, while this may require additional plastic adapters included in the universal plumbing kit;
- connect the other end of the drain pipe to the existing sewer;
- to connect to electricity if there is no pneumatic switch in the grinder model, install additional wiring and a separate switch.
Important! There are models of waste heaters that do not provide for a separate switch. The design of such devices is designed for a batch type of food waste loading. This means that the chopper turns on after turning the cap of its neck. The cover is inserted into the drain hole of the sink, acting as a switch.
Installing your own food waste chopper for the sink, following the instructions, is quite realistic. However, the help of a qualified plumber and electrician may still be needed.
3 comments