Replacing the water risers in an apartment - what will be faced?
High-quality replacement of risers is an inevitable problem that every owner of an apartment or house faces. This operation is considered part of the overhaul, however, the need for such work may arise suddenly. The fact is that the state of pipelines in old houses built back in Soviet times is hardly brilliant. For many years of operation, pipes undergo slow corrosion, and this leads to leaks. In addition, sediment builds up inside the pipe over time, which blocks the lumen. Water quality is deteriorating, its amount is becoming insufficient. Adequate, albeit expensive solution to the problem is a complete replacement of the riser.
Do it yourself or with the help of the brigade?
This is the first question that the landlord will have to answer.
Professional team invitation:
- will save time and effort;
- with a high probability guarantees a high-quality result;
- It will be very expensive.
Attempts to solve the problem with your own hands:
- give significant savings in money;
- require time and labor;
- not necessarily lead to the expected result.
When deciding on an independent replacement of risers, it is necessary to take into account equipment costs in addition to the cost of materials. For example, to work with polypropylene pipes you will need a special device. However, even with this in mind, replacing the risers with their own hands can be beneficial, especially if a sufficiently large amount of work is to be performed.

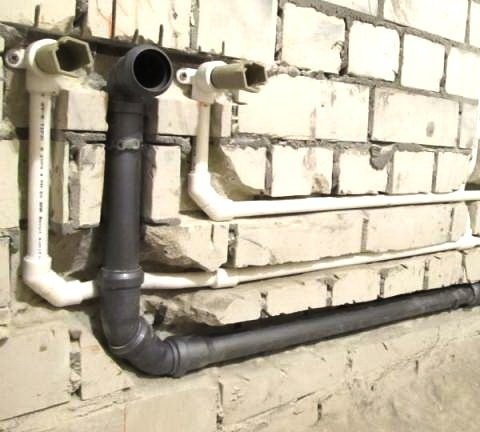
It is necessary to begin the replacement of the water riser by drawing up a wiring diagram
How to choose suitable pipes?
On the market are pipes:
- copper;
- steel;
- metal-plastic;
- polypropylene.
The first two options will most likely have to be abandoned. Copper, despite its strength and durability, is completely unsuitable for water supply, since the quality of the water in such pipes may become unfit for drinking. Steel structures are significantly inferior to more modern polymer pipes in terms of performance, price, and ease of installation. In fact, it’s almost impossible to install steel pipes with your own hands.
Most often you have to choose between metal-plastic and polypropylene pipes. Both options are great for self-installation.

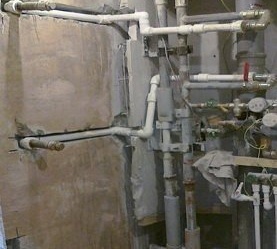
Before dismantling old pipes, turn off the water supply
Metal-plastic constructions are reliable, and special fittings are used to connect them, which eliminates the need for additional tools. Facilitates installation and fairly high flexibility of the pipes themselves. However, the total cost of such a structure can be quite high, and the connection points need to be checked from time to time, since this is the weakest point of structures of this type.
Please note: it is best if the riser is made of pipes of the same type, this will reduce the risk of leaks or damage.
Polypropylene pipes will cost much less, but to connect them you will have to master certain skills: learn how to use a special soldering apparatus to connect the pipes. This method allows you to get a very strong and reliable connection. If marriage is allowed during the installation process, you can correct the situation only by discarding the damaged piece and adding a new one. Polypropylene pipes are ordinary and foil. The latter are intended for installation of a pipeline through which hot water is supplied.
What to do with neighbors if they are not set up for repairs?
Before starting work, it is imperative to discuss the replacement of the water riser with the neighbors above and below. It is optimal that the replacement of water supply risers in the apartment is carried out along the entire height of the building. This will ensure maximum reliability of the structure throughout its duration.
In practice, it often turns out that the neighbors are not disposed to arrange unplanned repairs. In this case, you just have to attach part of your riser to the existing one. Immediately before starting work, it will be necessary to turn off the water supply for a while, this will not hurt to notify its neighbors. To give others as little inconvenience as possible and maintain normal relations with them, you should plan to carry out work in the middle of a weekday.
In cases where the replacement of the risers is carried out by the management company, often problems of this kind arise: some residents refuse to let the repair service employees into their homes. There are two options to resolve the situation: go to court to get an order or attach pipes to an existing section of the riser. In the first case, the work will have to be postponed for several months, and in the second, the reliability of the structure will suffer somewhat. However, it is necessary to replace the part of the pipe that is in the thickness of the ceiling.
Procedure for replacing the riser
To replace the riser in the apartment, it is necessary to do a number of operations:
- Draw up a layout of the new water supply.
- Turn off the water supply.
- Remove the old pipes.
- Assemble and install a new riser.
- Connect a new water supply to the general system of the house.
- Install accessories: taps, filters, etc.
The water supply must be disconnected by the public utilities officer. After that, all plumbing should be turned off. Then, the old pipes of the riser are cut and removed from the ceiling.
Now, using a special pipe cutter, you need to cut the pipes of the required length, in accordance with the previously compiled layout of the water supply. When cutting pipes, consider the depth of the fitting. 1.5 cm are added to the distance between them, for each side, i.e., the length of the pipe segment should be increased by 3 cm.

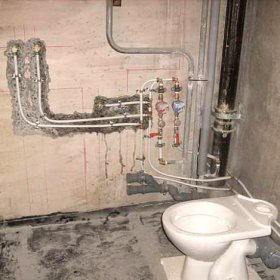
To connect polypropylene pipes, you need a special soldering iron
For the installation of polypropylene pipes, a special soldering iron is used. The technique of using this device is usually explained in detail in the instructions. First you need to select and screw a suitable nozzle to the device.
Then it is heated to 250 degrees. After that, the end of the pipe and fitting are briefly heated using the nozzle. Heating usually lasts from 5 to 10 seconds. After that, the pipe is connected to the fitting. It remains to wait for the design to cool.
After the taps are installed, you can reconnect the riser to the water supply and check for leaks at the joints. Pipes are attached to the wall with clips, and a special corner is used to install the mixer.