The head for the well: installation procedure and instructions for making it yourself
A small but extremely necessary node in creating the water supply of a private house is the tip for the well. This small device can be purchased ready-made or made independently. We suggest you to understand the design features and the installation procedure for the head in more detail.
The device and installation procedure
To put it simply, the ogolovnik for the well is a special cover that closes the outer edge of the casing very tightly and tightly. The tip is necessary in order to prevent getting into the well:
- garbage;
- soil contamination;
- flood waters;
- drains;
- foreign objects;
- small animals, etc.
Please note: the use of special "secret" bolts can protect the well not only from contamination, but also from theft of equipment.
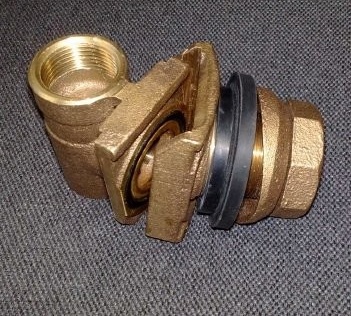
Before you purchase a head or do it yourself, you should study the device head of the well to understand the principles of its installation. This item consists of:
- a flange made of metal or durable plastic;
- special cover;
- rubber rings;
- fasteners;
- carbine, etc.
For ease of use, two eyebolts and one internal bolt are usually welded on the outside of the lid.

This diagram shows all the structural details that make up the classic type head
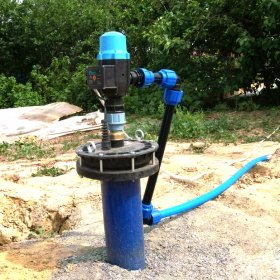
The head is mounted on the well only with fasteners, which must be tightened very tightly. This means that no welding work is needed. In this case, the rubber ring is clamped between the flange surface and the cover. To fix the pump, it is necessary to lift the cover by the external eyebolts. To do this, use any lifting mechanism that is available. The cable is fixed with a carabiner.

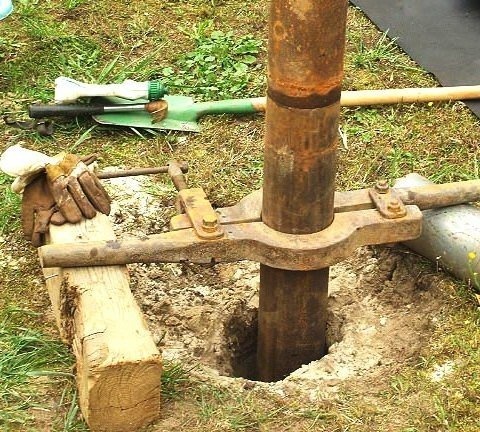
The main steps are shown here, but a more detailed briefing is slightly lower than this photo.
To install the well head, you must:
- Cut the casing perpendicularly.
- Eliminate all burrs and roughness from the cut surface.
- Strip the outer surface of the casing.
- Prime the cleaned surface and apply a layer of anticorrosion paint.
- Connect a plastic pressure pipe to the pump.
- Build up the cable and attach a cable of sufficient length to the pump.
- Pull off these elements with a special clamp.
- Pass the end of the cable through the lower eye bolt and attach it to the carabiner.
- Pass the pressure pipe and cable through the cover.
- Slide the flange and ring onto the casing.
- Lower the pump.
- Install cover.
- Raise rubber ring and flange to cover level.
- Tighten cover and flange with fasteners.
Buy or do it yourself?
It’s not difficult to get an industrial head for a well. In certain situations, such a solution is even preferable.These are typical designs, the installation of which can be done independently or with the help of specialists. The most common models are made from:
- plastic;
- become;
- cast iron.
At home, the head can be made of stainless steel or aluminum.
A skilled craftsman may well make a device that will work no worse than industrial models.
Please note: In any case, the head must be airtight, this meets the requirements of SNiP. If this condition is not met, a wide variety of contaminants can easily penetrate into the well. Therefore, experts do not recommend in any way to simplify the design of the head.
The procedure for the independent manufacture of the headband
From a sheet of sufficiently thick metal and a set of fasteners, you can make a head for the well with your own hands. Need sheet metal at least 10 mm thick. Make the head like this:
- A flange is first cut out of the metal. The diameter of the inner hole should be slightly larger than the outer diameter of the casing.
- Then cut out the cover (plug), the diameter of which corresponds to the size of the flange.
- Introductory fittings, which are necessary for the installation of cables and pressure water supply, are welded to the plug.
- An eyebolt is welded to the underside of the cover to which the cable for the pump will be attached.
- Outside, two more eyebolts should be welded to the cover. These fasteners will allow you to lift the cover if you need to remove or lower the pump, carry out maintenance work, etc.
- It remains to choose or cut out a suitable ring from the rubber, which will become the gasket between the flange and the cover. You will also need bolts with which the structure will be tightly tightened.
Fundamentally, such a head is not too different from an industrial device. The installation procedure is described above.
Caisson - a convenient addition in case of cold weather
If the well is arranged in a concrete well, also called a pit, at a depth of about two meters, it makes sense to install such a useful unit as a caisson.
It is a container made of polymeric materials that protects the well from freezing in the winter and ensures uninterrupted operation of the submersible pump.
The caisson will become an additional barrier to groundwater and other pollution from which the well should be protected. The polymers from which the device is made perfectly resist cold and are absolutely not subject to corrosion. The plastic water supply pipe is placed so that it reaches a mark of about two meters. Inside the caisson, equipment such as a filter, pressure sensors, automatic control systems, etc. is installed. If desired, a hydroaccumulating membrane tank (hydrojet) can even be installed in the caisson. Polymeric constructions do not need additional insulation.