How I made a do-it-yourself tray table to save money
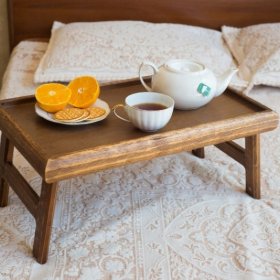
For a long time I could not choose my wife an original holiday gift. A friend suggested the idea of a home-made tray table. So with minimal expense, I took place as a master and managed to please my spouse.
If you are a “you” with simple tools, then making a table-tray with your own hands will not be difficult for you. A good motivation is the fact that in stores such trays cost decent money.
Homemade help save a family budget and, above all, to please a loved one. In any case, you will receive moral satisfaction from the result of the work.
In order to make such a table, I used materials that can be inexpensively purchased at any hardware store:
- a piece of plywood 60 * 40 cm;
- 4 boards for sides 10 cm wide;
- 4 rails for sides - 2 by 55 cm, and 2 by 31.5 cm;
- self-tapping screws;
- 4 80 cm slats for legs;
- 2 slats for rungs 28 cm long;
- round slats;
- screwdriver;
- screws;
- sandpaper;
- varnish or paint.
The basis of the tray for me was plywood 60 * 40 cm in size. The countertop itself should be at least 18 mm thick. Here is the sequential instruction:
- Sand all workpieces with sandpaper.
- Prepare the sides for the table.
- Fix them with screws along the perimeter.
- Make a frame from the boards. To do this, connect 4 boards for the sides.
- Screw the frame to the board. You can do this with glue, but with screws - more reliable.
- Drill holes in the middle of each foot rail.
- We cross 2 bars with the letter X so that the holes match.
- Connect the legs with a screw with a wing nut for strength.
- Do the same with the other two rails.
- Using round rails, connect 2 pairs of legs together.
- Place the legs on the tray.
- Now you can varnish the table or paint.
In fact, there are many options for how to assemble such a tray table. I told you about personal experience.