Do-it-yourself site drainage: technology for deep and surface options
Excess humidity brings a lot of trouble to the owners of summer cottages and suburban areas. The first signs of the phenomenon are stagnant puddles that can “delight” their existence for several days, or even weeks. If you can come to terms with them, then other manifestations of high humidity: the soaking of plants and trees on the site, the destruction of the foundation of buildings, are not so harmless. If land ownership is in a lowland or the groundwater level is high, do not despair, you need to do the drainage of the site with your own hands.
To remove excess moisture, a drainage system is used, which can be carried out in two ways. Distinguish between superficial and deep drainage. The first is used to divert water that accumulates after seasonal floods or heavy rainfall from the territory.
The second is designed to reduce soil moisture through the removal of groundwater. In general, the type of drainage is selected depending on the condition of the site and the requirements of its owner. Despite the significant difference between the types of drainage, each of them can be performed independently.
Design and construction of surface drainage
Surface drainage systems can be of two types: linear and point. The second are intended for water drainage from small isolated areas on the territory. Special inlets of spot drainage are placed in places of accumulation of water. These can be sections under the drains, in the lower part of terraces, in the recesses of the relief, in the entrance sections, etc. Such a system is considered the simplest and does not require a special scheme.

Spot drainage intakes are located at water accumulation sites.
More complex in design and installation is linear drainage. It is used to remove moisture from buildings, protect paths, entrances from water, prevent the washing away of the fertile soil layer on the site, etc. The design is a specially designed system of shallow trenches, laid at a certain angle, which runs along the perimeter of the site and in places of maximum water accumulation.
Before starting work, a project is developed for the drainage of the site, which involves the presence of a main trench to collect moisture flowing into the ditches. It should end in a water intake, in the role of which a storm sewer or a ravine can act. In the design process, it is necessary to consider all places of moisture stagnation and lay trenches from them to the main drainage system.
It is also necessary to correctly calculate the slope of the structures, otherwise the water will not flow down them. The minimum slope of drains in sandy soils should be at least 0.003, in clay soils - 0.002. The water intake is necessarily located below the level of linear drainage. Practice shows that the best result is obtained with a slope in the range from 0.005 to 0.01.To equip the surface drainage of the site with your own hands, you can use two methods:
- Open. It suggests the presence of open trenches dug according to the drainage scheme. The walls of structures are usually formed at an angle of 30 °, which allows water to flow into a ditch without any problems. The width of the structure is 0.5 m and the depth is 0.7 m. The main advantage of the system is its simplicity. A serious drawback is the unaesthetic appearance, which spoils the impression of the site. In addition, the unfinished walls of the trench quickly crumble and the structure becomes unusable.

Rubble dumping prevents the destruction of the trench, but at the same time reduces its throughput
Important: To solve the problem of crumbling walls of the drainage trench, rubble can be used. To do this, the lower part of the groove is covered with coarse gravel, and the upper one is of a finer fraction. On top of the structure can be covered with turf. Such a drainage device on the site allows you to prevent slipping of soil and save the trench, but it seriously reduces its throughput.
- Closed. It consists in the use of special drainage trays, which are laid directly in the trenches, and on top are closed with grates. The structures protect the grooves from slipping down the soil, the grilles prevent debris from entering the drainage structure. Trays can be concrete, polymer concrete or plastic, which are considered the most popular today due to their light weight and exceptional durability.

The grill covering the tray may be made of metal or plastic
Deep drainage system: the intricacies of design and installation
Deep drainage is designed to reduce soil moisture. For the system to work efficiently, it must be positioned below the level of subsurface water. In its definition, the help of a specialist will be required, since it is impossible to do it yourself. It is necessary for the surveyors to order a detailed plan of the site on which the level of the aquifer should be noted, which will accurately design the structure.
It happens that the drainage system on the site is needed only to ensure the life of plants suffering from excess moisture. In this case, you can use the simplified calculation option. To determine the depth of the drain, average values are used. Pipes can be located at a mark of 0.6 to 1.5 m. You need to know that for fruit trees it will be 1.5, for forest trees - 0.9, for lawns, flower beds and flower beds - about 0.9 m. areas with peat soils need to be equipped with deeper trenches, since such soils settle very quickly. Depth of laying of drains will vary from 1 to 1.6 m.
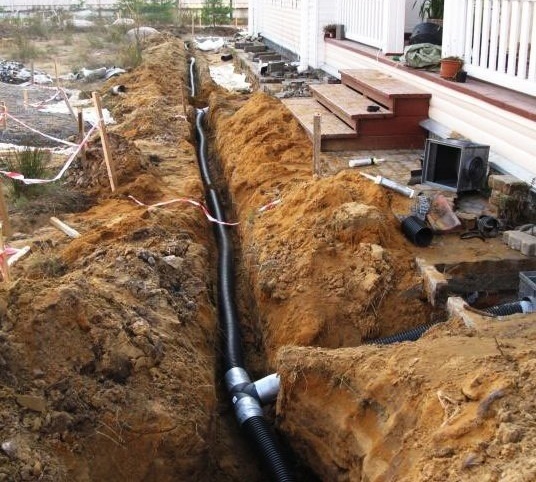
To equip the drainage system, special pipes with perforation are used. Initially, asbestos-cement or ceramic structures were used, which today have given way to plastic ones. Drains are pipes with a diameter of 50 to 200 mm, equipped with a network of holes with a diameter of 1.5 to 5 mm. Some models can be equipped with a special filter shell, which prevents debris from entering the holes. Plastic pipes are durable, lightweight and easy to lay.
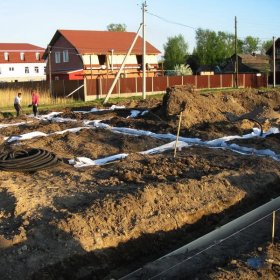
In order to equip the deep drainage of a summer cottage with your own hands, you should first draw up a project that will reflect the depth of the drainage pipes and show where they will pass. As with the surface drainage system, it is assumed that there is a main trench that collects moisture from all secondary pipes and ends in a water inlet: a gutter, a pond, or a special storage well.

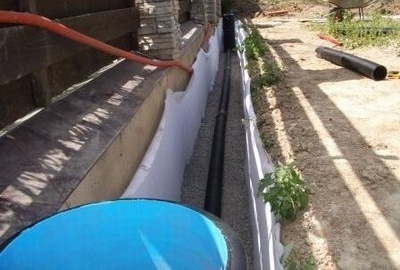
Perforated pipes for deep drainage are laid on a pillow of sand and gravel
During the installation of the drainage system, several stages are distinguished:
- Trench equipment. In the places marked in the project, we dig channels with a width of about 40 cm. The depth of the structure can be different, it depends on the level of groundwater. A sand cushion is laid at the bottom, and on it is a layer of rubble, on top of which a drainage pipe is laid. In some cases, it can be wrapped with geotextile to protect the holes from possible clogging.
- Installation of manholes. To control the drainage process and the necessary cleaning of the system, special wells are installed. They can be made of reinforced concrete rings, but if the depth at which the drainage is laid does not exceed 3 m, corrugated pipes of different diameters are used. Facilities must be equipped with covers to prevent various debris from entering them. On a straight line, wells are placed every 35-50 m and after one turn with a winding trench.

The wells are located in the places where the trench turns and every 35-50 m in a straight line
- Backfill facilities. Drain is covered with layers of rubble and sand. In some manuals explaining how to make drainage on the site, it is proposed to separate the sand from the rubble with geotextiles to prevent their mixing. A laid pipe with a rubble-sand cushion should not occupy more than half the height of the trench. The remaining place is laid compacted loam and the upper layer of fertile soil. Ideally, the area under which the drainage pipes are located should not stand out.
When thinking about how to make drainage on a site, you need to know that this work can be done independently. The main thing is to determine the type of system that is necessary for draining the soil, to execute a competent project and to correctly install the structure. Then it will be possible to forget forever about the troubles that brought excess moisture on the site.
2 comments