Instructions for installing roof gutters: how to carry out installation work with your own hands
The happy owners of their own houses and those who are still building personal households are equally interested in well-designed and properly installed gutter systems. These structures protect the foundation and walls of the building from moisture by organizing a controlled flow of melt and rainwater from the roof of the house. It is optimal for professionals to arrange the drainage system, but if you wish, you can easily do the design and installation of roof gutters with your own hands. How to do it? Let's get it right.
Content
What material to choose for a drain
The elements from which the gutter system is assembled can be made of various materials. Consider their brief characteristics.
Metal parts
Can be made of tin, galvanized steel and other metals. The main advantage can be considered a relatively low cost. The disadvantages are much greater. Upon contact with moisture, the elements begin to rust. Moreover, the protective zinc layer does not always prevent this, since it oxidizes itself under the influence of acid rain.
Tin parts are quite fragile and can burst when water freezes. Another minus is the noise produced by water entering the metal gutters. The service life of such a drain is about 10 years, which is quite a bit.
Gutter systems made of plastic are very lightweight, durable, resistant to corrosion, immune to chemical influences and last about half a century.
Plastic items
Made of PVC. Such parts are not susceptible to corrosion, practically insensitive to the effects of chemical compounds, stably tolerate all kinds of weather influences and are resistant to UV radiation. They are easy to install, light in weight and quite resistant to various mechanical damage.
With proper installation and quality regular care, plastic drains will last about 50 years. Plastic also has a drawback. This is a significant expansion when exposed to high temperatures. Therefore, plastic parts should not be used in regions with a wide amplitude of average annual temperatures.
Metal-plastic products
Such drains successfully combine all the advantages of PVC and metal products.They are metal elements coated with plastic. For the base, galvanized steel is most often taken, and as a coating - plastisol or pural.
The metal-plastic gutter is durable, it does not corrode, does not deform under the influence of temperature changes, and can withstand significant loads. The service life of such products is about 50 years. The only thing that the owner of a metal-plastic drain can be afraid of is mechanical damage to the system.
Copper Parts
Despite the fact that copper belongs to metals, drains collected from this material differ significantly from their metal counterparts. The special properties of copper allow such structures not to react to climatic or chemical influences, to withstand loads, to be resistant to ultraviolet radiation.
In addition, copper parts are not subject to corrosion. All this makes copper an almost ideal material for a drain. However, such parts are quite expensive, so they are not often used. Most often they are mounted on copper or tiled roofs.
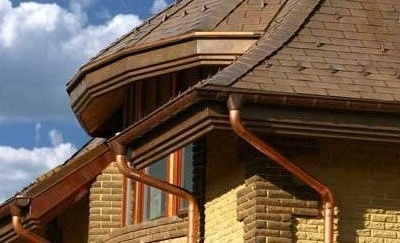
Copper drains are very beautiful, durable and durable, but their high cost makes such systems less common.
Elements of the drainage system
A gutter of any design consists of several basic elements:
- Gutter. The detail into which water is collected. It is fixed under the eaves of the roof around its perimeter. The shape of the gutter can be different: rectangular, trapezoidal or round. The first option has maximum traffic.
- Trumpet. Designed to drain water from the gutters. The diameter of the product is determined by the estimated number of drains.
- Water intake funnel. Mounted on the gutter. Designed to receive water and drain it into the drainpipe. Its diameter is determined by the diameter of the drain.
- Connecting elements. All kinds of couplings, angles and adapters.
For fixing structural elements, clamps and brackets are used. The former fix the drainpipes, the latter are designed to install gutters. In addition, gutter systems are equipped with a variety of accessories:
- Drippers. Accelerate the removal of moisture through the gutters and prevent its accumulation on the eaves of the roof.
- Storm receivers. Remove water draining from downspouts.
- Grids for water intake. Protect funnels from debris.
All elements are selected depending on the complexity of the system.
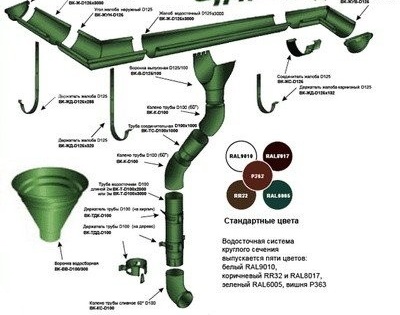
On sale you can find drainage systems made of various materials. The diagram shows the elements of a plastic drain
Technology of installation of a metal drain
If you decide to install a gutter system made of metal, the technology of its installation will look as follows:
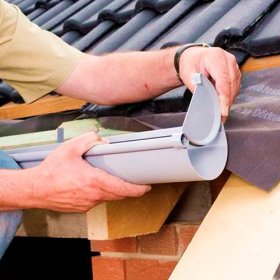
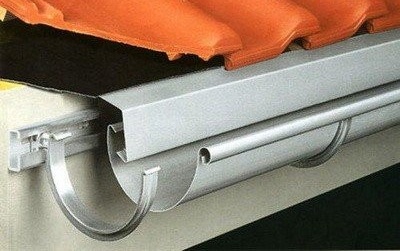
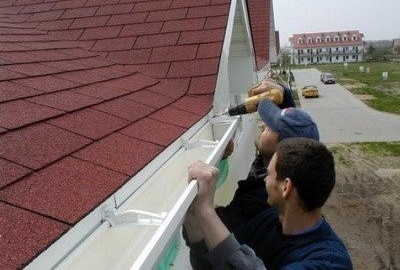
We install brackets under the gutters
The fastening of the metal gutter to the roof can be carried out in various ways. The correct solution is to fix the brackets until the roofing is completed. In this case, they are installed on a cornice board or on the rafters. For mounting, brackets with a long base are used. They provide maximum strength and reliability of fastening. If the roof is already equipped, so as not to carry out its partial dismantling, use short brackets. They are installed on the windshield.
The spacing of the brackets for metal gutters should be 600-900 mm. It is impossible to exceed these indicators, otherwise the drainage system may break under snow load. Thus, it will be very easy to calculate the required number of brackets. To do this, it is enough to divide the distance between the parts by the mounting step. In this case, we must take into account additional brackets, which are necessarily installed at the gutter connection areas with the corners of the tray, at its ends, as well as on both sides of the gutter joint.
To ensure effective flow, the installation of the gutters is carried out with a slope towards the funnel.It should be at least 0.5-0.7 cm per meter. Therefore, the brackets must be installed with a vertical offset. Calculating its value is very simple. To do this, multiply the distance between the last and first brackets by 0.005-0.007. Having received the desired value, taking it into account, we place the brackets on the base. Then we pull the cord between them, mark the position of the remaining parts along it. We fix the brackets.
The brackets for the gutters must be fixed at a certain distance from each other, otherwise the elements will not withstand the snow load and will break. For metal trays it is 60-90 cm, for plastic - 40 cm
We mount funnel gutters
To install the funnel, you will need to make a V-hole. To do this, we outline the place where the part will be installed and cut a hole of the desired shape with scissors for metal or a hacksaw. Its width will be 100-110 mm for a gutter system of size 125x90 and 120-130 mm for a structure of size 150x100. For the system to work efficiently, the hole must be as large as possible.
Be sure to maintain the following dimensions: the minimum distance from the cutout to the top edge of the water hole is 15 mm. The recommended distance between the water intake funnel and the end of the gutter is 150 mm. After the hole is ready, put the funnel on the tray and fasten with the rolled side in a special lock located on its outer side. After that, we bend the funnel locks into the gutter.
Install stubs
On the ends of the tray, not connecting with other elements, plugs are necessarily put on. We put the part on the end of the tray and fix it securely. If necessary, rivets can be used. Be sure to coat the joint with sealant. It is important to make sure that the composition is intended for external use or at least universal.
Put the gutters in place
Now you can put in place the gutters. We insert the inner edge of the tray into the latch, after which we fix its outer edge with the cap plate part. To prevent moisture from entering the building’s facade during heavy rain, lower the outer edge of the gutter by about 6 mm below the inside. The edge of the roofing should hang over the tray by 50 mm.
The extension of the slope of the roof should be removed from the edge of the gutter by a distance of about 40 mm, however, since the tray is inclined, in practice it can be at the very beginning of a slope of 20 mm and about 70 mm at its end. After the gutters are installed in the brackets, the cornice bar is mounted. The lower edge of it goes into the tray, which prevents possible wetting of the windshield.
The installation of the gutters is carried out in such a way that water flows exactly into the tray and does not splash onto the wall
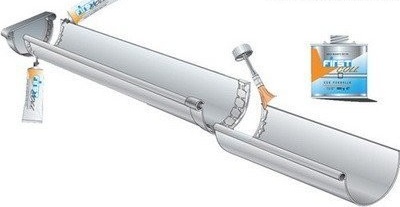
Install corners and gutter connectors
The gutters are connected to each other or to the corner of another tray using a special connector. It is equipped with a special rubber gasket, which ensures tightness of the joint and compensates for the thermal expansion of the parts. When making a joint between the elements, we leave a distance of 3 or 4 mm.
The connection must be treated with sealant. To correctly install the connector, carefully bend the lock. Then we put the part with the rolled side directly on the back of the tray, align the connector, and then snap the lock located on the outside of the gutter. Return the latch to its original position, thereby locking the lock.
We expose and fix the drainpipes
We mark on the wall the mounting points of the clamps. They should be located at a distance of not more than 1 m from one another. The minimum number of fasteners per pipe is 2 pcs. Clamps must be installed at the joints of parts and at the joints of pipes and elbows. If the walls are soft, for example, wooden, fasteners are fixed with screws.In harder concrete or brick surfaces we drill holes for hardware.
We connect all the elements of the drainpipe. Determined with the height of the product. The drain knee should be at a height of no more than 200 mm from the blind area, otherwise the water will spray. We attach the structure to the funnel and snap the locks of the brackets. An important nuance: downpipes are mounted by crimping down, otherwise unwanted leaks cannot be avoided.
Features of the installation of plastic construction
If the parts are made of plastic, the installation of a gutter for the roof with your own hands will be a little different.
Preparatory work
We determine the position of the drain. It should be in such a place that all the water draining from the roof gets into it. Funnel gutters should be located above the hatches to collect water. We determine their position using a plumb line. At the same time, we take into account that water can flow into one funnel from the tray, the length of which does not exceed 12 m. We proceed to marking the fastenings for the brackets.
You need to know that to ensure maximum efficiency of the gutter system, the gutters are fixed at a slope directed to the drainpipe. The slope is 5 mm per meter. We calculate the magnitude of the displacement of the gutters, after which we outline the places of attachment of the extreme brackets. We install fasteners. We fix on them a cord that will show the line of attachment of the remaining brackets. We mark on it the installation locations of the fasteners, taking into account that the distance between them should not exceed 40 cm.
Plastic parts can be joined with glue. Such a connection will be strong, but one-piece
We mount the gutters
First, we lay out on the ground all the elements of the drain. We cut the profile parts into parts of the desired length and connect them. This can be done with glue or special connecting parts. Choosing the first method, you need to understand that the connection will be inelastic and inseparable.
In case of repair or dismantling, you just have to cut it out and do something else. Connectors for gutters make it possible to easily disassemble the structure if necessary. We connect the connected trays to the brackets, using special latches. It is important that the fasteners do not appear in the area where the funnel or joint is located. We install funnels, put plugs on the ends of the trays that do not connect with other elements.
We establish drains
We place a drainpipe under the funnels. We connect the funnel and the drain with a special element resembling the letter S. Experts do not recommend using glue to connect these elements, otherwise it will not be possible to disassemble for cleaning. Using a square and a plumb, we control the position of the pipe relative to the wall. It should be strictly vertical.
We connect all the details of the drain and outline the location of the clamps. The topmost fastener should be located directly below the first connection, which will prevent possible slipping of the pipe. The distance between the clamps should not exceed 1 m. We install the fasteners on the wall using special fixing tabs or dowels. At the same time, we remember that the distance from the drain to the wall should be approximately 2 cm. We bring the socket of the drain pipe to the storm drain hatch, but do not fix it in order to be able to control the discharge.
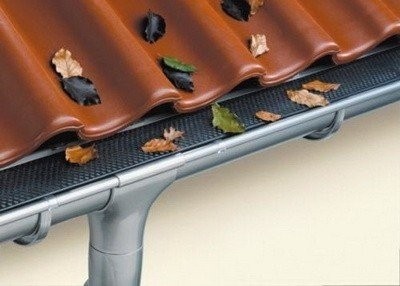
To protect the drainage system from large debris, a special mesh should be installed
Common installation errors
Performing an independent installation of the system, you need to know exactly what mistakes are made by inexperienced masters and, of course, try not to repeat them:
- Incorrect selection of the number of funnels and the diameter of the pipes. As a result, the system will not be able to cope with the flow of water.
- Horizontal installation of trays, due to which moisture accumulates in the corners of the structure and in the gutters.In the cold, it turns into an ice cork, which prevents effective drainage. As a result, the system will require repair in a year or two, and plastic parts may burst in such conditions.
- Mounting the gutter at a slope from or to the wall. As a result, during heavy rain, the cart will overflow over the edge of the tray.
- The roof ends far from the center of the gutter or overhangs too much. In both cases, part of the water will flow past the tray.
- The gutter is too close to the wall of the building, which causes the wall to get wet during rain.
Now everyone who wanted to know how to properly install the gutters on their roof will be able to cope with this task. Responsible attitude and compliance with all instructions guarantees a good result. No matter what material the gutter will be from, the main thing is to correctly install it and then the design will last a long time and will only delight its owner with impeccable service.