DIY walkthrough on installing and connecting a pump station
Of all the communications that are arranged in private households, the very first is a water supply system. Moreover, for a long time it has been something more than a commonplace pipeline ending with a water tap. Modern technologies make it possible to create an efficient water conduit that provides all the needs of the residents of the house, regardless of what is chosen as a source of water supply. That is why the topic of how a pump station is made with its own hands, which is an indispensable element of a well-designed functional water supply system, is relevant.
Content
Which station do you need?
Depending on operational tasks
Today, the consumer is offered two types of pumping stations - domestic and industrial. We will leave the second type to professionals, we are more interested in installing a pumping station for domestic use.
The tasks that a domestic pumping station should solve are: providing drinking water, watering the garden, hot water supply in the house, satisfying household needs (bathroom, toilet, washing machine, dishwasher), providing water to the heating system.

It is necessary to clearly understand what tasks the pump station should solve, the further choice will depend on this
Depending on the source of water
The connection of the pumping station depends on what source of water supply it is planned to arrange or is already available on an individual courtyard. In principle, choosing this equipment by this criterion is not difficult, since the water in the house can be supplied from three sources: a well, a well or a centralized water conduit.
Depending on the optimum operating mode
The station can operate in manual or automatic mode. If necessary, you can choose a mobile model. In addition, you need to understand how much pumped water per hour is needed in a particular case. That is why, before going to a specialized store, it is worth making simple calculations.
So, it is believed that one person per day consumes 250 liters of water to satisfy all his needs in a private house. Installation of the pumping station in the country can be performed taking into account lower performance.
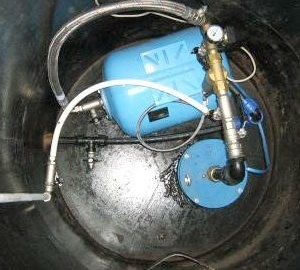
Where to install the station - in the caisson or basement?
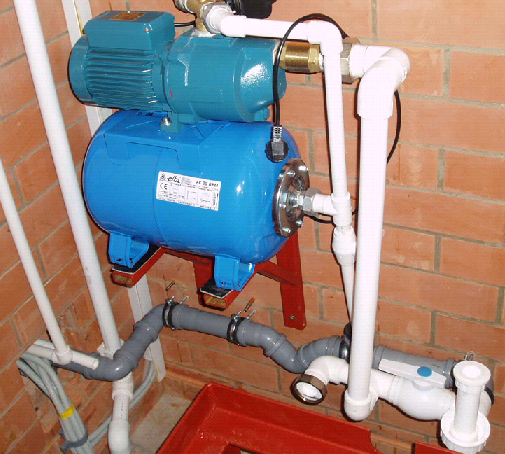
Installation of the station can be performed in one of two places - in the caisson or in a special room in the house.In this case, the most practical option is still considered to be the installation of equipment in a room, for example, in a basement. In this case, the installation must be arranged in such a way as to protect the station from damage during a possible rise in groundwater. That is, the pumping station should be installed on a stand or shelf, while making sure that there are no touches to the walls, which will avoid their vibration during operation of the equipment. The basement must be heated.
If the decision is made in favor of the caisson, then it must be insulated, and the station itself must be installed below the level of freezing of the soil. That is, the depth of the caisson will be at least 2 m.

The basement should be heated, and the station in it, as a rule, is arranged on a stand

Two-pipe option for connecting equipment to a well or well
If the depth of the well (well) does not exceed 10 m, then the single-tube model of the station will be relevant. With a depth of 10 to 20 m, preference should be given to a two-pipe station with an ejector. Naturally, before proceeding with the installation, a pump station installation scheme should be developed, which will be implemented in practice.
Connection work procedure
Option # 1 - connecting to a well or well
The algorithm is usually the same:
- An ejector is assembled - a cast-iron cast unit with three exits for connections.
- A strainer is installed in the lower sector of the ejector.
- The bend of the desired length (diameter 32 mm) is put on a plastic bell in the upper part of the ejector.
- Gathering the desired diameter. As a rule, it consists of two parts, endowed with transitional compounds.
- At the outlet of the drive, a coupling (bronze) is mounted, by means of which a transition to a polyethylene pipe is performed.
- To ensure the tightness of threaded joints, it is possible using flax or sealing paste.
- Digging trenches to a depth below the freezing threshold.
- A water pipeline is laid in trenches - the length of the pipes should be with a margin.
- The casing must be equipped with a specially purchased tip. However, in practice, it is not easy to find such parts on sale, therefore, as an option, a knee with a smooth angle can be used.
- Couplings are used to connect the pipe to the ejector.
- Before lowering the second end of the pipe, it is pushed into the elbow at an angle of 90 °. To seal the space it is filled with foam. Then the pipe is connected to the corner adapters (90 °), which in turn are connected to the outer part of the pipeline.
- The ejector assembly is lowered into the well to the desired depth, which is noted in advance, while the mark is performed at the level at which the casing comes out.
- The head of the pipe is mounted on the casing using plumbing reinforced tape.
Possible installation errors:
- When laying pipes to the house, a certain margin of length is not taken into account, that is, bends and turns, and possibly the thickness of the foundation through which the pipeline will pass, are not taken into account.
- Threaded connections are not tightened with a wrench. Simply sealing and tightening by hand are insufficient. During operation, water leaks are possible.
- Not given due attention to the accumulator. If the pressure drops below 1.2-1.5 atmospheres, then it must be increased using a compressor or a car pump.
Read more about setting the hydraulic tank and adjusting the pressure switch here.

Examples of making connections of pipeline elements during installation
Option # 2 - water connection
The need to connect a pumping station to a centralized water supply usually arises when it does not have enough pressure for the correct operation of the heating equipment. This, in turn, can be triggered by several reasons:
- altered hydrogeological conditions;
- outdated equipment;
- increase in water consumption due to population growth, etc.
It is important to note here that before connecting the pumping station it is necessary to take care of the acquisition and installation of the storage tank.
So, the algorithm works:
- In a predetermined place, the water pipe is disconnected.
- The end, from the city highway joins the storage tank.
- Water is sent from the tank to the pump inlet, the end of the pipe leading to the house is connected to the outlet.
- Installation of electrical wiring is in progress.
- Adjustment / regulation of equipment.
Setting up the pumping station is primarily aimed at setting the optimal pressure in the system. To adjust the equipment, first about 2 liters of water are poured into the cochlea through a special hole. Now you need to trace at what stage the pump turned off, and then when it turned on. Switch-off pressure - 2.5-3.0 bar, switch-on pressure - 1.5-1.8 bar.
If it is noted that the station shuts off earlier than necessary, it is worth reducing the pressure created. In general, setting up the equipment is quite simple. It is necessary to open the relay cover and screw the screw with the designation "DR" in the direction of "+" or "-". And to regulate specifically the switching pressure, a screw with the designation "P" is used.

The filter will ensure the longevity of the pump
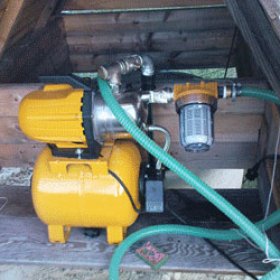
One more detail that you should definitely consider before connecting the pump station correctly is the chemical and physical characteristics of the water. Regardless of the source of the water supply, it contains harmful impurities that must be disposed of before the water enters the pump station. The easiest and most effective way to solve this problem is to install filter on the suction device of the station.
What will happen if you do not install the filter? Mechanical impurities in the form of sand, clay, etc. will gradually accumulate in the accumulator, which will ultimately lead to failure of the pump, which is an integral part of the pumping station. This problem is especially relevant when using a vibration pump.
On the other hand, one cannot help focusing on the negative aspects of installing the filter. So, additional resistance to the current of water is created, the pressure and pressure created are reduced. To avoid such problems, the filter must be constantly cleaned. And a situation may arise when a dirty filter does not let water through it at all, which can cause a pump to fail.
Video tutorial with useful tips
By installing a pump station yourself, you can save significant funds that will be used to purchase truly high-quality equipment. And this, along with proper installation and configuration, will allow for many years to forget that there may be any problems with the water supply system. We emphasize that stnation can not only be bought ready-made, but also assembled independently.