Installation and adjustment of the water pressure switch for the pump: technology of work and basic errors
Complete with the pumping station, the owner of the house or cottage receives a water pressure switch for the pump. It allows you to fill the hydraulic tank automatically, saving owners from unnecessary trouble, but requires the most careful attitude. The fact is that this key must, firstly, be connected correctly, and secondly, to make adjustments for the needs of a particular house and its plumbing system. Neglecting these important points can lead to breakdown of the entire pumping station, as well as to a reduction in its life. Before connecting and setting up the equipment, you need to understand the principles of operation of the device and the accumulator.
Content
Purpose, device and principle of operation
A relay is a basic element for regulating the flow of water in a pumping system. Thanks to him, the entire system of pumping equipment is turned on and off.
It is this node in the water supply system that is responsible for the pressure of water. Thanks to the relay, a balance occurs between its large feed and weak.
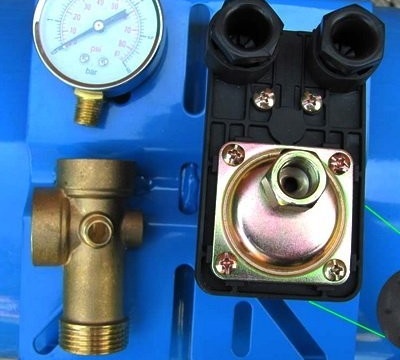
The relay is based on the principle of opening the contact group when the water pressure changes. It is directly connected to the pump via output contacts. The diagram below shows the main components of the water pressure switch device.
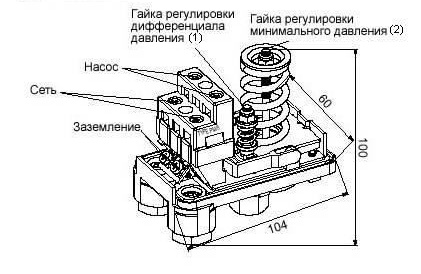
Water pressure switch circuit
Two network contacts are used to electrically start the device. With the help of the pumping contact group, the relay is switched on and off. On the top of the device are two nuts. They are designed to adjust the pressure supply. Each nut is responsible for the force of the water pressure in the system. When regulating the relay, it should always be remembered that the shutdown of the device must be activated at an average water supply pressure in the pump. The differential adjustment nut controls the flow of water between high and low pressure.
Using the relay, the on and off device that supplies water to the hydraulic tank is automatically adjusted. In this case, specialists use a number of concepts, such as:
- Turn-on pressure or lower pressure (Pvcl), at which the relay contacts for the submersible or borehole pump are closed, the device turns on and water begins to flow into the tank. The manufacturer’s default settings are 1.5 bar.
- Off pressure or lower pressure (up pressure), at which the device contacts open and the pump turns off. The manufacturer’s default settings are 2.5-3 bar.
- Pressure drop (ΔР) - the difference of the previous two indicators.
- The maximum allowable shutdown rate at which the pumping station can be turned off. The manufacturer’s default settings are 5 bar.
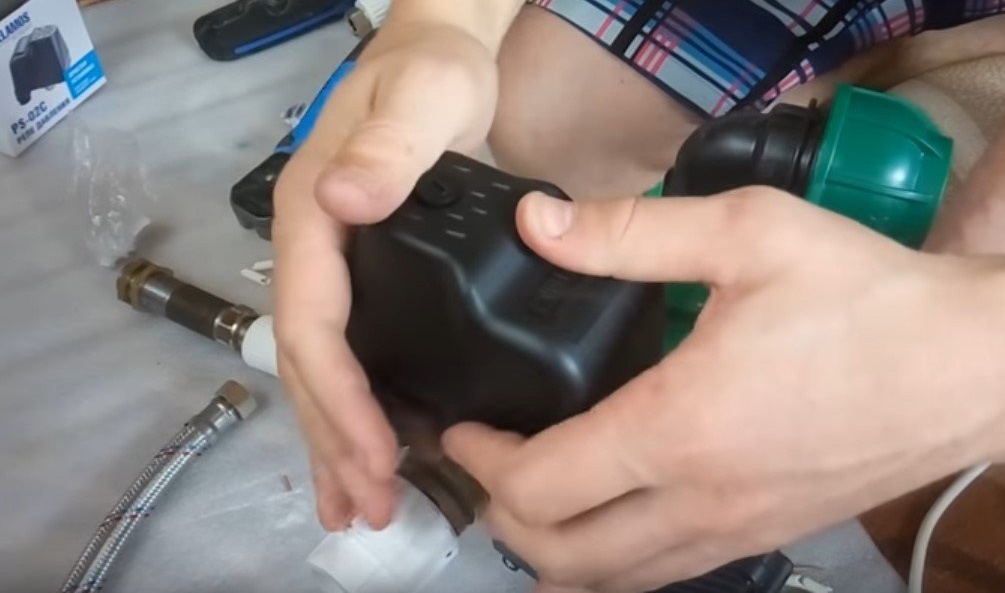
The hydraulic accumulator is a tank in which an additional rubber tank called a “pear” is built-in. A certain amount of air is pumped into this “pear” through the most common automobile nipple. The higher the pressure in the “pear”, the stronger it presses on the water accumulated in the tank, pushing it into the water supply system. This ensures a sufficient water pressure for comfortable use.
Membrane accumulators are arranged somewhat differently, but their principle of operation is approximately the same. The tank is divided into two parts with a special membrane, on one side of which there is water, on the other - air, which presses on the water, etc.
Relay classification
The relay is of two types according to the principle of operation - mechanical and automatic. When buying this mechanism, you need to consider what functions this device should perform.
In addition, although automatic relays are easier to operate, they are less durable than mechanical relays. Therefore, most buyers stop precisely on the mechanical version.
In addition, relays are sold as either integrated inside or separately from the pumping station. Therefore, according to individual characteristics, it is possible to select a relay that will improve the operation of all equipment.
Mechanical type
- SQUARE mechanical pressure switch with dry run protection. The pressure generated by this device is between 1.3 and 5 bar. The required amperage for the relay to operate effectively is 10 A.
- Cristal pressure switch. The current required for the operation of this device is 16 A. The permissible pressure limit in the water supply system is 4.5 bar.
Electronic
Electronic relays are more prone to breakdowns due to the fact that, when water is supplied, various small particles appear in it, which disable the equipment. To prevent this from happening, a special filter is installed at the feed inlet, which purifies the water and does not prevent the breakdown of the device. An electronic device is better than a mechanical one in that it does not allow idle operation of the pumping station.
After pressing the button to turn off the water supply, the electronic relays operate for another 16 seconds. This function is necessary in order for the device to work for a longer time.
Electronic relays are easier to install and configure. To reconfigure its operation, the entire system does not need to be disassembled, you just need to configure the necessary parameters on the electronic board using the appropriate buttons.
- PS-15A dry running pressure switch. This electronic device operates in the pressure range from 1 to 5 bar. The current strength is 12 A. In addition to the listed characteristics, the device has built-in factory settings and full protection against dry running.
- Pressure switch PS-2-15. It has factory settings and protection against dry running. The possible pressure limit in the plumbing system is 5.6 bar, current 10 A.
Installation and connection of the relay: instruction
To install the relay, you must first make a mechanical assembly of the entire system, then you should connect these devices to the mains.
Electrical part
According to this scheme, connect electric wires to the common network to terminals L1 and L2. Connect the pump terminals to the M terminals and connect the ground to the corresponding terminals.
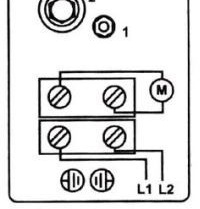
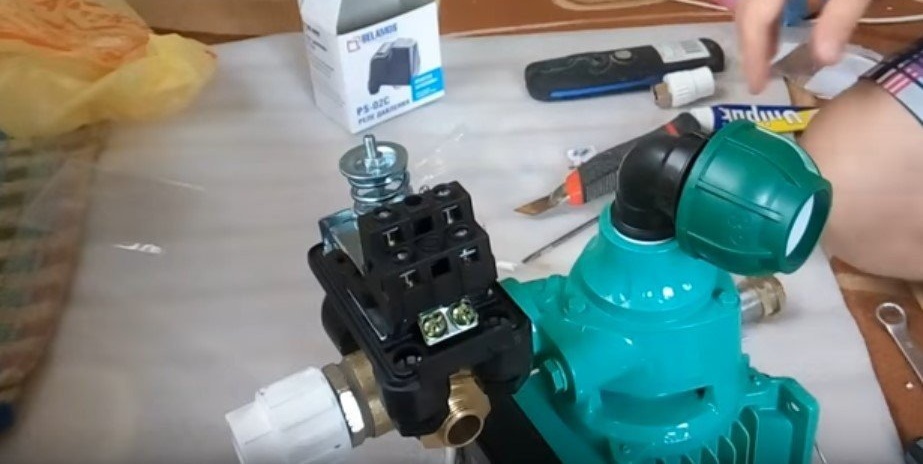
Wires need to be connected to special terminals
Then carry out the work as shown below for connecting the electrical and mechanical parts of this connection.
After connecting the mechanical part, you need to connect an electrician
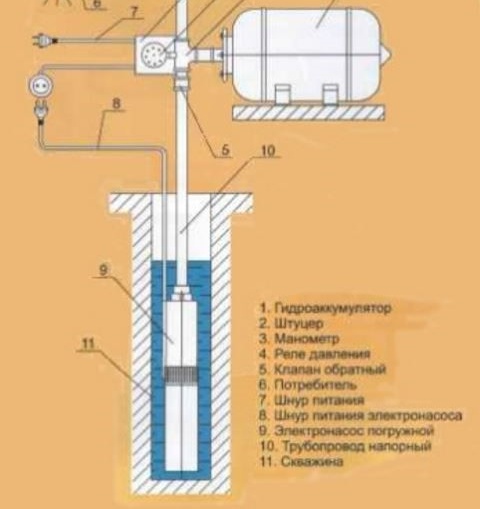
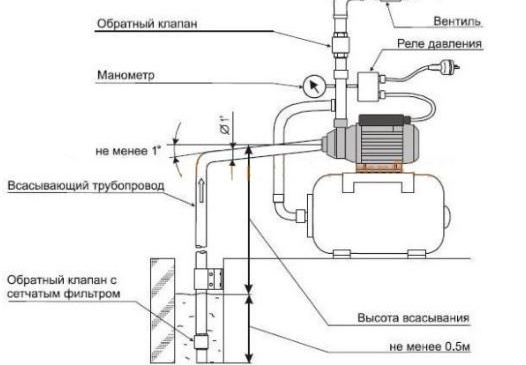
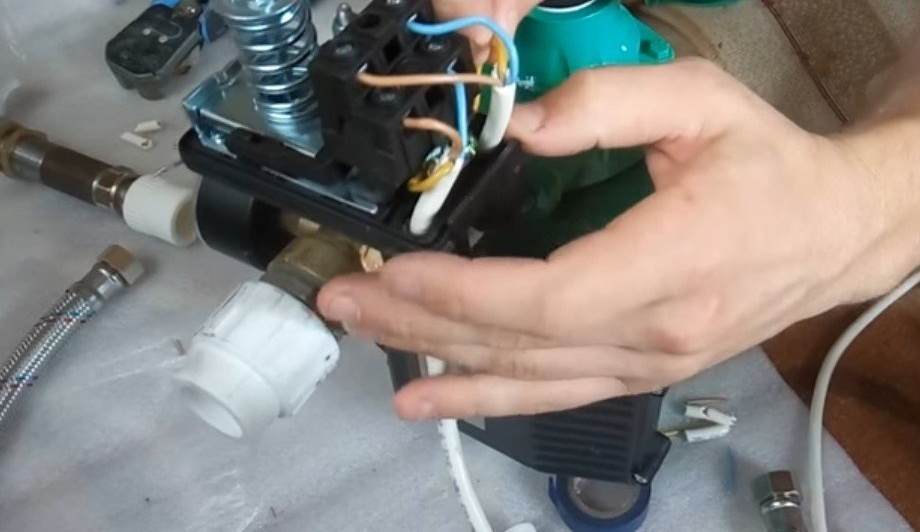
But such a connection system does not save the pumping station from dry running. Therefore, the pump should be installed in the correct position, i.e. an order of magnitude higher than the non-return valve.
A system connected by this principle will work in protected mode
This is a slightly different option for installing a home unit. But if the entire installation is carried out in accordance with this scheme, the pump will work in a protected mode, that is, the operation mode of the pump without water will be excluded.
This principle of operation of the pumping station will save the entire plumbing system from rapid wear and tear and complete failure.
All rules and instructions for connecting pumping equipment must be observed. First of all, you need to determine the required water pressure and select a relay based on this indicator.
- A cable with a solid residential cross-section of at least 2.5 square meters is suitable from the shield. mm or PVA 3x1.5. The parameters depend on the characteristics of the pump and can be selected according to current.

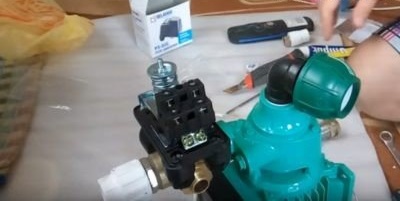
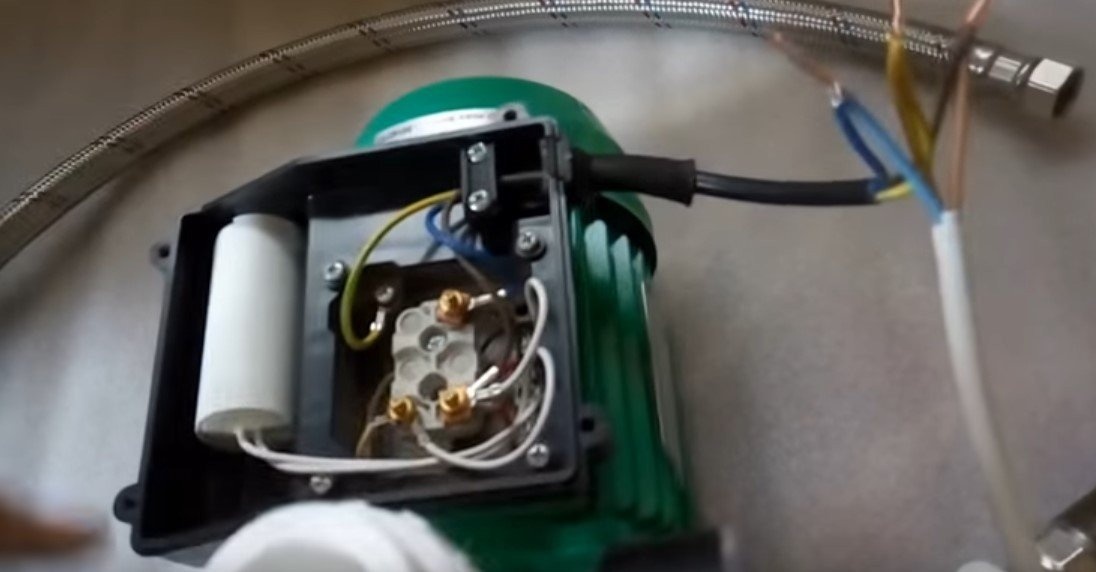
The pressure switch is connected to two systems: electrical and mechanical
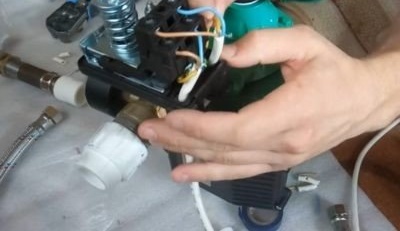
- Lead wires into special entries on the back of the case. A terminal block with contacts is located inside: grounding - conductors from the shield and pump are connected; line terminals - the phase and neutral wires from the shield are connected to them; terminals for the same wires from the pump.
Inside is a terminal block
- Route the wires and fix in the terminals.
Press the wires in the terminals
- Close the relay cover. Installation is complete; adjust if necessary.
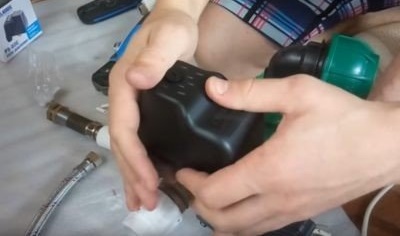
Close the relay cover and secure with bolts
Video: how to install a pressure controller
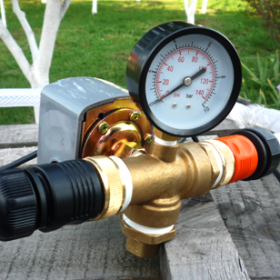
Checking the pressure in the water supply system with a manometer
Immediately after buying a pumping station, it is necessary to check the indicators that are set in the hydraulic tank by the manufacturer. Usually this figure is 1.5 atmospheres. However, during storage and transportation, leakage of part of the air from the tank is a completely normal phenomenon.
For testing, it is recommended that you use a car pressure gauge with a graduated scale as low as possible to ensure accurate measurement. Some models of pumping stations are equipped with plastic pressure gauges, but practice has shown that they are unreliable and do not give accurate pressure indicators in the hydraulic tank. Another option is electronic pressure gauges, the readings of which largely depend on the battery level and ambient temperature. Given the high cost of electronic pressure gauges and the extreme unreliability of Chinese plastic products, experts recommend choosing a conventional mechanical automobile pressure gauge enclosed in a metal case.

A mechanical pressure gauge is best used to set up the pump pressure switch.
To check the pressure in the accumulator, it is necessary to remove the decorative cap, under which the nipple is hidden, connect a pressure gauge to it and take readings. The lower the pressure, the more water can be created in it. To create a sufficiently large pressure of water, a pressure of 1.5 atm is considered an acceptable indicator. But even one atmosphere is enough to provide the household needs of a small house.
At high pressure, the pump turns on more often, which means it wears out faster, but the water pressure in the system is created approximately the same as in the city water system. This allows, for example, the use of a hydromassage shower. At low pressure, the pump wears out less, but the maximum comfort you can afford is an ordinary bathtub filled with hot water, but not the charm of a jacuzzi.
Please note that experts do not recommend over-pumping the tank or reducing the pressure to less than one atmosphere. This can lead to an insufficient supply of water in the accumulator, or to damage the rubber "bulb".
After these nuances are clarified, the air in the tank is either pumped up or bleed it until the required indicator is reached.
How to adjust (with a hydraulic accumulator)
Before setting the relay, it is necessary to remove the cover, under which there are two springs with nuts: large and small. By turning the large nut, the lower pressure in the accumulator (P) is adjusted. Rotating the small nut, set the pressure difference (ΔP). The reference point is the position of the large spring, with which the lower pressure limit is set.

Before you start setting up the pressure switch for the pump, you must remove the top cover from the device, which hides the large and small springs
After the necessary air parameter has been reached in the accumulator, the tank should be connected to the system and turned on, observing the readings of the water manometer. Note that in the technical documentation for each pump, the operating and maximum pressure indicators are indicated, as well as the permissible rate of water consumption. Do not exceed these values when configuring the relay. If the operating pressure of the accumulator or the limit value of the pump is reached during system operation, you must turn off the pump manually. The ultimate pressure is considered to be reached at the moment when the pressure stops growing.
Fortunately, ordinary household pump models are not so powerful as to pump the tank to the limit. Most often, the difference between the set indicators of pressure on and off is 1-2 atmospheres, which fully ensures the optimal use of technology.
After the water gauge shows the required lower pressure, the pump should be turned off. Further adjustment is made in this way:
- Carefully rotate the small nut (ΔP) until the mechanism begins to work.
- Open water to completely free the system from water.
- When the relay is switched on, the lower value will be reached. Please note that the pump start pressure should be approximately 0.1-0.3 atmospheres higher than the pressure readings in an empty hydraulic tank. This will protect the pear from premature damage.
- Now you need to rotate the large nut (P) to set the lower pressure limit.
- After that, the pump is turned on again and they are waiting for the indicator in the system to rise to the desired level.
- It remains to adjust the small nut (ΔР), after which the accumulator can be considered tuned.
Adjustment circuit
Here is a diagram that works for most devices:

The pressure switch for the pump is adjusted using two nuts: large and small. Handle them very carefully so as not to damage the appliance.
Video: how to adjust the relay for the pump
In addition to the initial settings when connecting the relay to the pump, the owner of the house must periodically check the operation of the system and adjust the settings. At least once every three months, experts recommend completely draining the water from the hydraulic tank and checking the air pressure, pumping up the required amount or bleeding the excess.

12 comments