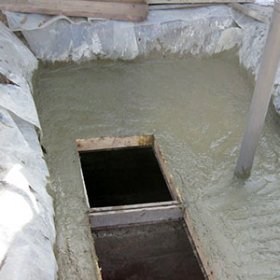
An example of an independent device of a monolithic concrete septic tank
Arrangement of sewage in a country house is not a whim, but a necessity. Is it possible to enjoy a vacation, much less work, without basic amenities. Well, if you constantly live in your own homebuilding, you can not do without a sewer system. There are several ways to resolve this issue. The main element of such systems is a septic tank. You can buy it or arrange it yourself. One of the options may be a monolithic concrete septic tank made by hand.
Content
How to determine the right amount?
The size of the septic tank is determined according to the daily volume of drains increased three times. Moreover, the calculation is taken with an orientation to the maximum possible water consumption. In designs with several cameras, such a calculation is carried out for the first tank and is already determined by its size with other cameras. If desired, the size of the septic tank can be made larger than required. This will increase its service life until cleaning. The shape of the concrete septic tank should be rectangular. This will ensure maximum wastewater treatment.
Note. When calculating the size of a septic tank, the thickness of the walls of the structure should be taken into account.
Different design options and their differences
Monolithic concrete septic tanks for summer cottages consist of chambers, the number of which are divided into:
- Single chamber. Entering the tank, solid fractions of sewage sludge settle to the bottom. There, they decompose with the help of bacteria and form a precipitate. Light substances are discharged into a filtration well or field.
- Bicameral. Once gravity flows into the first chamber, the effluents are separated into heavy fractions that precipitate and lighter, overflowing with the liquid waste into the next chamber. There they undergo additional cleaning and are discharged into the filtration system.
Three-chamber
- . The first chamber of such a septic tank occupies the sixth part of the entire structure. Solid and insoluble waste settles in it. For the second chamber, half of the entire structure is allocated. To accelerate the "work" of bacteria, air is pumped into the compartment using a compressor. The compressor is switched on according to a predetermined program using a timer. The clarified effluents enter the last chamber, where the final aeration takes place. A drainage pump is installed in it, producing a regular discharge of fluid into the drainage system. To make it clearer, the scheme of a concrete septic tank consisting of three chambers is presented below.

Air injected with a compressor accelerates the work of bacteria, which contributes to better purification of wastewater
We determine the location of the future sedimentation tank
When choosing the location of a septic tank, it should be borne in mind that it should be at least 4 meters from the house building. The pipeline of great length is also inappropriate. The longer it is, the more likely the clogging of the pipes. In this case, you will have to install intermediate wells. They are also necessary in places of bending of the pipeline.

When arranging a septic tank, it is necessary to take into account sanitary rules and norms for such structures
Important! When choosing a place to install a septic tank, it is necessary to take into account the direction of the flow of groundwater.
If the terrain is uneven, it is desirable that the septic tank is located below the structure. The filtration field must be constructed, 5 meters away from the foundation, 50 meters from the water supply source and no less than 30 meters from the reservoir.
Walkthrough for construction
Having made the necessary calculations and determined the size and location of the structure, we begin to build a concrete septic tank with our own hands. Consider the example of the construction of a two-chamber structure.
The first stage - earthwork
An independent device for a concrete septic tank begins with earthwork. They are made either manually or using technology. In the second option, the process will be faster, especially on heavy soil, but you will have to provide access to vehicles.
When digging a pit, note that for an unpressurized structure, its bottom should consist of rocks having good throughput. Otherwise, you will need to re-calculate taking into account the greater depth.
The walls of a dug pit should be extremely flat. The strength of the structure depends on this. At this stage, it is necessary to dig trenches from the house to the septic tank and from the septic tank to the drainage system. Lay pipes and fill up. The depth of their installation should be sufficient so that the system does not freeze. Otherwise, you will have to take care of the insulation of the pipeline.

Pipe laying in trenches must be carried out before the walls are poured
Reinforcing reinforcement and formwork
To avoid untreated sewage entering the soil, the walls of the pit are covered with waterproofing material. Its edge should protrude above the walls of the pit.

In order to prevent the penetration of untreated sewage into the soil, waterproofing material is laid along the perimeter of the pit
Next, the fittings are attached. For it, special rods or long metal products of a cylindrical shape having sufficient bending strength are used. For a sealed container, the bottom of the pit is filled up with 20 centimeters of sand, compacted and poured with concrete. Then you need to let it freeze for a couple of days.

The use of reinforcement increases the strength of the walls and the durability of the septic tank
The performance of an unsealed septic tank can be increased by making cylindrical pits in the bottom of the pit. Then cover them with a fine mesh and sprinkle with gravel.
Formwork for a septic tank is constructed from improvised material. Any inch boards or OSB sheets will do.
With insufficient material, you can erect a sliding formwork. That is, install boards for the construction of half a septic tank, and after hardening the concrete, remove and use to fill the remaining part of the structure.

To make the cameras separate, you need to insert a two-sided formwork. At the same stage, a hole is cut out and the pipe is attached
For the septic tank partition, double-sided formwork is installed, into which the overflow pipe is inserted. The longitudinal bars of the solid wood inside the formwork will strengthen its walls and will not allow the structure to fall apart under the action of the concrete mass.
Concreting of walls of a monolithic septic tank
Having established and securing the formwork, they begin to mix the concrete.The ratio of sand to cement in our case is 1: 3. Fine aggregate gravel is used as an aggregate. If kneading is done manually, the solution is prepared in portions and poured. It is necessary to ensure that no voids form in the walls of the septic tank. This reduces the structural strength.

The formwork is removed only after the concrete has completely hardened.
After completing the work, you need to wait a couple of weeks until the solution solidifies completely. Only then can the formwork be removed. Internal waterproofing of a concrete septic tank is not carried out due to the fact that under the influence of moisture, the strength of concrete is enhanced. The main thing is that there are no cracks in the walls of the structure.
Installation of floor and ventilation
On top of the septic tank made of concrete, metal corners are laid, and on top of them is an overlap of flat slate or boards. At this stage, the ventilation pipe is inserted into the concrete septic tank.

Installation of metal corners will give the floor additional strength

When constructing the ceiling, do not forget to insert the ventilation pipe. It should rise at least 2 meters above the septic tank
A hole is left for cleaning the septic tank. The resulting hole is fenced with boards mounted on the edge. The top of the structure is reinforced with improvised material and poured with mortar.

For structural strength, be sure to use reinforcement, pouring the septic tank ceiling with concrete
After concrete hardens, a box of corners is installed on the control hatch. The sides of the box are laid with bricks, and the top is closed with a board.
Overlap of the septic tank is covered with expanded clay and earth, and the hatch is closed with roofing material.

The frame for the control hatch is made of metal corners

A control hatch around the perimeter is laid with a brick, and covered with a board on top

The top of the septic tank is insulated with expanded clay, and the hatch is closed with roofing material
Rules for the operation of such a septic tank
Having built a septic tank out of concrete with your own hands, you need to take care of its proper operation. In order for your sewer system to not cause trouble, you must follow a few rules:
- do not empty solid waste into the sewer, there is a bin for this;
- for storm and drainage waters, a separate drainage system is needed; do not let them down the drain;
- do not pour hot liquids into the septic tank, they are dangerous for bacteria that decompose waste;
- conduct an annual inspection of the condition of the structure;
- timely cleaning of the septic tank will extend its life.
That's all. We hope this material has been useful to you.