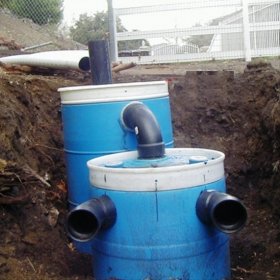
An example of a homemade septic tank made of plastic barrels
It is not advisable to purchase an expensive factory-made septic tank for an autonomous sewer device at a summer cottage, which is used only in the summer. There is a simple way to solve this problem, which does not require large financial costs. You can build a septic tank with your own hands from barrels, combining several plastic containers of various volumes into one system. Previously, such structures were made of metal barrels. However, with the advent of light plastic products on the market, metal structures are being used less and less. The operation of such a sewage system is possible only with a small amount of liquid waste. In practice, a home-made septic tank from barrels is installed to collect wastewater from baths and temporary buildings.
Requirements for the installation site of the septic tank
When choosing a location for the installation of plastic containers for collecting sewage waste, they are guided by sanitary norms and rules in force in Russia. It is necessary to withstand the required distances from the septic tank to the wells and wells used to draw drinking water, as well as to the foundations of nearby buildings. It is recommended to retreat from the house at least 5 meters, and from the garage and the bath you can retreat at least one meter.

Requirements for choosing the location of a home-made septic tank in relation to other life support facilities for people living or resting outside the city
Approximate installation scheme of plastic containers
If in the summer house no more than three people will live in the summer, then for the construction of a septic tank, two or three plastic barrels will be required. The volume of these containers must be at least 250 liters. Barrels connected in series with each other using overflow pipes are installed in one line. Holes for mounting overflow pipes are cut out in the plastic walls of the containers. At the same time, it is taken into account that the pipe exiting the chamber should be 10 cm lower than the incoming centimeters. The depth of each subsequent container should be 10-15 cm greater than the previous chamber (stepwise arrangement).
Two sealed barrels are designed for sedimentation, and the third with a cut bottom is adapted to the drainage well for the natural filtration of clarified water. The first two chambers are mounted on 10-cm sand cushions, well-packed and level. The third chamber (drainage well) is placed on a layer of crushed stone, 30 cm thick, which is poured onto a 50-cm layer of sand. This sand and gravel filter allows the post-treatment of wastewater leaving the soil. In areas with a high groundwater level, instead of a drainage well, filtering fields are installed.

The simplest scheme of a homemade septic tank, which can be built from plastic barrels, concrete rings, galvanized containers, etc.
The list of necessary materials for installation
If a septic tank is constructed from plastic barrels with an aeration field, then the following building materials and equipment will be required:
- fine-grained crushed stone (fraction size 1.8-3.5 cm);
- geotextile fabric;
- a pair of plastic barrels with a volume of 250 l;
- orange sewer pipes with a diameter of 110 mm;
- tees and angles for connecting pipes at different angles;
- perforated pipes for drainage;
- couplings, flanges;
- glue for PVC pipes;
- two-component epoxy sealant;
- plumbing tape.
From the tool you will need a level, a shovel, a rake, a jigsaw. In addition to the listed devices and manual tools, wooden pegs are also useful when marking the site for a septic tank and filtering field.
Features of installation work
First, with the help of a jigsaw in the barrels, holes are cut for installing overflow pipes and a vent riser. A hole designed to connect the inlet pipe to the chamber is made at a distance of 20 cm from the upper edge of the container. The outlet is made on the opposite side of the chamber 10 cm below the inlet, that is, 30 cm from the top of the barrel.

Mounting the overflow pipe into the hole cut in the first plastic settling barrel and filling the gap with a two-component epoxy sealant
The vent riser is only installed in the first settling barrel. For this chamber, it is also desirable to provide for a removable lid allowing periodic cleaning of the bottom of settled solid particles. In the second settling barrel, two holes are made below, located relative to each other at an angle of 45 degrees, for connecting drainage pipes laid along the filtration field.
Important! The gaps in the holes formed due to loose contact between the pipes and the walls of the barrel are filled with a two-component epoxy sealant.
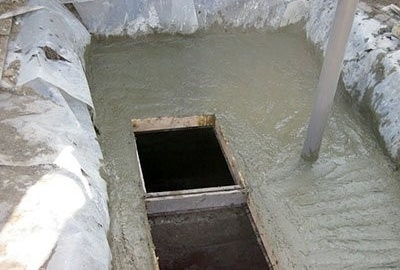
Stage # 1 - dimensioning and excavation
When calculating the dimensions of the pit, it is assumed that there should be a gap of 25 cm between the barrels and its walls along the entire perimeter. This gap will subsequently be filled with a dry sand-cement mixture, which serves to protect the walls of the septic tank from damage during seasonal soil movement.
In the presence of finance, the bottom under the settling chambers can be poured with concrete mortar, providing for the presence of embedded metal parts with loops in the “cushion” that will serve to secure the plastic containers. Such fastening will not allow the barrels to “float up” with a vein, and, thus, disrupt the equipped system of autonomous sewage.

The stepped bottom of the pit should be leveled and covered with a layer of compacted sand, the thickness of which should be at least 10 cm
Stage # 2 - installation of plastic containers
On the prepared bottom of the pit, barrels are installed, they are fixed with straps to metal loops immured in concrete. All pipes are connected and the gaps in the holes are sealed. The remaining space between the walls of the pit and the tanks is filled with a mixture of cement and sand, not forgetting to carry out a layer-by-layer tampering. As the pit is filled with backfill, water is poured into the tank to prevent the walls of the barrels from deforming under the pressure of the sand-cement mixture.

Preparing an opening in a second settling barrel for connecting an overflow pipe. In this embodiment, the flange is connected not from the side, but from above
Stage # 3 - filter field device
In the immediate vicinity of the septic tank, a trench 60-70 cm deep is excavated, the dimensions of which should allow the location of two perforated pipes. The bottom and walls of the trench are lined with a geotextile with a margin, which is necessary for sheltering from above pipes covered with gravel.

A 30-centimeter layer of crushed stone is poured onto geotextiles, the bulk material is leveled and compacted
The drainage pipes are laid with perforations in the walls, which are connected to the second settling barrel. Then another 10 cm of crushed stone is poured on top of the pipes, they are leveled and the backfill is covered with a geotextile so that the edges contact each other by 15-20 cm. Then it remains to fill the filtration field with soil and decorate this place with lawn grass.
As you can see, any summer clerk can make a septic tank from barrels. Just remember that this facility is designed to collect and dispose of a small amount of liquid household waste.

1 comment