How to make a drain pit: requirements for construction and an example of construction by yourself
People strive to travel outside the metropolis, to the country, in order to be closer to nature, fresh air and land. But there awaits them one unpleasant discovery - the lack of familiar urban amenities, one of which is sewage. There is no centralized system, traditional for the city, so for a comfortable stay you have to lay sewage pipes and get acquainted with such a concept as a drain pit in a private house.
Content
The principle of operation of country sewerage
The modern cottage is radically different from the village houses of the last century. The household townspeople replaced hastily put together toilets in the courtyard with convenient toilets, installed showers, bathtubs, washing machines and dishwashers in the houses. The question arose: where should the dirty used water run off?
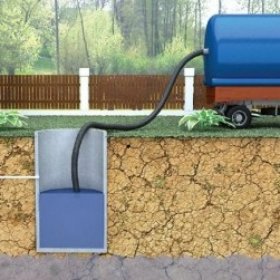
So there was an elementary sewer system: a set of outlet pipes that lead to a drive installed on a summer cottage outside the building. Various structures can act as a drive: an expensive biological treatment station, a simpler device - a septic tank or cesspool, known since antiquated times. Waste and wastewater through pipes fall into the drive, from where they are taken out at different intervals by special equipment.

Regular pumping of the contents of the sewage pit is a prerequisite for its use. The only way to efficiently clean the drive is to call the trap
Most vacationers, especially spending only summer vacations in the country, dream of installing a suitable drive quickly and cheaply. The ideal option in this case is a do-it-yourself drain pit. For its construction, it will take several days and a minimum of costs - basically, improvised material: bricks, boards, cement.
Drive volume calculation
Before digging a pit, it is necessary to determine its size, as well as the approximate volume of wastewater. It is considered that 0.5 m³ of the total pit volume should be allocated for each tenant. But it is necessary to take into account the unaccountable flow rate of water during water procedures and the use of household appliances, therefore for a family of 4 people a reservoir of at least 6 m³ is required.

The inclination of the base of the pit towards the location of the hatch is necessary for the full pumping of sewage with sewage equipment - a specially provided hose, which is lowered to the bottom
The size of the structure depends on the volume of incoming wastewater, but there are certain boundaries. For example, the depth of the country drain pit should not exceed three meters, otherwise the cesspool equipment simply can not cope with the cleaning. The width is usually 1-1.5 m, the length is 2.5-3 m.
Attention! The ground level must exceed the level of filling the pit by at least 1 meter. This is a kind of insurance against spillage of sewage beyond the boundaries of the pit.
Choosing the right construction site
It is important not to make a mistake in choosing a location. The question arises: how to properly make a foundation pit for a drain pit so that sanitary standards are not violated?

The diagram shows the approximate location of the drain accumulator in relation to a residential building, a source of water and the nearest obstacles
There are a number of rules:
- The minimum distance from home to the drive is 5 m.
- The distance to the nearest water source is 30 m or more.
- The pit should be in an open space, not fenced with buildings or a fence.
- A prerequisite is a good access road for the sewage machine.
It is necessary to consider the drain pit as an object of increased danger, so the playground and recreation should be located on the other side of the house.
Brick pit example
Stage # 1 - excavation and foundation
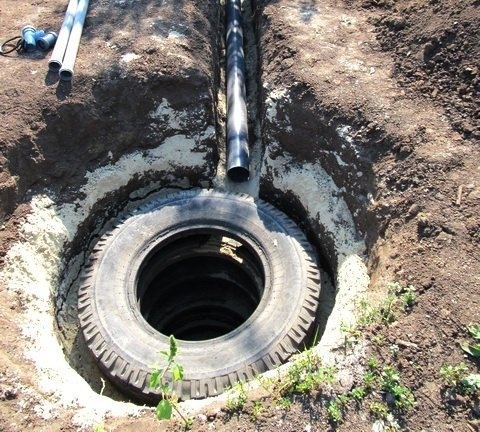
Digging a pit is a difficult and laborious process, so it is best to use an excavator if possible. The most convenient form is considered rectangular or square, but you can also find pits and a cylindrical configuration. During digging, you should monitor the condition of the walls: they must be smooth and protected from shedding.

If you did not have to deal with brickwork before, it is better to choose a rectangular structure: straight walls and corners are easier to form
Features of the drain pit device are largely dependent on the material. Let us consider in more detail the construction of a red brick drive with a concrete bottom.
The bottom of the tank should be given a slight slope towards the hatch - for effective cleaning. The bottom layer is a 15-cm sand cushion, then a layer of concrete, in conclusion - a cement-sand screed.
Attention! Instead of a multilayer base, a reinforced concrete slab of suitable sizes can be installed at the bottom.
Stage # 2 - building walls
The material for the construction of walls is red brick, the mortar for laying is a mixture of sand and clay, which in the future will play the role of plaster. Masonry is done in the traditional way - with a half shift of the brick in the next row. The minimum masonry thickness is 0.25 m. The brick walls are partially waterproof, but how to make the drain pit leakproof? And very simple - you need to use bitumen mastic or a similar waterproofing solution.

During the construction process, the pits use a long staircase and any useful improvised material, for example, boards and beams left over from the construction of the house
Attention! Bitumen-based mastics cover only absolutely dry walls.
Stage # 3 - installing the floor
The most durable is a reinforced concrete floor. Wood and plastic will not work, as they have too little life. It is better if the upper part of the structure is blocked from the sides by 0.3 m. The pumping hole should be located in the upper part, but not in the center, but on the side of the slope of the base. The concrete slab structure is created in several stages. The first layer of mortar is poured (5-7 cm), then iron rods are laid on it, and a second layer of concrete is coated on top. When the floor is completely hardened, it must be masked: cover with a thick film and cover with soil. Only a hatch should be visible from the ground.

On the surface of the earth, only the manhole cover remains visible. It can be made of concrete, plastic or metal.
As you can see, it is not difficult to make a drain hole from a brick, it is enough elementary skills in laying and processing walls.
Advantages and disadvantages of construction
The benefits of a drain tank include the following factors:
- Ease of installation and maintenance. The pit can be dug up and ennobled on its own, and for its cleaning it is enough to call the scavengers.
- Independence of installation on the type of soil. In sandy soil, a clay castle is used for greater strength.
- Groundwater protection against pollution. The concrete bottom and walls of brick prevent the penetration of effluents into the soil, but if they leak, the soil bacteria will cope with the cleaning.
Before you dig a cumulative drain hole, you should consider its negative sides. One of the tangible troubles is the recurring smell of sewage. Regular cleaning will help fix this problem.

A well-equipped road leading directly to the sewage pit is a guarantee of quality cleaning. The construction of the road is better to do at the stage of construction of the house
It is necessary to get used to frequent visits to the scavengers - 1-2 times a week. Only with frequent cleaning of the pit does not silt occur. The service life of a brick drive is no more than 15 years, since the masonry is slowly destroyed under the influence of water. If for some reason the cesspool ceases to be arranged, a more functional septic tank can be installed that produces mechanical and bacteriological wastewater treatment.
3 comments