How to make a solar battery yourself: step-by-step instruction
The desire to make the energy supply system of a private house more efficient, economical and clean from an environmental point of view makes us look for new sources of energy. One of the modernization methods is the installation of solar panels capable of converting the energy of the sun into electric current. There is a great alternative to expensive equipment - a do-it-yourself solar battery that will allow you to save money every month from the family budget. We will talk about how to build such a thing today. Denote all the pitfalls and tell you how to get around them.
For general information on the design features of solar panels, see the video:
Content
Development of a solar power system project
Designing is necessary for more successful placement of panels on the roof of the house. The more sunlight that hits the surface of the batteries and the higher their intensity, the more energy they will produce. For installation, you need the south side of the roof. Ideally, the rays should fall at an angle of 90 degrees, so you should determine in which position the operation of the modules will be more useful.
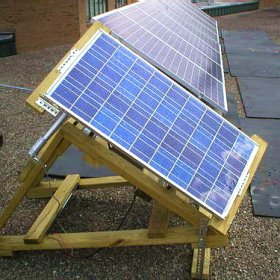
The fact is that a home-made solar battery, unlike the factory one, does not have special motion sensors and hubs. To change the angle of inclination, it is possible to manufacture a mechanism for manual control. It will allow you to install the modules almost vertically in the winter, when the sun is low above the horizon, and lower them in the summer, when the solstice reaches its peak. The vertical winter arrangement also has a protective function: it prevents the accumulation of snow and ice on the panels, which extends the life of the modules.

The energy efficiency of a modular design can be increased if you create a simple control mechanism that allows you to change the angle of the battery depending on the time of year and even time of day
It may be necessary to strengthen the roof structure before installing the batteries, since a set of several panels has a rather large mass. It is necessary to calculate the load on the roof, taking into account the severity of not only solar panels, but also the snow layer. The weight of the system largely depends on the materials used in its manufacture.
The number of panels and their size are calculated based on the required power. For example, 1 m² of a module produces approximately 120 watts, this is not enough even for full lighting of residential premises. Approximately 1 kW of energy with 10 m² of panels will allow the operation of lighting fixtures, a TV and a computer. Accordingly, a solar structure of 20 m² will provide for the needs of a family of 3 people.Approximately at such sizes should be counted if the private house is intended for permanent residence.

The manufacture of a solar battery does not necessarily end with the initial assembly, in the future it is possible to increase the elements, thereby increasing the efficiency of the equipment
Self-assembly module options
The main purpose of the solar panel is to generate energy from sunlight and convert it into electrical energy. The resulting electric current is a stream of free electrons released by light waves. For self-assembly, mono- and polycrystalline converters are the best option, since analogues of another type - amorphous - reduce their power by 20-40% during the first two years.

Standard monocrystalline elements are 3 x 6 inches and have a rather fragile structure, so you need to work with them extremely carefully and accurately
Different types of silicon wafers have their pros and cons. For example, polycrystalline modules are characterized by a rather low efficiency - up to 9%, while the efficiency of single-crystal plates reaches 13%. The former retain power indicators even in cloudy weather, but serve an average of 10 years, the power of the latter drops sharply on cloudy days, but they function perfectly for 25 years.
A home-made device must be functional and reliable, so some of the parts are best purchased ready-made. Before you make a solar battery on an individual project, take a look at the eBay website, where you can find a huge selection of modules with minor defects. Slight damage does not affect the quality of work, but significantly reduces the cost of the panels. Suppose a single-cell Solar Cells module, located on a fiberglass board, costs a little more than $ 15, and a polycrystalline set of 72 pieces costs about $ 90.

The best finished option for a solar cell is a panel with conductors that require only a serial connection. Modules without conductors are cheaper, but increase battery assembly time by several times
Solar Instructions
There are many options for self-assembly of solar panels. The technology depends on the number of solar cells purchased in advance, and additional materials required for the manufacture of the housing. It is important to remember: the larger the total area of the panels, the more powerful the equipment, but at the same time the weight of the structure grows. In one battery, it is recommended to use the same modules, since the current equivalence is equated to the values of the smaller of the elements.
Modular frame assembly
The design of the modules, as well as their sizes, can be arbitrary, so instead of numbers, you should focus on the photo and choose any individual option suitable for specific calculations.

The cheapest solar cells are panels without conductors. To make them ready to assemble the battery, you must first solder the conductors, and this is a long and painstaking process
To make the case, inside which the solar cells will be fixed, it is necessary to prepare the following material and tool:
- plywood sheets of the selected size;
- low rails for sides;
- universal or wood glue;
- corners and self-tapping screws for fixture;
- drill;
- fiberboard boards;
- pieces of plexiglass;
- paint.
We take a piece of plywood, which will play the role of the base, and glue low sides along the perimeter. The slats on the edges of the sheet should not block the solar cells, so make sure that their height does not exceed ¾ inch. For reliability, each glued rail is additionally screwed with screws, and the corners can be fastened with metal corners.

A wooden frame is the most affordable option for placing solar cells. It can be replaced with an aluminum corner frame or with a purchased set of frame + glass
For ventilation, drill holes in the lower part of the body and along the sides. There should not be any openings in the lid, as this threatens moisture. The fastening of the elements will be done on fiberboard sheets, which can be replaced with any similar material, the main condition is that it should not conduct electric current.

Small ventilation holes must be drilled over the entire area of the substrate, including the sides and the middle rail. It will allow you to adjust the level of moisture and pressure inside the frame
We cut out the lid from plexiglass, adjusting it to the dimensions of the case. Regular glass is too fragile to fit on the roof. To protect the wooden parts, we use special impregnation or paint, which should be used to treat the frame and the substrate from all sides. It is not bad if the shade of the carcass paint is combined with the color of the roofing.

Painting performs not so much an aesthetic function as a protective one. Each part should be covered with at least 2-3 layers of paint, so that in the future the wood does not warp from humid air or overheating
Installation of solar cells
We lay out all the solar modules in even rows on the substrate with the back side up to solder the conductors. To work, you need a soldering iron and solder. Places of soldering must first be treated with a special pencil. For starters, you can practice on two elements by connecting them in series. Also sequentially, in a chain, we connect all the elements on the substrate, the result should be a “snake”.

We set each element strictly according to the marking and make sure that the conductors of neighboring elements intersect at the places of soldering
Having connected all the elements, gently rotate them face up. If there are a lot of modules, you will have to invite helpers, since it is quite difficult to turn soldered elements without damaging them. But before that, we smear the modules with glue to firmly fix them on the panel. It is better to use silicone sealant as glue, and it should be applied strictly in the center of the element, at one point, and not along the edges. This is necessary to protect the plates from damage if a slight deformation of the base occurs. A plywood sheet can bend or swell due to changes in humidity, and stably bonded elements will simply crack and fail.
Having fixed the modules on the substrate, you can test run the panel and check the functionality. Then we put the base in the already finished frame and fix it along the edges with screws. To prevent battery discharge through the solar panel, we install a blocking diode on the panel, fixing it with sealant.

To connect the chains, you can use a copper wire or cable sheath, which fix each element on both sides, and then are fixed with sealant

Trial testing helps to make preliminary calculations. In this case, they turned out to be true - in the sun without load, the battery produces 18.88 V
On top of the installed elements we cover with a protective screen from plexiglass. Before fixing it, we again check the operability of the structure. By the way, modules can be tested during the entire installation and soldering process, in groups of several pieces. We make sure that the sealant has completely dried out, since its evaporation can cover the plexiglass with an opaque film. We equip the output wire with a two-pin connector so that you can use the controller in the future.

One panel is assembled and completely ready for work. All equipment, including items purchased on the Internet, cost $ 105
Photovoltaic systems of a private house
Electric home energy supply systems using solar cells can be divided into 3 types:
- autonomous;
- hybrid;
- battery-free.
If the house is connected to a central power grid, then a mixed system would be the best option: during the day the power is supplied from solar panels, and at night from batteries. The central network in this case is a reserve. When it is not possible to connect to the central power supply, it is replaced with fuel generators - gasoline or diesel.

The controller is needed to prevent short circuits at the time of maximum load, the battery - for energy storage, inverter - for distribution and supply to the consumer
When choosing the most successful option, you should consider the time of day at which the maximum energy consumption occurs. In private homes, the peak period falls in the evening, when the sun has already set, so it would be logical to use either a connection to a common network or the additional use of generators, since solar energy is supplied in the daytime.

In photovoltaic power supply systems, networks with both direct and alternating current are used, and the second option is suitable for placing devices at a distance of more than 15 m
For summer residents, whose operating mode often coincides with daylight hours, a solar energy-saving system is suitable, which begins to function along with sunrise, and ends in the evening.

2 comments