Standards and features of installation of a sandwich chimney: attention to safety
For self-installation, it is difficult to come up with a more suitable option than a metal chimney. These lightweight and compact designs are practically indispensable if the chimney in the house is not provided for by the initial design. Do-it-yourself installation of a chimney sandwich is not difficult. To do this, connect the structural elements and the set of auxiliary parts in the correct sequence. Of course, in this case there are a number of nuances that must be taken into account.
Content
How is a sandwich chimney arranged?
With the light hand of a famous Englishman, any structure that has three layers is called a “sandwich”. A chimney with this name is no exception. Between the inner and outer metal contour sandwich pipe for the chimney, a layer of heat insulator, usually made of basalt materials, is enclosed.

The set of elements of the chimney sandwich, in addition to pipes, includes brackets, crimp clamps, tees, pipes with revision and other details that will ensure the correct operation of the structure
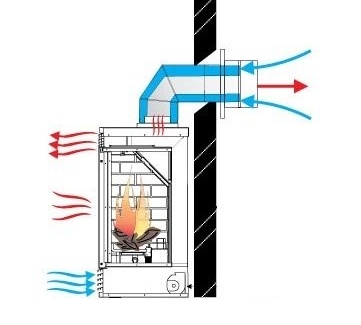
This device allows you to effectively remove combustion products from the furnace, because:
- the internal circuit perfectly tolerates heating to a high temperature, as well as the effects of condensate;
- the heater reliably protects the external circuit from overheating;
- the design of the sandwich chimney does not allow moisture to get on the heater;
- necessary draft and rarefaction of gases in a flue are provided.
The inner contour of the pipe is always made of stainless steel, which has enhanced anti-corrosion properties. But the external circuit for the sake of economy is sometimes made of a less durable galvanized metal. The buyer is forced to choose between a more durable "stainless steel" or the opportunity to save a little. In this case, the material of the inner pipe is selected based on its ability to tolerate elevated temperatures, but the outer contour must be rigid enough so that the configuration of the pipe and the entire structure remains unchanged.
In addition to sandwich pipes, when installing a chimney, the following are used:
- wall brackets that hold the structure;
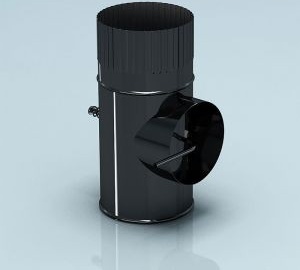
- audit with a window for cleaning and stand under it;
- set of adapters;
- tees;
- a knee that allows you to change the direction of the structure by 45 or 90 degrees;
- crimp clamps for connecting individual structural elements;
- unloading platform that allows you to correctly distribute the weight of the structure and remove the load from the base;
- rosetta, rat and comfrey, which are used when passing the structure through the roof.
The top of the chimney can be decorated with a cone, as well as elements such as bending or thermofungal, Wappler, turbovent, spark arrestor (especially important if the roof is made of combustible materials), weather vane, etc.
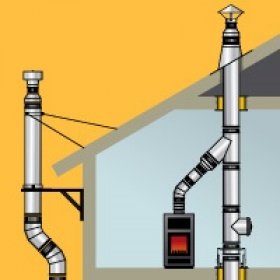
The device of the sandwich pipe provides a sufficiently high thermal insulation so that a chimney can be installed outside the building. However, the removal of combustion products will be more effective if the structure is located in the house, as close to the center of the structure as possible to reduce heat loss.
On our portal there are still useful materials about installing chimneys. For example, this one:https://aquatech.tomathouse.com/en/otoplenie/dimohod/dymoxod-svoimi-rukami-v-chastnom-dome.html, where you will learn about design options and requirements for chimney systems for a private house.
Standards for the size of basalt inside the "sandwich"
The thickness of the basalt non-combustible insulation, which serves as the "filling" of the sandwich, can vary between 25-60 mm. The cross section of the structure may also be different. In order for the installation of the chimney sandwich pipe to be performed in accordance with the requirements of SNiP, the heating capacity of the heating boiler should be taken into account:
- at a thermal power of less than 3.5 kW, it is recommended to use pipes with a cross section of 0.14 x 0.14 m;
- at a thermal power of 3.5–5.2 kW, it is recommended to use pipes with a cross section of 0.14 x 0.2 m;
- with a thermal power of 5.2-7.0 kW, it is recommended to use pipes with a cross section of 0.14 x 0.27 m.
However, the installation of a chimney sandwich is more often performed using round pipes. In this case, it is necessary to calculate the total cross-sectional area of the pipe recommended by SNiP and select elements that have the same indicators.
How to install such a chimney
When installing a chimney from a sandwich pipe, there is no need to build a special concrete foundation, like for a brick or ceramic chimney, since light weight is one of the undoubted advantages of this metal structure. However, do not consider the task too simple. There are a number of rules and nuances that should be understood and considered at the stage of equipment selection.
For example, it does not hurt to draw a plan diagram of a future design, indicating all sizes on it. Experienced stove-makers who know exactly how to properly assemble a chimney sandwich are especially encouraged to pay attention to such moments as the passage of the chimney through the roof, through ceilings, etc. For example, often the chimney is mounted before finishing finishing and roofing work. In this case, the boiler or fireplace insert is installed on the draft floor. In this case, it is necessary to take into account the height of the “cake” of the floor, taking into account the installation of the floor covering, and put the heating equipment, for example, into pieces of bricks, so that the structure exactly matches the opening for the exit of combustion products.
Do it yourself installation of a chimney sandwich from the outlet pipe of the heat-generating equipment. The first element of the chimney is a piece of pipe without insulation. If you start the installation immediately with a full-fledged sandwich pipe, the insulation will burn, sinter into stone and damage the chimney. Improper installation may result in damage to the heating equipment and even a fire. So, this element is inserted into the bell, and then the joint is isolated with a plug. After that, the structural elements are sequentially connected to each other, fixing the connection points with crimp clamps.

A common mistake when installing a chimney sandwich is the absence of a pipe without insulation immediately above the outlet pipe of the heating equipment. As a result, the insulation is simply sintered into stone
If there is a possibility of a significant increase in pressure in the chimney, the joints are additionally closed with sealing couplings. Often, when installing steel chimneys, special high-temperature sealants are used that lubricate the joints. The more tight the chimney, the better the draft.
Despite the excellent heat-insulating properties of the sandwich pipes, in places where the chimney passes through the ceiling, there is still a certain risk of heating and ignition of the materials surrounding the pipe.To ensure the necessary level of fire safety, it is recommended to lay an additional layer of thermal insulation in such places. Another important requirement of SNiP from this area: the distance from the chimney pipe to the wall should not be less than 25 cm. A sufficient number of elements equipped with revision hatches should be included in the design to allow visual inspection of the internal walls of the chimney.
If it is necessary to make horizontal segments (each length should not exceed 100 cm), tees should be arranged in such areas, which will allow for the effective removal of moisture generated during the condensation of water vapor.
Pay attention to the article that describes the principles of installing a chimney from a steel pipe:https://aquatech.tomathouse.com/en/otoplenie/dimohod/dyimohod-iz-stalnoy-trubyi-svoimi-rukami.html
We also suggest that you watch a video clip with useful tips from a "seasoned" master.
How to draw a conclusion to the roof?
The most difficult step in the installation of a sandwich chimney can be called, perhaps, the correct conclusion of the structure to the roof. To do this, use a special element called a roof cut. This is a metal construction that prevents the chimney from coming into contact with roofing cake materials.
When choosing a roof groove, it is necessary to take into account the angle of inclination of the roof. Standard options allow you to bring the chimney to the roof with a slope of 15-35 degrees or 35-55 degrees.

When putting a chimney sandwich onto the roof, one should take into account the slope of the roof, and also ensure a sufficient distance between the materials of the roofing cake and the pipe
First you need to mark with a marker or construction pencil the place where it is supposed to hold the chimney through the roof. After that, in accordance with the intended marking, an opening is made on the inside of the roof. It should be wide enough so that the pipe passes through it freely.
After that, the roof sheet is fixed from the inside, and the roof cutting is installed outside, the conical part of which is adjusted in accordance with the angle of the roof. The edges of the groove should be placed under the roofing sheet or under the ridge.

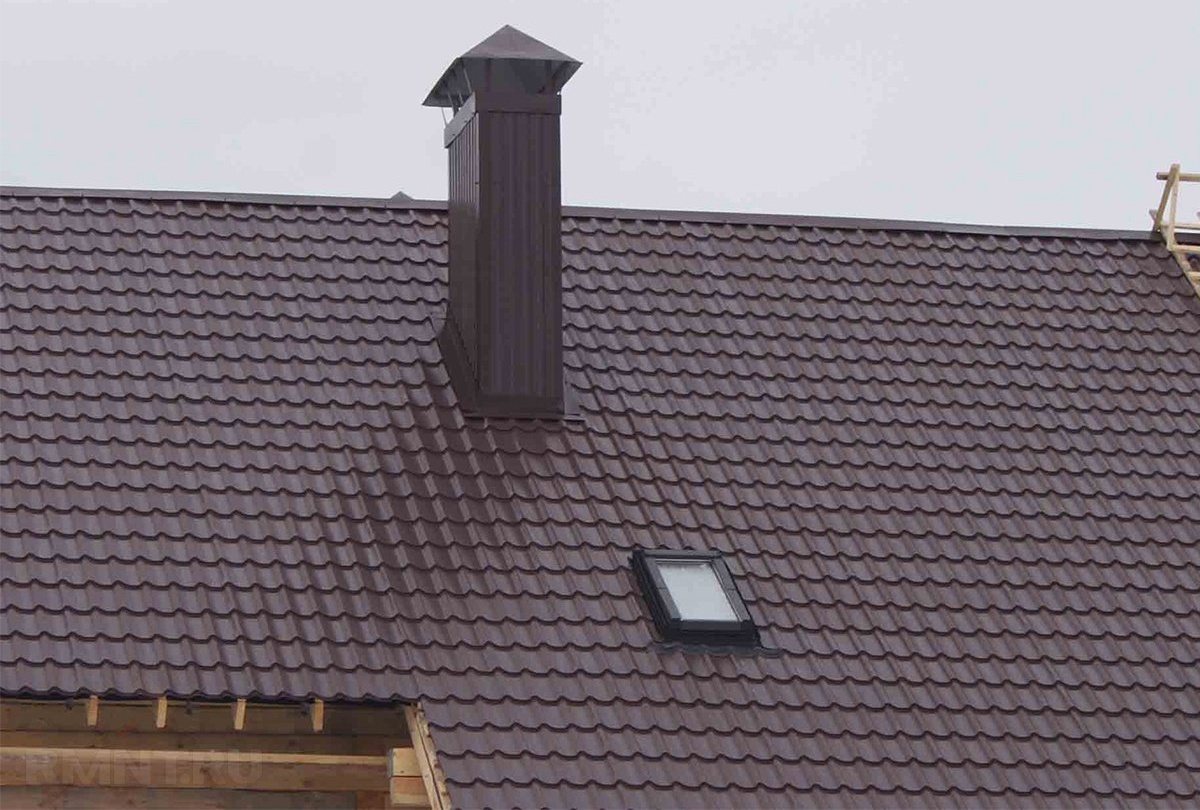
After the sandwich pipe is brought to the roof, you should take care of a sufficient height of the structure, as well as arrange the edge of the pipe with protective elements
You may find it useful material that describes methods for improving draft in the chimney:https://aquatech.tomathouse.com/en/otoplenie/dimohod/kak-uluchshit-tyagu-v-dymoxode.html.
To improve the tightness of the joint of the cutting and the chimney, use a special adjustable apron. After installing it, you can mount the next structural element. It remains to grow the pipe to the required height and install the necessary elements on its edge: spark arrestor, fungus, weather vane, etc.
3 comments