Making a chimney from metal pipes with your own hands

Today it is hard to imagine, but once the hearths in the houses did not have chimneys. Combustion products were collected indoors and exited through a fiber window under the ceiling. At the end of the furnace, the fire was extinguished and the hole was closed with a bundle of hay. Over time, stoves were improved, and special devices - chimneys were created to remove smoke. Operating experience has led to continuous improvement of devices, complexity of the structure and increased reliability. A real revolution in the design of exhaust systems for combustion products occurred with the advent of light heat-resistant materials - thin-walled metal pipes.
Content
Scope of tubular metal flues
The advantages of using such materials are several points:
- Light weight. For chimneys, electric-welded pipes with a wall thickness of 0.5–1.5 mm are used. The total load of this design allows it to be used for all types of furnaces, including metal bathtubs, brick and wall open-type, slow burning in greenhouses and residential premises, as well as for other types of heat sources.
- Tubular devices do not require special support structures in the form of foundations.
- Long term of operation. For galvanized pipes, it is 10–20 years, and manufacturers of stainless steel products declare viability for 100 years. Of course, there is no evidence on this issue.
- The simplicity of installing a chimney from pipes allows you to easily cope with this task even to a person with minimal skills of a home master.
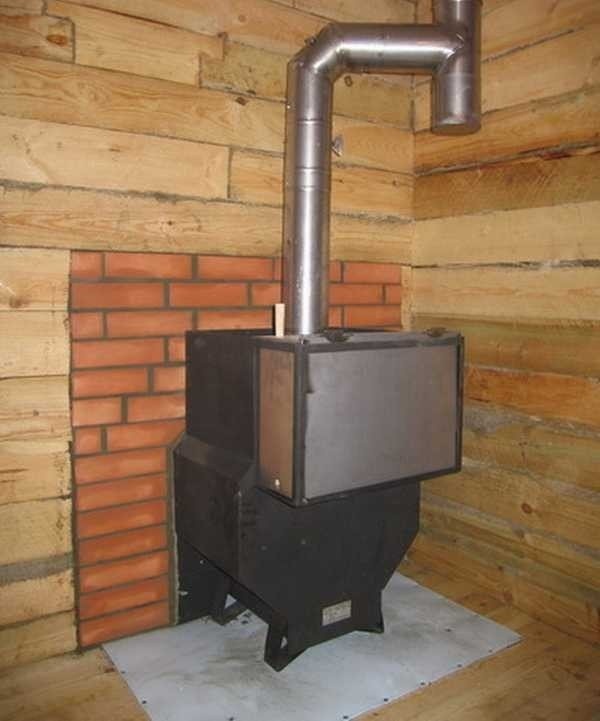
The installation of a steel chimney for a bath stove is quite simple
A limiting factor in the use of steel pipes is their cost, but this only applies to stainless pipes.
Video: what you need to know about metal chimneys
Types of steel pipes for chimneys
In the specialized construction store, a wide range of steel pipes is presented, which differ in purpose:
- Single-walled - made of galvanized steel or stainless steel, cheap, used to repair existing chimneys.
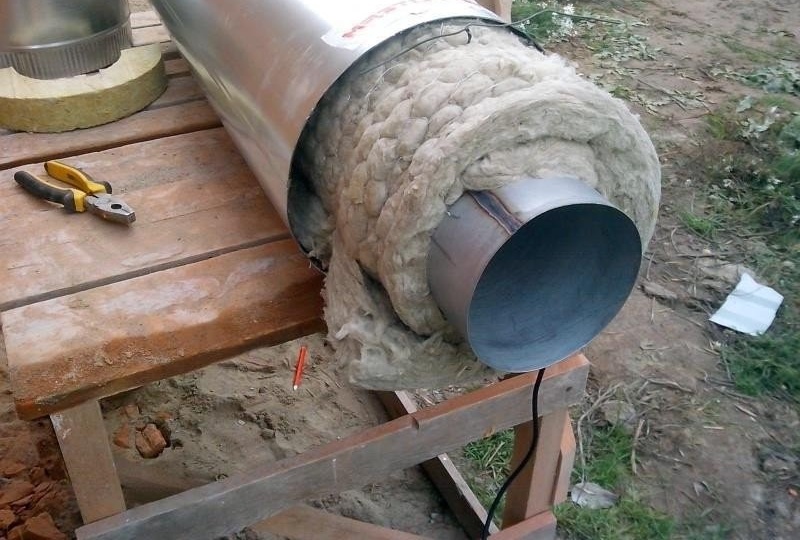
- Multilayer - consist of an outer shell and an internal conductive pipe, made of stainless steel, galvanized or made combined. This allows you to significantly reduce the price. The gap between the two walls is filled with heat-resistant insulation, for which refractory basalt wool is often used.

The sandwich pipe is ideal for a chimney
-
Coaxial - the same sandwich pipe, but there are partitions between the walls. Through a free channel, air is introduced into the furnace to improve combustion and increase heat transfer. This is the know-how in the field of chimney construction. Coaxial pipes are used for forced draft boilers.
Coaxial pipe went on sale recently


Types of chimneys
Based on the used component parts, these devices can be conditionally divided as follows:
- single;
- multilayer.
The materials used for their manufacture have special strength, they are highly corrosion resistant to acid condensate. A clean surface helps to completely remove moisture and soot from the flue duct.
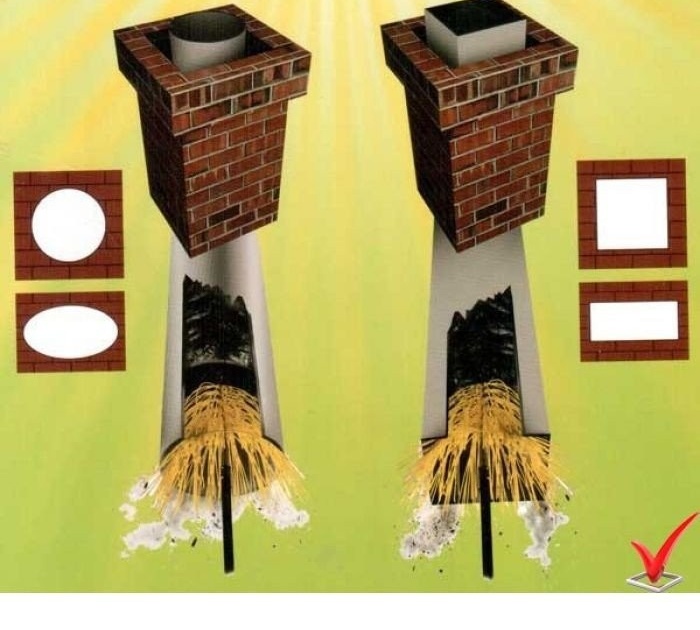
Very often, single-pipe structures are used. Such technical solutions are used to adapt old chimneys to new heating equipment. Pipes for them are made square, oval or round. For their production, austenitic stainless steel is used. Enameled pipes are also available, but they are not widely used, since they are sensitive to mechanical stress.
Single chimney needs additional protection
When installing a single chimney, you should be guided by the fire safety rule, which requires a distance of at least 1 m from the nearest wall of combustible materials.
Two-layer designs have their advantages. The heat-insulating layer between the walls of such a chimney can reduce the cooling of the inner pipe, resulting in less condensation. The inner pipe is made of stainless steel, because the condensate has an acid reaction and other material, including galvanized steel, will not be able to work for long under such conditions.
The two-layer chimney is already insulated
Such chimneys are placed at a distance of at least 20 cm from the walls of combustible materials. If this cannot be avoided, then the wall is sheathed with metal with a substrate. It is made of refractory material, such as asbestos sheet.
According to the installation method, chimneys are:
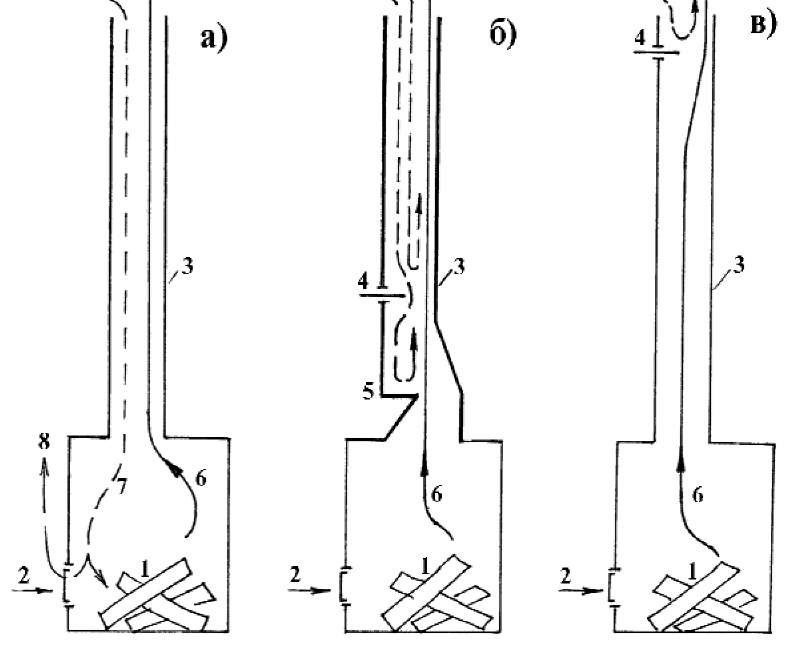
- Internal. Such a construction can rise vertically from the furnace through internal ceilings and a roofing cake. Its main drawback is that condensate flows directly into the furnace, increasing its concentration in flue gases. The result may be an unpleasant pungent odor in the room and accelerated chimney wear.
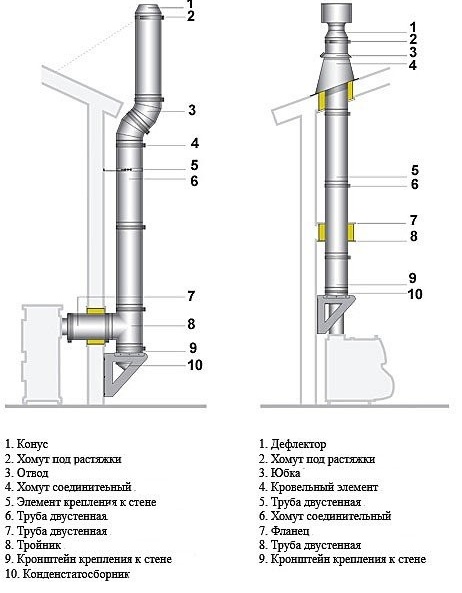
- Outdoor. With this design, the chimney is diverted from the furnace horizontally through the wall. For this, two knees are used, which can have an angle of rotation of 30, 45, 60 or 90 degrees. In this case, the outer one looks like a tee, and at the bottom there is a tank for collecting condensate. The vertical part of the chimney is installed parallel to the wall, the pipe is attached to it using brackets and clamps.
Components
It is not possible to assemble a chimney without using fittings. They are intended for:
- execution of contours of engineering systems;
- changes in the direction of the pipeline;
- transition to another diameter;
- traction adjustment;
- condensate collection;
- protecting the upper end from precipitation, leaves, litter and nesting birds.
Additional elements for the assembly of the chimney from pipes must be used
Using these structural elements, you can assemble a chimney of any configuration with your own hands. Acceptable is the length of horizontal sections of not more than 1 m, otherwise the traction will be greatly weakened.
Calculation of chimney parameters
The basis for calculating the height and diameter of the chimney is a power indicator.
The efficiency of the boiler or furnace is directly affected by the height of the chimney. For household appliances, it is 5 m. This characteristic is provided for by SNiP requirements for stoves in residential buildings. Measurement is taken from the grate of the device to the hood. At a lower height, the natural draft in the furnace will not ensure efficient combustion of the fuel, it will smoke and not generate the optimum amount of heat. However, the possibility of height increase is limited. When experiencing the natural resistance of the pipe walls, the air will slow down when the channel length is excessive, which will also lead to a decrease in traction.
Rules for choosing the length of the chimney
For a private house, the calculation of the height of the chimney is based on certain rules:
- The pipe must be at least 5 m.
- The excess of the end of the chimney over a conditionally flat roof is not less than 50 cm.
- For a pitched roof, a pipe whose axis is no further than 1.5 m from the ridge, and if there are superstructures, then from their highest point, the excess value is 0.5 m.
- When the distance to the ridge is 1.5-3.0 m, the end of the pipe should not be lower than the level of the ridge.
- When the chimney is removed at a distance of more than 3 m from the ridge, in particular during external installation, the angle between the level of the horizon and the conditional straight line between the ridge and the end of the pipe should be at least 10 degrees.
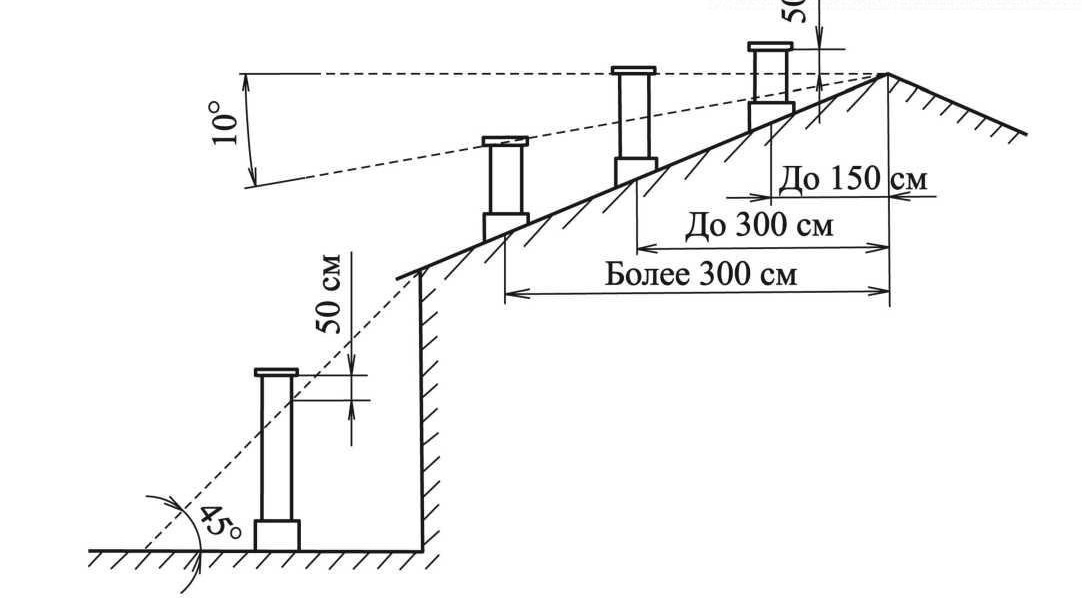
The height of the pipe depends on its location
When choosing a place for the outlet of the chimney through the roof, it should be borne in mind that it should not be near dormers and other similar devices in order to avoid the creation of fire hazard situations.
Calculation of the cross section of the chimney
The following procedure for determining the channel value is valid for a circular cross section. It is the optimal form, since the flue gases do not move in a monolithic direct stream, but the flow swirls, and they move in a spiral. Angular swirls form in the rectangular channels, inhibiting the movement of gases. To calculate the cross section, the result should be multiplied by 1.5.
You will need the following source data:
- The power of the furnace, that is, the amount of heat generated by the device per unit time when fully loaded.
- The temperature of the flue gases at the outlet of the furnace is usually taken within 150-200 degrees.
- The velocity of the gases along the channel (2 m / s).
- Chimney height.
- The amount of natural draft (4 MPa per 1 m of the smoke channel).
The dependence of the size of the cross section of the chimney on the volume of fuel burned is obvious.
Smoke does not move in a straight line.
To perform the calculation, you need to use the converted circle area formula: D2 = 4 x S * Pi, where D is the diameter of the smoke channel, S is the cross-sectional area, Pi is the number pi equal to 3.14.
To calculate the cross-sectional area, it is necessary to determine the gas volume at the place of their exit from the furnace into the chimney. This value is calculated depending on the volume of burning fuel and is determined from the relation Vgas = B x Vtop x (1 + t / 273) / 3600, where Vgas - gas volume, B - amount of fuel burned, Vtop - tabular coefficient, which can be found in GOST 2127, t - temperature of gases at the outlet of the furnace, usually a value in the range of 150-200 degrees is taken.
The cross-sectional area is determined by the ratio of the volume of passing gases to its speed, that is, by the formula S = Vgas/ W. In the final version, the desired value is determined by the relation D2 = Vgasx4 / PiW.
After making the necessary calculations, you get the result - the diameter of the chimney should be 17 cm. This ratio is true for a stove in which 10 kg of fuel burns in an hour at a humidity of 25%.
The calculation is made for cases when non-standard heating units are used. If the power of the device is known, it is enough to apply the chimney parameters recommended by specialists:
- for devices with power up to 3.5 kW - 140 x 140 mm;
- at 3.5–5.0 kW - 140 x 200 mm;
- with a power of 5.0–70 kV - 200 x 270 mm.
For chimneys of circular cross-section, its area should not be less than the calculated value of the rectangular.
Video: how to calculate the chimney for a solid fuel boiler
Materials and tools for making a chimney
Before proceeding with the procurement of parts, fixtures and tools for this work, you need to determine the design of the device and perform a preliminary design, an integral part of which is the material sheet, which lists all the necessary details. By adding to this list the cost of materials, you will get an estimate of costs.
Before construction, it is recommended to sketch the chimney
Installation of the device is carried out from the bottom up, that is, from the furnace to the tip, for which you will need:
- adapter from fittings from the furnace to the pipe, depending on the design, an outlet may be necessary;
- multilayer pipe;
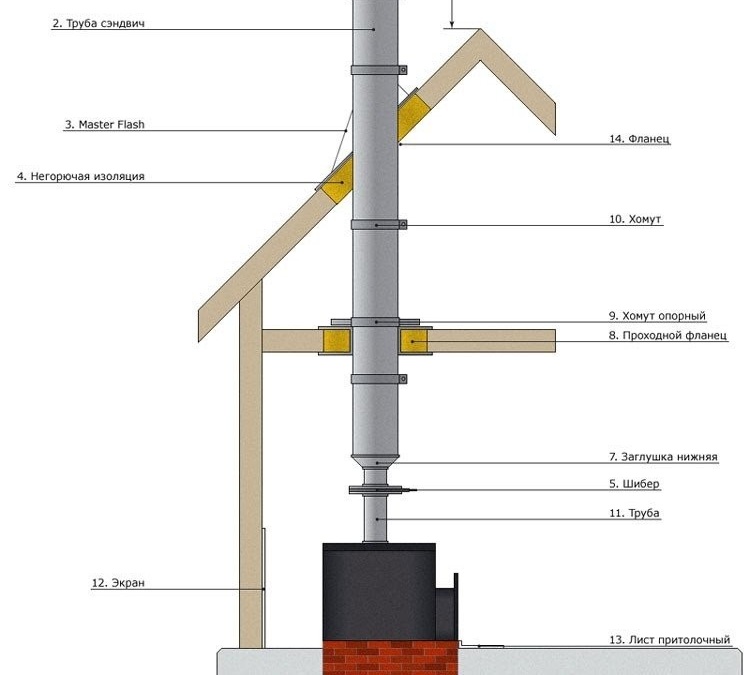
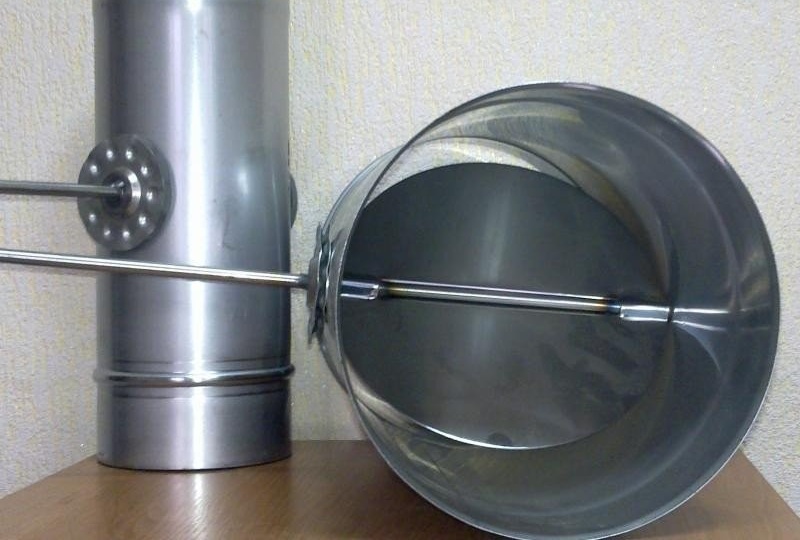
- gate;
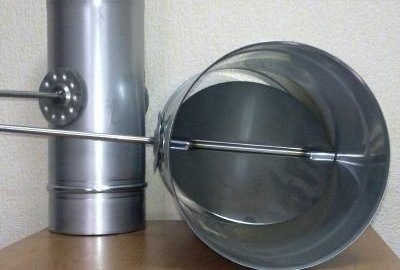
Shiber allows you to adjust traction
- refractory material for the passage through the ceiling;
- galvanized sheet plates, approximately 500x500 mm in size - to close the passage;
- materials for isolating the intersection of the roofing cake, for example, a probe for protection from the outside;
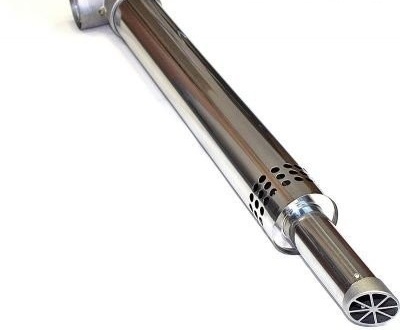
- chimney head
- clamps for fixing joints at the rate of 1 pc. for each;
- brackets for fixing chimneys to the walls (depending on its design);
- collector for draining condensate;
- high temperature joint sealant;
- steel pipes at the rate of 1 pc. per meter of chimney;
- stainless wire for stretch marks;
- screws, nails.
The tool list is small and may look like this:
- drill with drill bits for concrete and wood;
- jigsaw;
- screwdriver or wrench for installing fasteners;
- plastic inserts (dowels) for mounting brackets;
- a hammer.
Depending on the design of the chimney, other tools may be needed, this will be clarified when drawing up a preliminary design.
DIY chimney installation
The degree of readiness of the metal chimney parts for installation is so high that its assembly is a sequential implementation of a number of elementary operations that do not require any special skills or special knowledge.
The whole process may look like this:
- Installation of the furnace in the place of its permanent placement, fixing.

The furnace should be located as far as possible from combustible materials.
- Mounting the adapter from the nozzle of the fuel unit to the main chimney. To do this, the pre-prepared part, after application to the sealant seat, is put on the console and secured with a clamp.
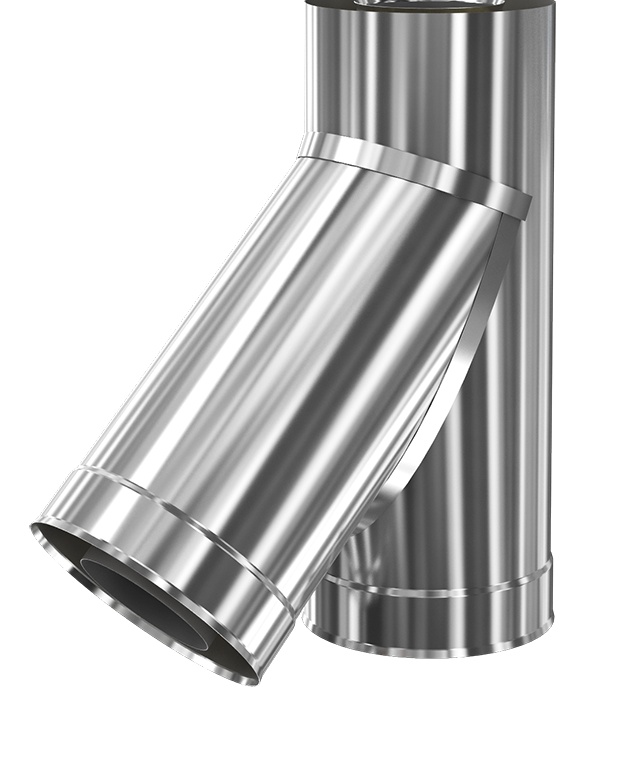
- Installation of a branch with the necessary angle of rotation (90, 30, 45, 60 degrees). To do this, just put the part on the landing site with the sealant applied to the flanges and install the clamp. Further actions do not differ in variety and are produced in the same way.
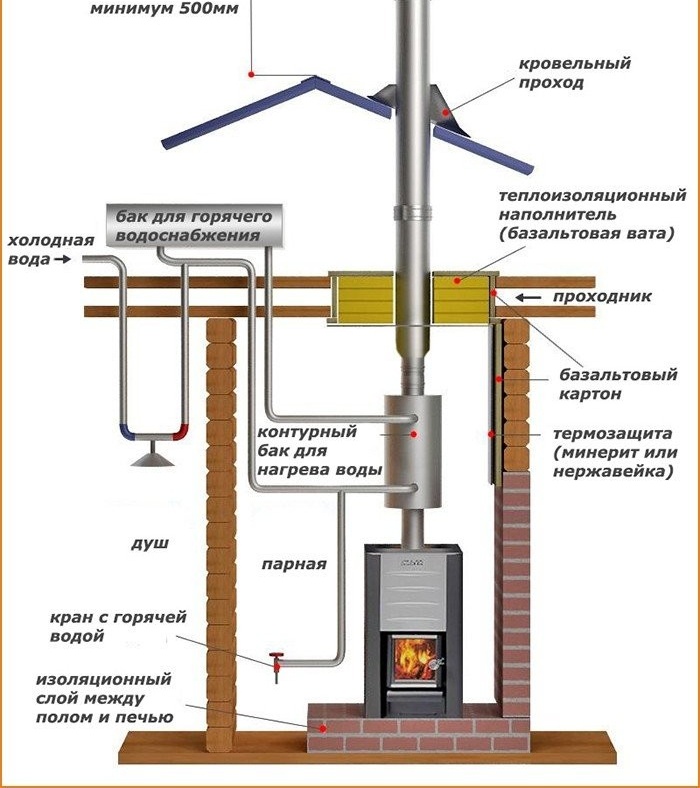
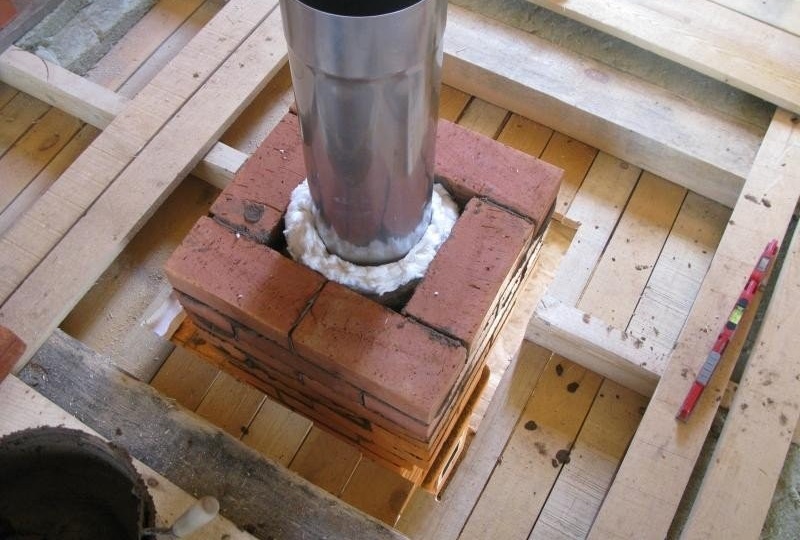
- If you need to pass the pipe through the wall, it is necessary to make an opening in it. After installing the pipe on the brick partition, it is enough to fill the cracks with cement mortar. When passing through a wooden wall or any combustible material, the hole size should be 2–2.5 times the diameter of the pipe. At the intersection, it must be isolated. To do this, you can use an asbestos sheet or cord that wraps around a pipe, basalt wool or a slab. Further, a metal sheet of galvanized or stainless steel is installed on the wall inside and out.
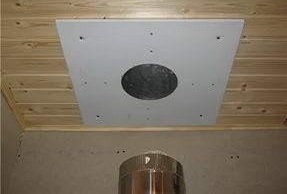
The places of contact of the metal pipe with the floors must be insulated
- Installation of the second branch in the form of a tee, the lower opening of which is used for mounting on the condensate collector. In this place you need to install a support platform with its fastening either to the wall or with support on the ground.

The bottom opening of the pipe outlet is used to collect condensate
- Installation of a straight pipe section.
- Fixing the bracket to the wall.

The chimney can be placed outside and inside the building
- Pipe fixation.
- Installing the cap on the pipe protecting its mouth.
- If necessary, install stretch marks.
If it is planned that the chimney will pass through the ceiling and the roofing cake, the same construction protection technology will be used as for the wall.
An umbrella is installed on the pitched roof in a smoke to protect the roof vents from precipitation.
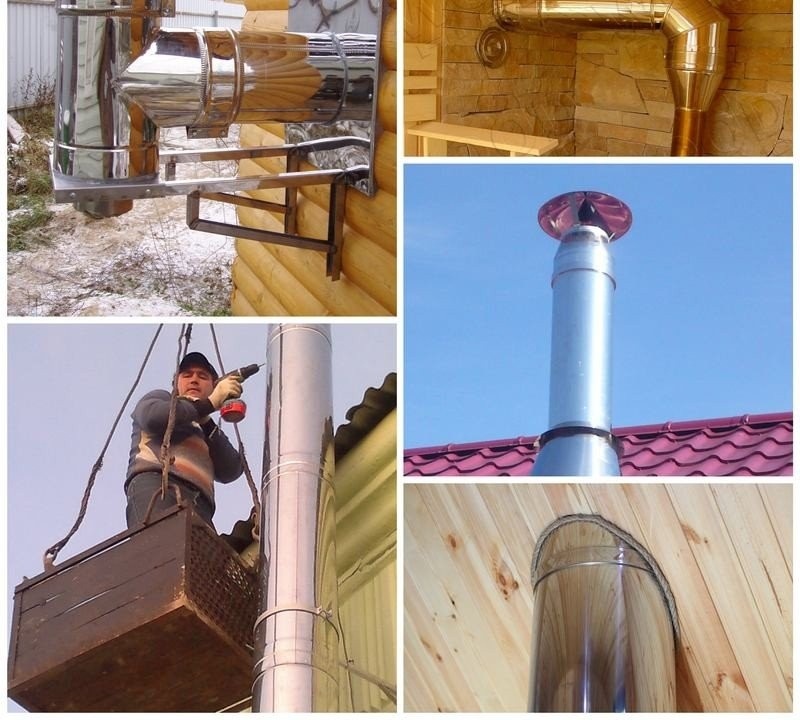
All joints of the chimney with the wall and roof must be insulated
The installation process is greatly simplified when using sandwich pipes, since the temperature on their surface is much lower than on single ones.
It is necessary to pay attention to the design feature of pipes for chimneys. Docking is provided by the seats created during production, therefore, during installation, you need to correctly orient them in space. When installing multilayer pipes, the layers of internal insulation are closed.
A significant advantage of assembling steel chimneys is that welding is not used.
Video: DIY chimney sandwich installation
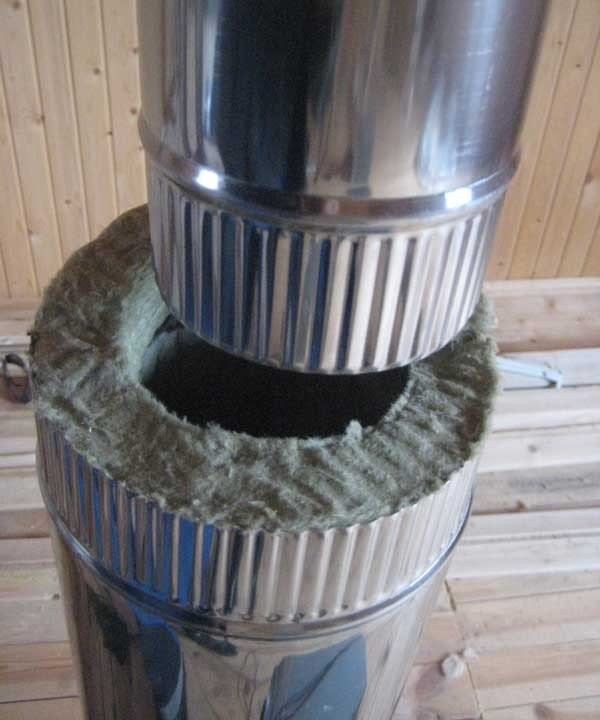
Chimney insulation
This operation is only performed if single pipes were used. It is necessary to reduce the intensity of condensation and protect combustible structures from exposure to high temperatures.
The best material for this purpose is basalt wool, since it is absolutely non-combustible and does not emit harmful fumes in a fire. It is also used in the manufacture of multilayer pipes.
Insulation of a metal chimney may not always be required
An insulating layer of aluminum foil must be mounted on top of the insulation, and its installation begins from the bottom up with an overlap of turns of 10–12 cm. This order ensures the joints are oriented downward, which prevents water from penetrating into the insulating layer.
Operational Features
Metal chimneys, having a mass of undeniable advantages, need increased attention both during assembly and operation:
- Do not place them near other utilities, such as electrical wiring or plumbing.
- Before starting installation work, the inner longitudinal joints of the pipes must be coated with a special sealant, since they are in a temperature differential, which gradually weakens the joint edges.
- When cleaning stainless steel pipes, it is better not to use traditional metal balls with a wire “hedgehog”. From their influence, the mirrored inner surface deteriorates, as a result of which it is difficult to drain the condensate into the drives. It is better to choose a brush made of synthetic materials.

The most effective mechanical cleaning method
Chimney service
With a properly made chimney, especially if it is made of stainless steel, the main operation to care for it is to clean the inner surface of soot.
Causes of soot formation
Combustion is a reaction of fuel oxidation with atmospheric oxygen. If it is not enough, soot is adhering to adhering to the walls of the chimney. Actually, the occurrence of conditions under which the smokestack clogs literally in a few months:
- The lack of oxidizer in the furnace can be caused by a deliberate reduction in draft by manipulating the shutter to achieve slow burning or even smoldering of the fuel, which can quickly lead to negative consequences.
- Another furnace error should be considered the use of raw firewood. Moisture prevents the intensive burning of fuel, while a large amount of soot is formed.
- The use of tarry firewood, the burning of which is accompanied by the release of soot, should be considered an adverse factor. Of course, it’s too expensive to heat the stove with oak or ash, but you should strive to use firewood of non-resinous tree species.
- It is strictly not recommended to burn garbage in the oven, especially plastic bags or bottles for the same reasons.
- Particularly unfavorable is the use of plywood, wood chipboards and other materials for the manufacture of which synthetic adhesives are used for the furnace waste. With such fuel, chimney soot clogging occurs most quickly.
Methods for cleaning the chimney from soot
There are several of them, including:
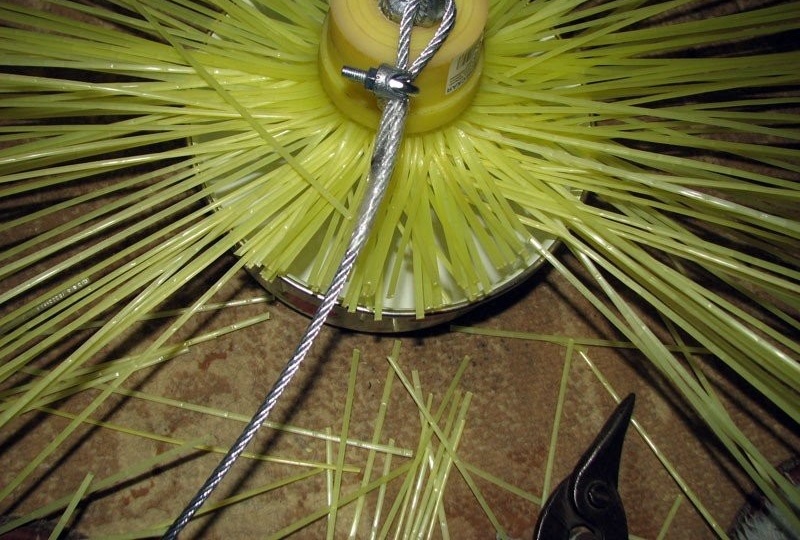
- Mechanical using a special brush. Most often, such cleaning is done through the roof. To do this, you need to prepare a brush (preferably plastic), a rope and a load, the mass of which is 2-3 kg. The brush must be tied to a rope, pick up the load and lower it into the pipe. Ruff, walking his way, cleans all the soot, but on condition that you will lower it gradually. Repeat the procedure several times. The disadvantage of this method is that it is impossible to clean the horizontal sections of the chimney, in addition, you can work in the warm season, because you need to do this on the roof, and in winter it is slippery.

For a metal chimney, it is better to use a plastic brush
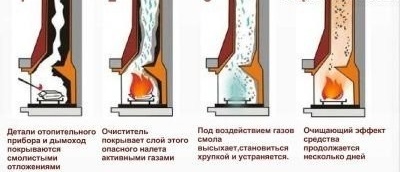
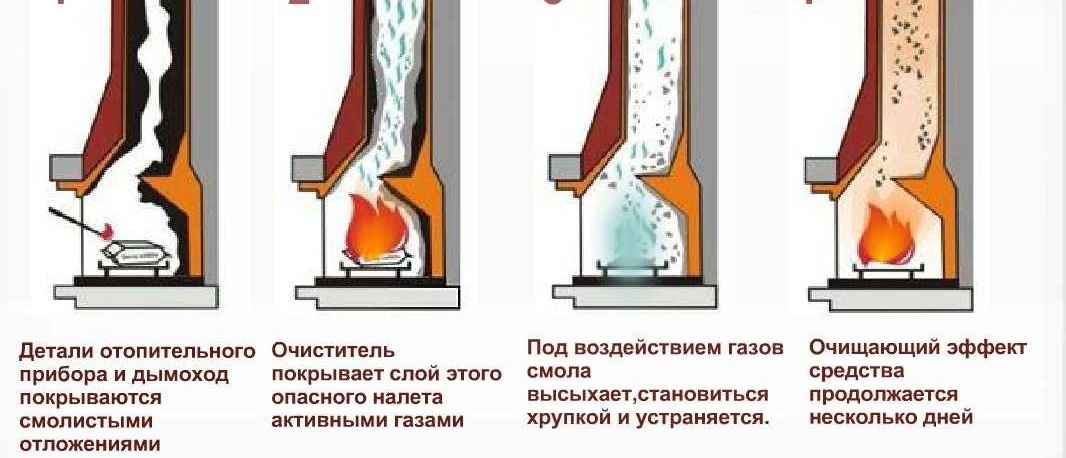
- Chemical - it consists in introducing special powders or briquettes during the combustion process, the smoke from which can soften soot deposits. They are carried by a stream of air from the pipe. However, with a large amount of soot, as a result of softening, it can fall down, and then a large cleaning is inevitable with all the resulting inconveniences and troubles. Therefore, such measures must be resorted to periodically for the purpose of prevention. For cleaning, you can use the log “chimney sweep”, for prevention, a special additive to firewood in the form of a powder is suitable. It is recommended to combine with mechanical cleaning.
Chemicals can be used for both cleaning and prophylaxis.
- Folk remedies - burning potato peelings in a furnace or adding salt during the burning of a furnace. This method is comparable to the previous one, only more affordable and cheaper.
You can avoid constant fuss with soot and special preparation of firewood. To do this, you need to arrange an extensive, well-blown woodcutter with a fuel supply for several years, and use them only well-dried.
The hearth, which is designed to provide a comfortable stay in the house, will become a source of constant concern and disappointment if the system for removing smoke from the living space is incorrect and does not work well. Therefore, before starting installation work, it is recommended to carefully study all the information and prepare.