Do-it-yourself welding of polypropylene pipes: how to do everything accurately and professionally
In the process of installing a heating system and water supply system, or for arranging a sewage system, polypropylene pipes are increasingly used. This is due to their durability, corrosion resistance, lightness and ease of installation. This compares favorably with metal parts. It seems to many that welding polypropylene pipes with their own hands is a complex procedure that requires special knowledge and skills. However, in reality, this is not so. If you want to master the welding technology, even a beginner can easily. But exactly how the welding process takes place, what is needed for the work and how not to make a mistake when soldering - this is what we will analyze today.
Varieties of polypropylene pipes
The quality of the welds and the pipeline as a whole largely depends on the proper selection of parts. There are several types of polypropylene pipes:
- PPH. Single-layer parts made of homopolypropylene. Used for various ventilation and industrial pipelines, cold water supply systems.
- RRV. Single-layer pipes made of polypropylene block copolymer. They are used for the manufacture of floor heating systems and pipelines for cold water.
- Ppr. Single-layer parts made of random copolymer of polypropylene. Used for hot and cold water supply systems and heating circuits. Designed for temperatures up to 70 ° C.
- PPS. Special flammable pipe variety with a limitation of the temperature of the working medium at 95 ° C.
- Reinforced. Multilayer parts that can significantly reduce the temperature elongation of pipes, which are clearly manifested in single-layer elements. May be perforated or smooth. They require additional preparation before welding in the form of stripping the aluminum shell and the polymer cladding layer to the depth of the pipe entry into the fitting.
It is important to choose the right parts for each type of pipe and select the appropriate couplings or fittings for them. You can learn more about the types of pipes from the video:
What equipment is needed for welding?
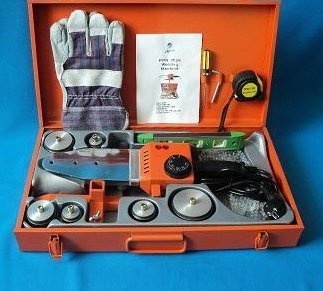
In order to do the welding of plastic pipes with your own hands, you will need special devices. First of all, this is a welding machine. For parts of large diameter and in the case when serious forces are required to combine the elements, mechanical models are used. Most often, they are used by professionals. For independent use, the so-called "iron" or manual welding machine is ideal. It is designed for socket soldering of polypropylene only. Welding polyethylene pipes is a completely different unit.
The device is quite simple. Its main part is a heating plate with holes in which the pair of Teflon-coated welding elements are fixed. They can be of different diameters. In addition, the equipment is equipped with a temperature regulator and a convenient handle.Models vary in configuration. The minimum is suitable for working with pipes of one or two diameters. The average involves the presence of several nozzles of different diameters, the maximum - a complete set of nozzles and special tools needed in the welding process.

In addition to the manual apparatus for welding polypropylene pipes, special scissors and other tools will be needed. All this may be included in the package.
Topic article: What is a welding machine for polypropylene pipes?
In addition to the device, you will definitely need pipe shears and a device for stripping reinforced parts, if intended to be used.
How to weld polypropylene parts?
Technology literate welding polypropylene pipes involves heating parts. The surfaces to be welded are heated by Teflon nozzles inserted into the welding machine. The element on which the fitting is worn is called the mandrel. Pipe nozzle - sleeve. The welding machine is installed on special legs. Next, nozzles of the desired diameter are selected and fixed. After which the desired temperature is set on the thermostat, it can be clarified in the table, usually attached to the instrument.

For the accuracy of the connection, experts recommend marking the depth of the end of the pipe into the fitting before heating the parts
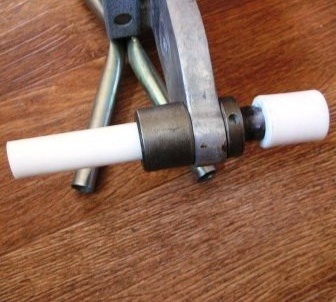
The welding machine is plugged in. The indicators on its case should light up and continue to light during heating. After the device warms up to the desired temperature, with a quick and accurate movement we combine the fitting with the mandrel, and the pipe with the sleeve. The peculiarity lies in the fact that in the process of combining the welding nozzle with the pipe, its outer layer is melted and comes out in the form of a small bead-burr. The inner layers are heated to a plastic state and can be elastically compressed to allow the pipe to enter the nozzle.
The same thing happens when the mandrel is combined with the fitting: the wall of the latter is stretched, and grata appears on the inner surface. As the nozzle advances, the outer section of the fitting begins to abut against its base, while it is slightly melted. The moment of emphasis and pipe and fitting is well felt by hand. At this second, it is very important to immediately stop the pressure. Next, you only need to hold the parts in place until they reach the desired heating temperature.

After the welding machine has warmed up to the desired temperature, the pipe and fitting are simultaneously put on teflon nozzles
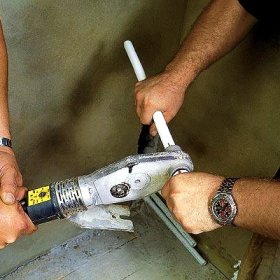
At the end of heating the elements must be quickly removed from the nozzles. The movement must be very accurate. Heated parts are combined until they stop. During the operation, the pipe is elastically compressed, while the fitting, on the contrary, is stretched. As a result, the surfaces to be welded begin to press against each other and displace the air present in the seam. The molten material is mixed, which ensures strong welding of polypropylene pipes.
It must be borne in mind that the melted parts cool down quite quickly. The rate of their cooling depends on the depth of heating and can be determined from the table. Until the elements have cooled down, they retain their ductility. Therefore, they must be fixed so that the joint does not deform. After loss of ductility, parts can be laid on a flat surface. However, you should know that the elements will become fully durable only after their temperature drops below 40 ° C. Then the seam can be cleaned.

The parts warmed up by the welding machine are inserted quickly and accurately into one another. It is not allowed to twist them or squeeze them strongly, otherwise the connection will be deformed
Important! For beginners in the welding business, it is best to practice a little before starting work.To do this, you need to purchase a few extra fittings and cut off a certain amount of pieces from the pipe. Training work will allow you to quickly acquire the necessary experience and perform welding accurately and efficiently.
Detailed video briefings on the work
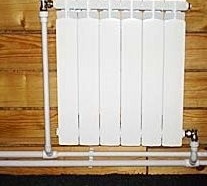
Polypropylene pipelines For a long time already not a rarity in our houses. To mount them, it is not necessary to invite specialists. Welding plastic pipes is a fairly simple event, which a beginner can cope with. It is only necessary to strictly follow the instructions and perform all work extremely carefully. The result of the efforts will be reliable and high-quality connections.