DIY fan heater: homemade heat gun device + mini unit
Not all cottages are equipped with an autonomous heating system, and in some there is no stove or fireplace, not to mention warm floors and other amenities of life. Sometimes, to create a comfortable environment, there is simply not enough heat, and summer residents often purchase mobile heating appliances. However, there is a chance to save on buying an expensive device and assemble a fan heater yourself, using improvised materials.
It is impossible to heat an entire house and even one large room with a standard domestic fan heater, but it is ideal for creating a comfortable atmosphere in a work or sleeping place, as well as in a small room.
Content
Which fan heater is better, video
Self-installation of a fan heater
Before self-assembly, it is necessary to carefully study the fan heater device. It consists of three main parts:
-
- a separate case (metal or plastic);
- a fan;
ceramic, spiral or tubular heating element.

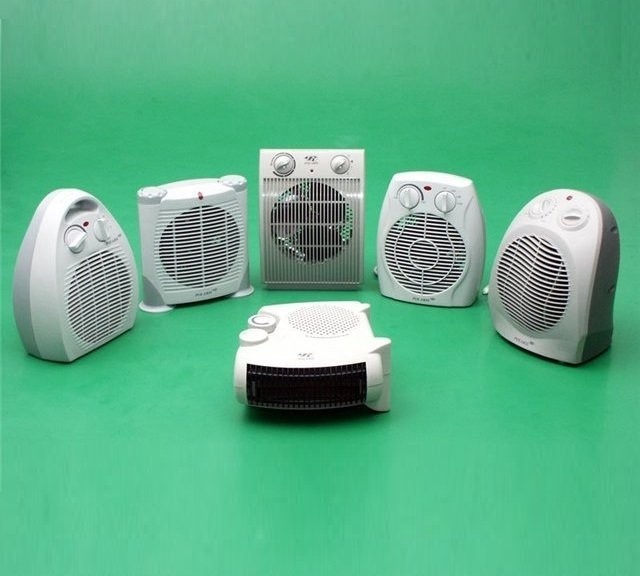
The size, power and design of modern fan heaters allow you to use them in rooms of various purposes - from a simple garage to a living room in the house
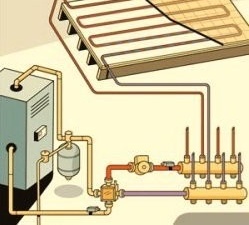
The installation method, dimensions and power of the heaters are different. The principle of operation is quite simple: the flow of cold air by the fan is directed to the heating element, where its temperature rises by a certain number of degrees, and then, already heated, spreads around the room. The main advantage of a stationary heating device is its efficient, quick heating of air in a limited area. In addition, a small device is convenient to carry from place to place and use only when necessary.

Blue arrows indicate the cold air that enters the device and, under the influence of a fan, rushes to the heating elements. Red - heated air in a certain direction
Today, the market offers a huge amount of heating equipment for rooms of different quadrature. Often, thermal curtains began to be used. You can read more about this unit in our article:https://aquatech.tomathouse.com/en/otoplenie/teplovaya-zavesa-na-vhodnuyu-dver.html
Many models, including self-made ones, can be used in the heat by turning off the heating elements, thereby turning the device into a regular fan.

Having studied the device’s device diagram, it is necessary to select parts that are useful for assembly. Most of them will not even have to be purchased: in any house there will be faulty devices, suitable materials, wires, fasteners, tools. You can choose one of the proposed options or design your own.We will tell in more detail how to make a fan heater with your own hands from a channel fan and a power supply.
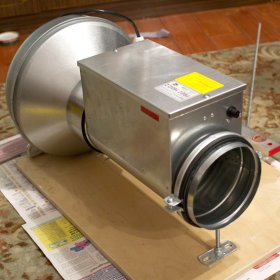
Directional heat gun

The heat gun of its own production has enough power to easily heat a garage, utility room or office in the house
To build you will need:
- a piece of plywood 16 mm thick;
- fan (duct);
- temperature and speed controllers;
- PBEC heating element (2.2 kW);
- fasteners (clamp, bracket, studs, nuts, washers);
- wheels.
From a plywood, we cut out a rectangle of approximately 47 cm x 67 cm, we clean out unevenness and corners with an emery.

The base from plywood was not chosen for nothing: it is light, flat, and most importantly - it does not conduct electric current, which is important when force majeure circumstances arise
We connect two central parts with a clutch - a fan and a heating element. We fix the resulting structure on a plywood base using a bracket and a plumbing clamp.

We select fasteners so that they firmly fix the elements of the device and do not harm them. For example, self-tapping screws are perfect - they do not destroy plywood
Self-tapping screws (16 mm) are suitable as fasteners. We install a temperature sensor (for example, TG-K 330), necessary for monitoring the temperature regime, next to it are two more devices - for adjusting the speed and temperature.

Connecting the parts of the fan heater to each other, do not forget about the safety of the device: the connection points of wires and cables must be insulated
As a thermal regulator, Pulsar 3.6 is suitable. After installing all the necessary devices and parts, we connect them according to the scheme.

Instrument control circuits can be found in the specialized literature, instructions for devices such as an electric fan, or on highly targeted sites.
For ease of use, we fasten the wheels to the plywood base.

Small rollers screwed on the bottom make the homemade fan heater more convenient for moving around the room, especially if it is heavy
That's it - homemade heat gun ready.

Try to place the parts of the device in such a way that, if necessary, it is easy to disassemble each of them and replace the failed elements
Like any home-made fan heater, this device has disadvantages. For example, when the device stops, the voltage on the heating element remains, and this is quite dangerous, since overheating occurs and an emergency situation is possible. The situation can be corrected by installing a relay for timely disconnection of the power supply to the temperature controller. Another disadvantage is the inadequate heating of the room, but this is a drawback of almost all stationary fan heaters.
Power supply heater

The heater from the computer power supply unit is no different from it, since the main elements - the fan and the heating element - are located inside the case
Necessary details and materials:
- old computer PSU;
- 12V power supply (up to 300 mA);
- thermal fuse;
- heat shrink;
- fasteners and wires;
- soldering iron;
- 3 m nichrome wire;
- fiberglass sheet.
The case of the case will play the old PC power supply, so we get all the insides from it, except the cooler.

Everything except the cooler must be removed from the power supply. In order to disassemble the old PC power supply and assemble a fan heater from it, you need the usual tools for home use - wire cutters, a hacksaw, pliers and a screwdriver
From fiberglass we build a frame for the heater. We cut the material with a hacksaw, and then connect the individual elements with a soldering iron. We prepare the heater like this: on a prepared frame we wind the wire in the form of a spiral and fix its ends with screws. We connect the screws with a wire. The power cable of the heater is equipped with a thermal fuse, which will turn off the device when overheating.Overheating is considered the moment when the temperature overcomes the threshold of + 70 ° C.
To power the fan, insert a 12 V BP into the case. The power supply can be purchased or made independently. We connect the fan - when applying electric current, it starts to rotate. We collect the remaining elements according to the scheme and check the finished device for operability.

Something like this looks like a schematic diagram of a self-assembled fan heater. The power switch of the new device will play the role of the power connector
Do not forget to place a home-made fan heater on a safe fireproof stand or rubber mat to prevent fire in case of emergency.
Safety measures must be observed when operating any heating equipment, including oil heaters:https://aquatech.tomathouse.com/en/otoplenie/radiatory/kakoj-maslyanyj-obogrevatel-luchshe.html
You see, knowing what the device consists of and how it functions, you can quickly fix the breakdown or replace one of the elements with a more modified one. Small homemade appliances work for a long time without repair and have many uses. For example, the second model (from those proposed above) can be used in an electric fireplace as a heating element.
2 comments