The device of a warm water floor with your own hands: what will you encounter during installation?
Traditional radiators, for many years considered the only possible source of heat, are gradually giving way to systems of underfloor heating and ceilings. Many people experience innovative methods "on themselves" and are very satisfied. However, underfloor heating is hardly an innovation. They managed to prove themselves well and become a fairly common heating method. Such systems can run on electricity or use the energy of hot water. According to experts, the most effective and practical, it is considered a water heated floor with your own hands to assemble it is quite difficult, but if desired, it is quite realistic.
Content
Elements of such a heating system
The principle of operation of a water heating floor is quite simple. There are pipelines under the floor covering through which hot water circulates. She gives her heat to the floor, thereby heating the room. The system includes such elements:
- water heating boiler;
- a pump for pumping water, if it is not in the heater;
- ball valves located at the inlet of the boiler;
- pipes for wiring and for laying on the entire surface of the floor;
- a collector together with a system for regulating and adjusting the work of a warm floor
- fittings for connecting the collector to the pipeline and laying the main route.
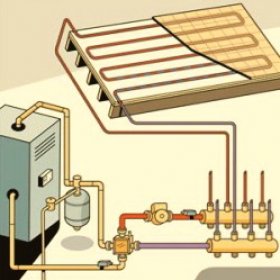
Here's what it looks like:

The design of a water floor heating device is quite simple. It necessarily includes a heating boiler, a collector, a circulation pump and a pipeline filled with coolant
Unit # 1 - water boiler
The boiler selected for installation must have sufficient power in order to cope with the heating of the coolant at peak times of operation of the circuits. In addition, it should have a small power reserve. Tentatively, this value should be the total capacity of all served underfloor heating, increased by 15-20%. In addition, a circulation pump is needed. Most often, it is already included in the package of most boiler models. An additional device may be needed only if the area of the heated room is more than 120-150 sq. m. In case of prevention or repair of the boiler without draining the water from the entire system, shut-off valves are installed at the outlet and inlet of the heater.
Unit # 2 - Collector
The collector is a device responsible for the distribution of hot water in the heating circuits, as well as the setting and adjustment of underfloor heating. The device must have enough leads to connect all circuits to them. The simplest models are equipped with shut-off valves only.They are extremely cheap, but do not even provide the minimum ability to configure the system. Devices with control valves allow for the correction of water flow for each circuit, which allows you to adjust the warm floor for the most uniform heating of the premises.
Without fail, the collector of any model is equipped with a drain outlet and a special air vent valve. The most convenient to use are devices with servomotors on valves, equipped with preliminary mixers that mix the heated water supplied to the system with the returning cooled down and thereby regulate its temperature. Such a device fully automates the functioning of a warm floor, but its cost is very high.

Manifold with servomotors on valves and a pre-mixer. Necessary system adjustments are made automatically
Unit # 3 - pipes for the system
Most often, pipes are used for laying an underfloor heating floor:
- Polypropylene The preferred option is fiberglass reinforcement, which reduces the rate of linear expansion during heating.
- Made of crosslinked polyethylene.
- Metal-plastic.
Regardless of the material, the parts should be marked “for heating”, withstand pressure 10 bar and temperature up to 95 ° C. The diameter of the pipes is 16-20 mm.
How can water floors be laid?
Warm water floors can be laid in different ways - flooring and using concrete. Let's look at each of them in more detail.
Concreting. Pipes through which the coolant circulates are laid as necessary on the prepared base and poured with a concrete screed. The main disadvantages: labor-intensive "wet" work, the large weight of the system and the complexity of its dismantling.
The way way. It involves laying pipes in a specially assembled flooring. It can consist of plastic modules or wooden blocks with grooves prepared for them in the installation of pipes. On sale you can find wooden mounting modules. The main disadvantage is that the system warms up longer than concrete.
What needs to be done before installation?
The competent device of a warm water floor requires carefully conducted preparatory work. In their course, all the little things should be taken into account, on which the effective functioning of the structure will subsequently depend:
- The project of the future system is best entrusted to specialists, since it is quite difficult to make independent calculations. It will be necessary to determine the length of the pipe, the step of its installation and the power of the heating circuit, if there are several, then for each separately. This takes into account many nuances and parameters. There are special calculation programs that many use. However, you need to understand that a flaw in the calculations will lead to a decrease in efficiency or simply the impossibility of the entire system functioning.
- Equipment for underfloor heating should be of high quality, manufactured and purchased in a reliable company that gives good guarantees. It will be cheaper to pay for high-quality goods than subsequently to constantly lay out decent amounts for expensive and time-consuming repairs.
- To minimize the heat load on the screed and prevent its cracking, the system should be divided into sections of no more than 40 square meters. m
- The underfloor heating needs to be carefully prepared. It must be clean and level, differences of more than 5 mm are not allowed.
- To prevent heat loss to the prepared base, a heat-insulating layer is necessarily spread, with a height of 3 to 15 cm, depending on the values of the working temperature of the coolant. It can be special heat-insulating materials or mats designed for a warm water floor. The latter can be equipped with pipe mounts, the so-called bosses, which is very convenient.
A damper tape is laid out around the perimeter of the room and between the mounting sections, which can compensate for the temperature fluctuations of the screed.

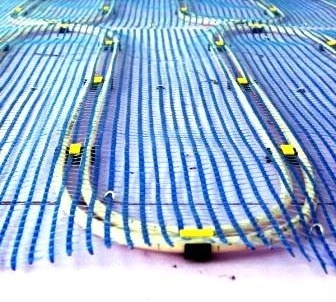
Mats with bosses intended for a water heat-insulated floor are very convenient. They not only perform the function of a heat insulator, but also fix the pipes in place
When drawing up a laying scheme, a large number of pipe joints should be avoided, which carry the potential danger of leaks under the floor. It is best to equip the safest option, where connections are present only at the outlet and input of the collector. In this case, the length of the whole pipe should not be more than 90 m, otherwise the temperature of the circulating coolant may fall.
Laying the underfloor heating water floor
Work begins with determining the installation location of the collector, which is most often "hidden" in a special cabinet. It is usually mounted on a wall. The device should be placed so that the length of the pipes from each of the heated rooms is approximately the same. You can bring the collector closer to the largest contours. The main thing is that it should be installed above the level of the warm floor, without taking the pipes up, otherwise there may be problems in the air exhaust system.
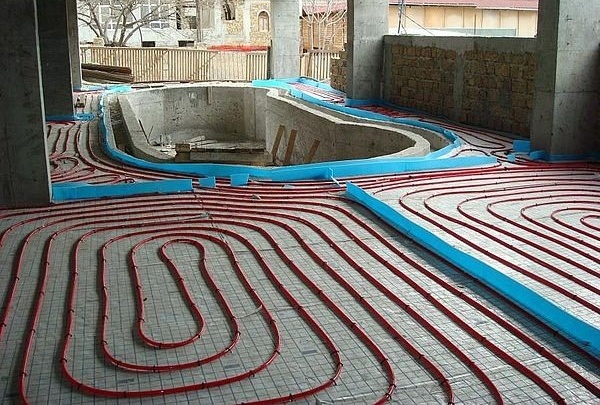
The next stage is the marking of the prepared base, taking into account the division into sectors with an area of 40 square meters. m. Then the heat-insulating layer and the damper tape are laid. Next, a reinforcing mesh is laid, on which pipes will subsequently be attached. If special mats are chosen as thermal insulation, no mesh is needed. You can start laying out the pipeline. It can be carried out in different ways: a snake, a spiral, loops, etc. The laying step varies from 10 to 40 cm, and the distance from the wall to the nearest pipe cannot be less than 8 cm.
Pipes are fixed to the reinforcing mesh using plastic clamps. It is important not to squeeze the part, it should be in a free loop, as it were, otherwise the pipe will expand under the influence of heat and may become deformed in the area of tight pressing. Fixing clamps are installed in increments of 1 m. It is necessary to work with the pipe very carefully. Most often, it comes in the form of a bay. Pulling it from there in turns is unacceptable. It should be gradually, as it is laid, unwind the pipe, placing and fixing the element on the floor.

There are several options for laying pipes for underfloor heating. The most common: spiral, snake, loop, double snail
Turns of a part are carried out very carefully with observance of requirements to the minimum radius of a bend. Usually it is about five pipe diameters. If you squeeze the product, a whitish area-hall is formed. It indicates a sharp stretching of the fragment and the loss of its strength characteristics, which leads to an increased risk of pipe rupture. It is not recommended to install a part with such a defect in the underfloor heating system. It is necessary to replace the damaged fragment, which leads to the appearance of extra joints in the pipeline, and this is also undesirable.
The laid pipes must be connected to the collector. To do this, use special crimp fittings or Euro cone systems. The beginning of the pipe of each heating circuit is connected to the supply output by the collector, so the number of outputs and circuits must match. The end of the pipeline is connected to the return manifold. If the pipe is laid near the expansion joint, a corrugated pipe must be put on it.
At the end of the installation, a system check is mandatory. To do this, water is poured into the pipeline, a pressure of 5-6 bar is supplied during the day. After that, a thorough inspection is carried out to identify possible extensions on pipes or leaks. More details on the video:
If the control run was successful, begin to fill the screed. It should be carried out only with pipes filled with water with a working pressure in them.After pouring, the screed will completely dry out no earlier than after 28 days. After this time, you can begin work on installing flooring.

Before starting to fill the screed, the pipes are attached to the reinforcing mesh using special plastic clamps that prevent the elements from moving
There are some nuances regarding the formation of screed over water heated floors. They depend on the type of flooring that will be laid on top of it. If you plan to install the tile, the screed should be 3-5 cm high or the distribution of pipes should have gaps of the order of 10-15 cm. Otherwise, according to the principle of heat distribution, there is a danger of the appearance of a “thermal zebra”, which can be clearly felt by the foot. But under a laminate or linoleum it is better to lay a thinner screed. In this case, to reinforce the structure, another reinforcing mesh is laid on top of the warm floor, which also reduces the thermal path to the surface of the coating.
There are many recommendations on how to make warm water floors yourself. However, you need to clearly understand that this is a complex and responsible event. A pipeline laid in a screed can hardly be repaired and if installation or design errors are detected at this stage, it will be extremely difficult to fix them. That is why work should be approached very responsibly, then the new heated floor will only please with its long and efficient functioning.
9 comments