What to do when the toilet bowl flows: an overview of possible causes and repair
Even a small leak in the bathroom is an occasion to carefully check all pipes, connections and containers that could leak. A certain part of the trouble is associated with the drain tank. This is understandable: fittings, bolts and gaskets wear out, sanitary ware can leak, and connecting fasteners have a habit of loosening. That is why, before repairing, first you need to find out why the toilet bowl leaks, and then take measures.
Content
Overflow: 2 causes of failure and their elimination
If water begins to flow through the overflow, the next bill for utility bills will increase sharply, so you need to urgently find the cause of the leak and take measures to get rid of it. Most likely, the problem is a malfunction of the valve or valve, so there are two options for solving the problem: buying new equipment or repairing the old one yourself. What can you do on your own if the toilet bowl is leaking and there is no way to buy new parts?

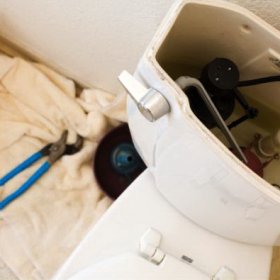
Tanks for the toilet have a different design. The most popular ones differ in the way the drain device is installed - with the side lever (on the diagram) or with the top button
To begin, we suggest that you read the article: The design of the toilet flush tank: how does the flush design work and what does it consist of?
Option # 1 - Float Repair / Replacement
Perhaps the lever of the float is a little stray, shifted to the side or bent. It is enough to remove the tank cap and fix the problem in literally one motion. The normal position of the float is just below the inlet of the pipe through which water enters. Sometimes the liquid gets inside the float and it stops functioning properly. It should be removed from the tank, released water, dried, glue the hole with glue (for example, epoxy) and put back into place.

To replace the float, it is necessary to choose a domestic analog with a side connection, but difficulties can arise, since in stores they sell mainly modern designs in the kit
The best solution is to simply buy a new valve and install it instead of the old one, because the old, worn-out instance will not function fully. Replacement occurs in the following sequence:
- remove all fluid from the tank;
- disconnect the part connecting the valve to the inlet pipe;
- remove the float lever;
- having unscrewed the nuts, remove the old valve and install a new one in its place (if necessary, replace the fasteners as well);
- return the float lever to its place;
- fill the tank with water;
adjust the lever in height.

Italian-made chrome-plated valve withstands water pressure drops and is able to function for over 20 years without repair.
Topic article: How to adjust the toilet float and change it if necessary
Option # 2 - Siphon Membrane Replacement
A membrane is a small rubber part that prevents the flow of water from the tank into the toilet. To correct the cause of the leak, that is, to replace the worn out element with a new one, it is necessary to select an analog in the store that is fully consistent in size and material. Otherwise, the replacement will be useless, water will still leak.
To change the membrane, you need to drain the water and fix the float beam so that the valve closes the hole and water does not enter the tank. To do this, instead of the lid on the sides, you can put a small block, and tie the rocker to it. Then the siphon should be disconnected, loosening the nuts and the coupling, and replace the membrane with a new one. Then it is necessary to install everything in the reverse order. At the end of any replacement is a control drain.
How to eliminate a leak under the tank?
Sometimes the toilet flush tank flows in its lower part, so you can immediately not notice a puddle on the floor. The problem is usually created by the cuff, which is a connecting and softening element between the tank and the shelf of the toilet bowl on which it is mounted. It is worth the cuff to move or wear out, as there is a gap or hole through which water flows out with every flush.
There is an opportunity to rectify the situation by tightening the clamps. This option is especially relevant if the gasket is not rubber, but plastic or metal - in this case it is necessarily equipped with special tightenings. When tightening the bolts, be careful - the constriction can also negatively affect the position of the cuff. Corrugated or rubber gaskets can be additionally treated with sealant and pressed tightly, but only if they are strong enough and able to last a few more years. Otherwise, they should be replaced with new ones that are suitable in size.
The second reason for a leak under the tank is wear or loosening of the fasteners. This violation becomes noticeable immediately - the water flows almost constantly, and not only during the discharge, as in the previous case. The fixing elements are two long bolts with nuts and gaskets. With the help of them, the tank is securely attached to the toilet shelf.

The bolts securing the tank on the toilet shelf are easy to detect. If you remove the cover, they will be visible at the bottom, on both sides of the float structure
If rubber pads are stretched or collapsed, they can be easily replaced by simply unscrewing the bolts. But sometimes a more serious problem arises: the bolts are corroded by rust and they eventually become unusable, starting to let water through. The only way out is to completely replace the mounting kit.

The cost of bolts for the drain tank is different. There is no fundamental difference between them
To change the bolts, you should drain all the water, block the inlet hose and remove the old fasteners and all the debris left from it. Then install new bolts, having previously strung rubber funnel-shaped gaskets on them, placing them with the narrow part to the hole. Additionally, you do not need to seal, it is better to stock up with another pair of gaskets.
Replacing individual parts is a simple matter, but what to do when a toilet bowl leaks due to a crack appearing from an impact in it or in a shelf? Sanitary ware or sanitary porcelain is relatively fragile and often does not withstand pressure or strong shock. The optimal solution, unfortunately, is only to buy a new product.
Performing flexible wiring repairs
The hose itself connecting the tank to the water pipe is quite strong and durable. The critical point is the connection between the hose and the float structure. The first sign of leakage is a thin stream of water from the point where the flexible eyeliner is attached down. Two options for leakage should be considered:
- weak connection of fasteners;
- the appearance of cracks in the plastic valve.
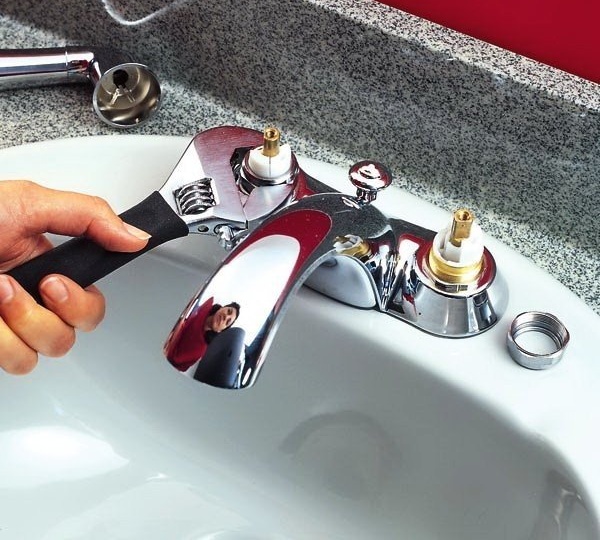
Disadvantages of the connection are easily corrected by tightening the nut or changing the gasket - the part that has lost its elasticity and elasticity loses its tightness. If the parts are made of plastic, it is better to carry out the manipulations with your hands, without using a metal tool, otherwise they may be damaged or the thread is broken.

In addition to the junction of the flexible eyeliner with the float design, it is necessary to check the remaining joints that can leak, for example, the connection of the hose and water pipe
Cracked valve cannot be repaired. The best option, fast and inexpensive, is to take it off for a sample and buy an identical one at a plumbing store. Before removing the valve, shut off the pipe with water, remove the lid of the tank and carefully remove the eyeliner. Having installed a new valve, carry out all the steps in the reverse order.
As can be seen from the article, the main repair of the toilet tank is to replace individual parts: fittings, fixtures, pipes. The cost of parts is not so high, so it’s much easier to buy a new spare part than to fix an old one. The main thing is to be able to understand the design and know what the individual parts are for.

4 comments