How to fix the toilet flush tank: eliminating the most common breakdowns

When installing sanitary ware in a new house or a recently purchased apartment, you need to worry in advance about the correct installation of the toilet, the tight connection of hoses and pipes, the health of gaskets and fasteners. Old plumbing also occasionally requires a routine inspection. Due to the poor quality of the water, the fittings quickly wear out and fail, and then urgent repair of the drain tank is required. Procrastination is worth flooding the home, including the neighbors below.
Content
What the drain tank consists of
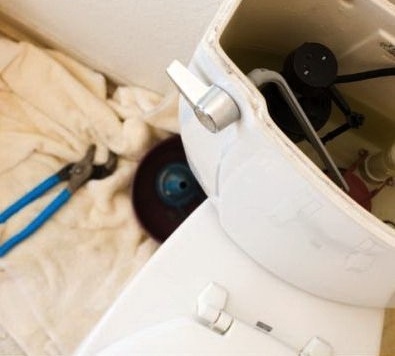
At first glance - the simplest device: a tank equipped with a drain and water supply system. When the button is pressed, the mechanism releases water, the supply valve opens, the emptied container is refilled.

The main functional parts of the tank: 1 (1) - inlet (filling) fittings; 1 (2) - drain (drain) mechanism; 1 (3) - water drain button. All details are interconnected.
Video: how to remove the toilet lid
DIY drain tank repair
It turns out that even such an elementary device can break down. Let us consider in more detail how to eliminate malfunctions without resorting to the help of plumbers.
Float mechanism troubleshooting
If water is constantly drawn into the tank and immediately flows into the toilet, look for a problem in the float mechanism. There may be several reasons for the breakdown:
- intake valve wear;
- skew lever ("rocker");
- malfunction buoy.
The float (buoy) from long operation gives cracks through which water enters into it. It drowns and ceases to fulfill its main function - it just needs to be replaced.
If the lever is bent, it is necessary to return it to the correct, horizontal position. The lever is located about 2 cm below the hole through which water enters.

Modern sets of drain valves have a different structure - they do not include a traditional float on the beam, although the principle of the mechanism has been preserved
The float mechanisms installed in the tanks of modern toilets can be divided into piston and membrane. The former have a simple construction in which a piston with a sealing collar is pressed against the valve seat and thus shuts off the water supply. The second ones are a relatively newer development - they can be found in the overwhelming majority of modern drain tanks.Instead of a piston with a gasket, a membrane made of wear-resistant silicone or latex is installed in them, due to which it is possible to significantly reduce the noise level during water collection.

The diaphragm valve of the drain tank, although it has a more complex design, has gained wide popularity due to its high reliability and quiet operation.
It is easy to guess that the breakdown of the locking mechanism is most often associated with the wear of the gasket in the first case and the membrane in the second. In addition, malfunctions of float valves can be associated with malfunctions of other parts of the mechanism:
- control lever axis;
- saddles;
- persistent cap.
Although the presence of any type of inlet valves in the distribution network allows you to replace the entire assembly, you should not rush into this. A zealous owner will certainly disassemble the mechanism and, after identifying the cause of the leak, eliminate the breakdown with the help of improvised means. So, the sealing gasket can be cut out of a piece of genuine leather or thick rubber, the axis can be replaced with a piece of thicker wire or nail, and the stop cap can be cut out of a suitable sealing material.
How to get rid of noise when filling the tank
The loud noise that accompanies the process of filling the tank with water creates discomfort for others. It’s easy to get rid of it by adjusting the diameter of the inlet or by adding a small plastic tube to the fittings. Water will cease freely, pour into the tank with noise, and will flow through the tube, respectively, the loud sound will disappear. To do this, we put a tube 30-35 cm long with one end on the hole, the second placed below the water level with the tank drained. Even if the noise does not completely disappear, the plumbing will become quieter.

A plastic or rubber tube put on the inlet opening dampens the noise coming into the water tank. This device is relevant for tanks with top eyeliner
Leak bolt replacement
Here, most likely, the steel bolts that are the fastening of the tank to the toilet shelf rotted - they urgently need to be replaced. Having bought a new set of bolts, we proceed to dismantle the tank:
- we block the water by turning the valve perpendicularly;
- we dry everything inside and remove the remnants of rusty fasteners;
- unscrew the nut and disconnect the inlet valve;
- we unscrew the old bolts securing the tank on the toilet shelf;
- remove the tank with a rubber tight cuff;
- take out the old bolts. It is necessary to remove both, even if only one of them is faulty;
- we clean the joints of the bolts with the tank and the tank with the toilet;
- we twist new bolts;
- set the tank on a shelf, after securing the cuff;
- tighten the fasteners carefully so as not to damage the sanitary ware;
- let water in and check if it leaks at the bottom of the tank; we release water a couple of times and check again.
Sometimes a leak may appear a little later, so for two days it is sometimes worthwhile to carefully look at the problem place. As you can see, it is not always necessary to carry out major repairs - sometimes it is enough to replace the fasteners.

A special tool is not needed to unscrew the bolts connecting the drain tank to the toilet shelf: usually, “ears” are provided for convenient grip

Fasteners for the toilet bowl are supplied at every plumbing store.
Expert OpinionThanks to versatile hobbies, I write on various topics, but my favorite ones are engineering, technology and construction.If the toilet has been used for a long time, then, most likely, the bolts connecting the tank and toilet bowl have rusted so much that they cannot be unscrewed even using the universal penetrating lubricant WD-40. In this case, only the grinder will help, with which it is necessary to carefully cut the bolts from the bottom of the shelf. Best of all, if at the same time someone from home will hold the tank - so it is guaranteed to remain intact.Looking for fasteners for replacement, choose hardware from brass. This alloy perfectly resists corrosion, so if there is still a need for disassembly, you can do it without difficulty.
What to do when water is constantly flowing
There can be no question of any water saving if it constantly flows with a thin stream into the toilet, preventing the necessary volume from being accumulated in the tank.
Most likely, the case is in the siphon membrane, which has worn out and has lost the ability to seal the opening hermetically. The problem is solved by simply replacing the membrane with a new one.
To do this, you must perform several actions:
- drain the water;
- remove the siphon;
- remove the old membrane, install a new one;
- put the siphon in place, attach it to the lever, tighten the fixing nut.
Sometimes it’s not the membrane, but the breakdown of the thrust, which can also be easily replaced.

The siphon membrane is located at the bottom of the drain valve. It is a rubber gasket providing a tight connection of parts
Expert OpinionThanks to versatile hobbies, I write on various topics, but my favorite ones are engineering, technology and construction.The constant flow of water from the tank into the toilet bowl is often not associated with any malfunction. The same thing happens when, for some reason, the overflow regulation is violated. If the drain pipe is set correctly, then the water level in the tank will be 20 mm below the plane of its cut. At the same time, the edge of the drainage channel should be more than 10 mm from the inlet of the flexible connection.
What to do if the drain tank does not fill
So, suddenly, the water completely stopped flowing into the tank. Will self-repair be enough, or will you have to turn to plumbers? Consider three ways to solve this problem.
First, check the serviceability of the inlet hose. We block the water, disconnect the hose from the tank and place it over any container (you can also above the tank). Turn off the valve a little, let the water run again. If everything is OK with the hose, water will flow freely into the container. Otherwise, you will have to replace it.
It is possible that the connection point of the inlet hose is clogged, because after repairing the pipeline sand and other mechanical impurities that can clog small holes get into the water. You can try to clean it with an elongated sharp object, such as a screwdriver.
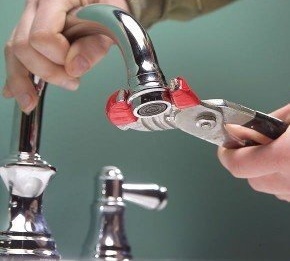
In addition, you should make sure that the coarse filter is clean if a modern shut-off valve with a diaphragm valve is installed in the tank. To do this, disconnect the flexible eyeliner and use a pair of pliers with thin sponges to remove the filter from the inlet pipe. To clean it of dirt, it is enough to place the part under a strong stream of water. If the filter is clogged with persistent deposits, then it should be placed for several hours in vinegar or a solution of citric acid, and then brushed with a brush.

It is better to buy a product with a shut-off valve - in case of leakage of the drain tank, it is much easier to shut off the water
If a float mechanism malfunction occurred due to wear of the intake valve, it will be advisable to replace the assembly. As practice shows, units manage to repair the locking mechanism - most likely, you are not among them.
Valve Replacement
If you don’t want to tinker with small parts of damaged fittings, you can simply remove the old one and replace it with a new mechanism purchased in the store.

When removing old fittings, pay attention to malfunctions. Perhaps a complete replacement of the mechanism is not required, sometimes it is enough to change one small part

Armature kits for drain tanks have structural differences. For example, their structure is different depending on the type of eyeliner - side or bottom
To begin with, we’ll figure out how to better disassemble a structure using reinforcement with a bottom connection as an example:
- we block water;
- gently unscrew the button;
- remove the cover;
- disconnect the eyeliner;
- remove the drain column in parts: first, dismantle the upper part (turning 90 degrees);
- unscrew the fastener of the drain tank;
- put it on the toilet for further work;
- we unscrew the two nuts: valve and column fasteners, we get the second part of the valve;
- install a new mechanism and carry out reverse work on installing the tank.
As you can see, changing the components of the tank is not difficult: the whole operation takes no more than 10-15 minutes. Another advantage of independent work is that a special tool is not required, all actions are carried out with the help of hands, pliers and keys.
11 comments