DIY faucet repair - examples of some frequent breakdowns and their repair
It so happened that our men, and sometimes women, are used to cope with minor home repairs on their own. We glue wallpaper, repair floors, install plumbing, and even lay tiles. And such a trifle as repairing a mixer with your own hands is affordable for almost everyone. If 10 years ago in all the houses and apartments of our immense homeland there were faucets of the same design, then their current diversity can confuse even an experienced home craftsman. Let's look at what faucets today are presented on the shelves of our stores and what to do if you suddenly flowed where it should not.
Content
Ball valve - the most popular option
The most common mixer design today is the ball valve. It is a mechanism with one rotary handle. When the handle moves up and down, the pressure of the water is regulated, to the right and left is its temperature. The popularity of such a device is explained not only by the simplicity and convenience of its operation, but also by increased reliability.
Single lever mixer
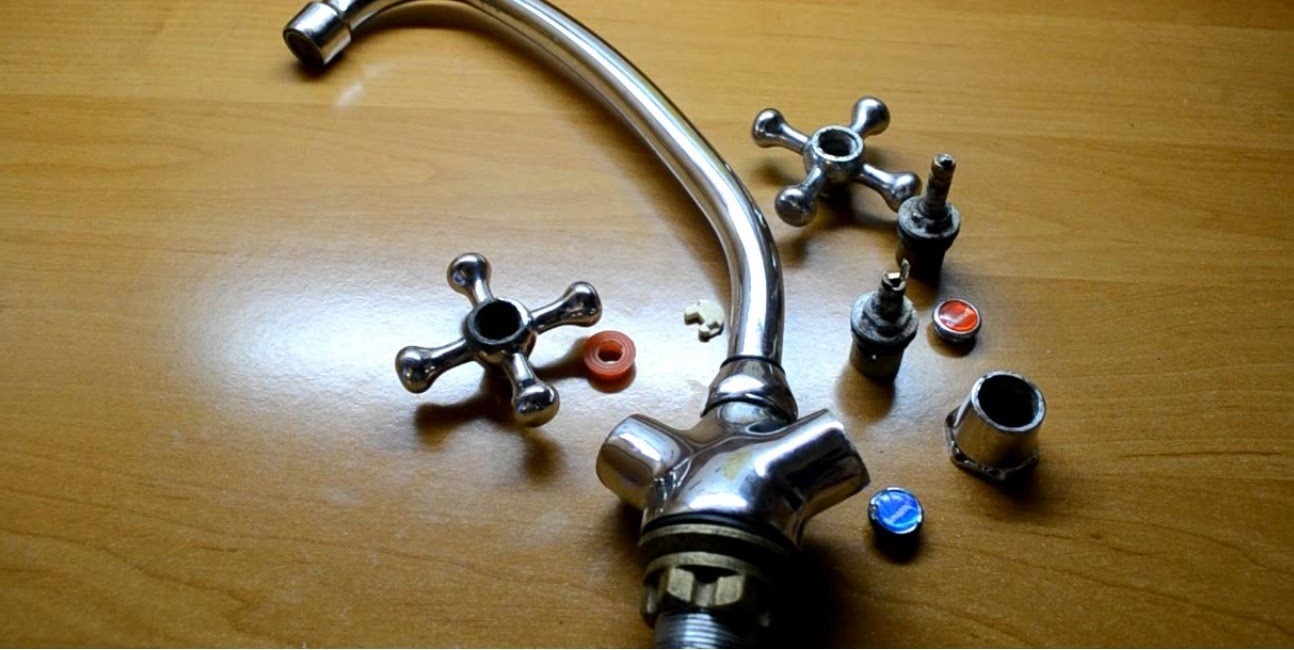
In order to answer the question “how to repair a ball mixer”, you need to understand how the system works. This is how the ball valve looks in section.

The scheme of a single lever mixer in the context, where: 1.Decorative cap with the designation of hot and cold water; 2.screw; 3.Stock adjustment; 4. Hollow ball for mixing water; 5. The saddle is rubber; 6. Adjustment ring; 7. Steam cuff; 8. Adjusting cuff; 9. Issue of cold and hot water; 10. Mixed release; 11. The sleeve is spherical; 12.Aerator
The main difficulty in repairing such a mixer is that most of its parts are part of a non-separable cartridge. This means that you cannot replace them individually - you will have to change the cartridge completely.
In our next article, you will learn how to replace the cartridge in the mixer yourself:https://aquatech.tomathouse.com/en/santehnika/kran/kak-zamenit-kartridzh-v-smesitele.html.
Causes of malfunctions and solutions
There may be several causes of trouble:
Body crack
Before you fix the mixer, you need to carefully examine the body of the product, if you find a crack or chip, you can try to eliminate it with sealant. However, this temporary and cracked mixer will still have to be changed.
Gasket wear
If the case is intact, you will have to remove the mixer.To do this, you need to make a number of preliminary measures:
- We block the valves on the pipes of hot and cold water;
- We open the tap and lower the water;
- We turn off the inlets from the mixer and carefully drain the water into a previously prepared container;
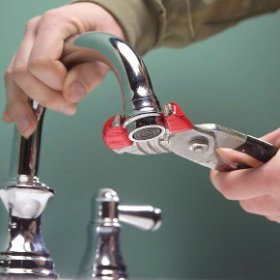
Now you can start dismantling. It is enough just to unscrew the fixing nut. In most models of kitchen faucets, it is located under the sink. Carefully inspect the gasket. If it is out of shape or cracked, a replacement is required. A new gasket costs mere pennies, and you can buy it at any hardware store.
Note! It is important to choose the correct diameter for the gasket. It should go into the groove with some effort.
Cartridge clogging
If the replacement of the gasket did not help, then the case is in the cartridge. Quite often, a mixer of this design “leaks” due to small debris entering its mechanism. In this case, the repair of a single lever mixer with your own hands consists in the complete replacement of the cartridge.

To replace the cartridge, you need to remove the knob
This is done according to the following algorithm:
- We overlap and drain the water;
- We dismantle the mixer;
- Pry off the decorative plug with a knife or screwdriver and remove it;
- We unscrew the screw;
- Remove the lever;
- We take out the cartridge and install a new one in its place;
- We make assembly.
That's all. Now your mixer will definitely work like new.
Aerator blockage
When the water in the bathroom flows in a thin stream, and in the kitchen it beats a powerful stream, there is no need to talk about the fault of the water utility. So, how to fix a faucet in the bathroomif water pressure drops? The most common and easily eliminated cause of this problem is an aerator blockage.

If the aerator is rusty or heavily overgrown, it is better to replace it.
Check if this is your case is very simple. Unscrew the aerator and open the tap. If the water pressure returned to normal, the culprit was found. It is better to replace a very rusty aerator, but if it is just clogged, it is enough to rinse it, I direct a stream of water to its outer surface. Now we install the part in place and everything is ready.
Clogged water pipe or hose
If simple manipulations with the aerator did not take effect, the pipe or hose is most likely clogged. Quite often, in houses with old metal pipes, rust falling from their inner surface overlaps the cross section, which leads to a drop in pressure in the mixer. The pipe cleaning will help to cope with the problem, but it is better to replace them with plastic ones. The inner surface of modern pipes made of polymers is very smooth and not subject to corrosion, which means that it does not “overgrow”.
If there is no possibility to replace the pipeline yet, arm yourself with a thin “snake” cable, disconnect the pipe from both sides and start cleaning.
Trouble with shower bath switch
Now we turn to the answer to the question of how to repair the faucet in the bathroom if the water supply to the shower stops by itself. The switch lever spontaneously lowers, and water flows only through the tap.
The cause of this malfunction may be the wear of the valve spacers. If only the top gasket is damaged, you do not have to remove the mixer. Since it is impossible to determine this “by eye”, for a start it is worth replacing it, and only then draw conclusions:
- Unscrew the union nut of the hose and remove it;
- With a thin hook or awl we pry the gasket;
- Wet a new gasket with water and install in place;
- We assemble the mixer.
If the failure could not be fixed in this way, you will have to change the lower gasket:
-
- We block the water;
- Remove the flexible hose by unscrewing the union nut;
- Remove the spout and adapter;
- Remove the switch and remove the eccentric;
- We take out the spool;
With a thin screwdriver or hook, remove the lower gasket (the upper one has already been replaced);

If the upper spool gasket has already been replaced, you do not need to do this again
- We put on a new gasket, moisten it with water and put the spool back;
- We assemble the mixer.
Note! Spool spacers are generally not sold separately from the mixer. If the spare rings that came with the mixer are not preserved, they can be made with your own hands from hard rubber 3-4 mm thick.
And about the types of divertors, the principle of their work, as well as how to independently disassemble and assemble the mechanism, read in our material:https://aquatech.tomathouse.com/en/santehnika/kran/kak-razobrat-divertor-smesitelya.html.
Two-valve version of the mixer
Despite the emergence of many new technologies, the traditional dual-valve models did not completely give way.

The design of a two-valve mixer is quite simple, everyone can figure it out
If this equipment is installed in your home, it will not be superfluous to know how to repair a mixer of this design.
Dual valve mixer design
Modern two-valve mixers can fundamentally differ in design. As a rule, the cheapest models are equipped with a worm gear, and the more expensive crane-axle with ceramic discs. The second is more reliable, which means we will pay more attention to the first in this article.
Worm gear repair
So what to do if a worm gear mixer is dripping. Most often, the cause of this trouble is a failed gasket that closes the inlet. Need to replace her. You can buy a new rubber ring in a store or make it yourself from thick rubber. Now we disassemble the mixer and make a replacement.
You need to act according to the following algorithm:
-
- Turning counterclockwise, unscrew the valve body;
- Remove the gasket and install a new one;
- We wrap fum under the stop edge;
We assemble the mixer.

It looks like ceramic (left) and rubber (right) gaskets
Now the mixer should work fine. However, it happens that repairing a kitchen faucet with your own hands is effective for only a few days. And then the stream appears again. The cause of such rapid wear and tear may be the roughness of the seat - the gasket stop. Need to polish it. Sometimes this process is also called a “cutter”, by the name of a special cutter, which must be inserted in place of the worm gear and scrolled with a drill. When the surface of the "saddle" becomes smooth, you can install a new gasket and no longer worry about its service life.
Elimination of a leak in the crane box
The axle box can also be installed in a conventional mixer in place of the worm gear, technologically there are no obstacles to this. The first few years after installation, you can not even look in the direction of the crane - it will not leak.
The design of the ceramic crane is as follows: two discs pressed against each other have through holes. When the faucet is open, the holes match, when it is closed, no. Just like all ingenious.
If, after some time, such a valve still drips, just tighten the lock nut on the body and the problem will be solved.
You will learn about other failures of cranes and their elimination in our next article:https://aquatech.tomathouse.com/en/santehnika/kran/chto-delat-kogda-techet-kran.html.
4 comments