How to assemble a drain (and drain-overflow) system when installing a sink
The assembly and installation of the sink is carried out in accordance with the manufacturer's instructions, which indicates the list of necessary tools for installation work, as well as the connection diagram of the device to the sewage system. Following this guide, you can assemble and install a sink drain on their own, without causing plumbing. The drain hole in the sink must necessarily be blocked by a special metal grill protecting the sewer pipe from ingress of food waste when processing raw materials and washing dishes. To collect garbage penetrating through the grate, a plastic siphon is provided in the drainage system, which can be easily removed after filling for cleaning. In addition, a siphon filled with water prevents the entry of unpleasant odors from the sewer pipe into the kitchen or bathroom. To prevent overflow of the sink, manufacturers suggest installing sink drain with overflow. An additional corrugated or rigid plastic tube connects the hole in the upper part of the sink to the drainage system in the area preceding the siphon.
This video shows side sinks that are used in small rooms. To save space, washing machines are located under them. Installation of the drain system in this case is best entrusted to a professional plumber.
What is the construction of a classic drain?
This is how the design of a kitchen sink drain does not come with a overflow system.

Serial connection of all components will ensure normal drain operation
Legend:
1. Protective grille.
2. Rubber gasket.
3. Outlet pipe.
4. Connecting screw.
5. The base of the drain-release.
6. Bottle type siphon body.
7. Coupling nut.
8. Cone gasket.
9. Standard sewer tap.
10. Nut.
13. Siphon cover.
14. Rubber gasket.
Additionally: the symbols 1c, 3b, 12a, 12b indicate gaskets, 1a - a plastic plug for a drain hole.
This sink drain system is installed in the following order:
- first perform a connection with the sink;
- then carry out the assembly of the main part of the siphon;
- the last to connect the structure to the sewer.
A protective grill, equipped with 5-6 divisions, is installed on the drain hole of the sink, not forgetting to lay a gasket between them. Then, a rubber gasket, the thickness of which is 3-5 mm, is attached to the side of the branch pipe. The bevel is chamfered at the other end of the pipe, which ensures its free plant into a siphon. Firmly pressing the upper part of the nozzle to the sink, insert the connecting screw, 6-8 mm in diameter, into the protective grill and begin to screw it with a flat screwdriver into the nut of the nozzle, which is tightly inserted into a special recess. At this stage, the connection of the drain with the sink can be considered complete.
The assembly of the main part of the siphon begins with the fact that a plastic coupling nut is put on the branch pipe, and then a conical gasket. Next, a nozzle is inserted into the upper part of the siphon body, pushing it to the desired height. Then lower the nut and tighten it by hand without the use of tools. A large flat gasket made of rubber is placed in the siphon cover and screwed to the housing.
Important! The glass (lid) of the siphon is often clogged with food waste, so it is periodically removed and washed. For this reason, it is not recommended to use silicone sealant to cover the joint between the siphon body and its cover. To create a tight connection, you can use plumbing.

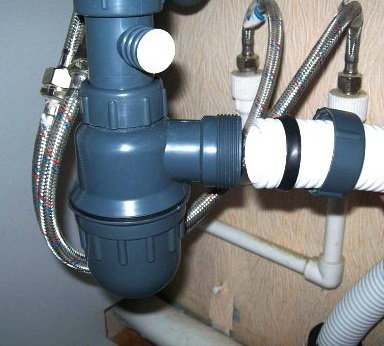
View of the complete drain system for the kitchen sink. This design uses a bottle type siphon (sump)
The last stage is connected with the connection of the sink drain system with the sewage system. To perform this operation, it is necessary to connect a standard sewer outlet, the diameter of which is usually equal to 50 mm, with a sewer pipe, using a nut and a conical gasket.
Important! If the outlet or sewer pipe has dimensions that do not meet the accepted standard, then a ready-made plastic adapter is used to connect them.
The socket of the sewer pipe must be equipped with a special rubber cuff, with the help of which the smell coming from the sewer will be suppressed. The inner diameter of the cuff should be less than the outer diameter of the outlet pipe. This will allow the cuff to tightly clasp the pipe and prevent the penetration of unpleasant odors into the room.
Features of the installation of overflow drain
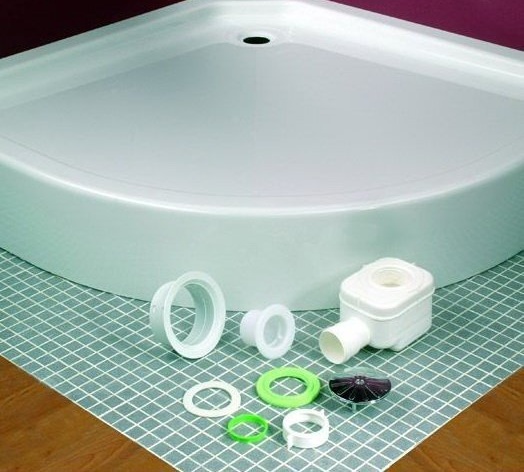
Of the tools you will need a Phillips and a large flat screwdriver, the latter can be replaced with a regular coin. An electric jigsaw is required if it is necessary to cut a seat of a suitable diameter in the countertop under the sink. In the manual attached by the manufacturer to the equipment manufactured, there is a list of all components and a scheme for their serial connection. To better understand the assembly order, you need to lay out all the details on the floor or on the table.

Assembly diagram of a drain with overflow, taken from the instructions of the manufacturer of the sink installed in a special seat cut in the countertop
After carefully studying the instructions, they begin to collect the drain. A thick rubber gasket is laid on the base of the drain-release, adjacent to the bottom of the sink. A thinner and softer gasket is placed under the bottom of the upper part of the outlet. Then, from the side of the sink itself, a metal part of the outlet is placed on the gasket in the drain hole. Connect both parts with a plastic hollow screw, which is screwed with a wide screwdriver or coin.
Important! Before tightening the screw, make sure that the overflow pipe fits exactly with the overflow hole provided in the sink.
Overflow assembly begins by adjusting the height of the tube, which depends on the depth of the installed sink. In this case, the black part of the tube, equipped with clamps, is connected to the white part in the selected height. The assembled overflow pipe is attached to the sink, not forgetting the rubber gasket located between the surfaces. Then, a nut and a cone-shaped gasket are put on the white part of the overflow pipe. The overflow pipe is connected to the outlet by hand tightening the nut. That's going to sink overflow for sink do it yourself.

The connection of the overflow pipe to the drain outlet is carried out with the help of a hand-tightened nut without the use of any tools, and a rubber gasket
Then it remains to collect a water seal, which is a sump, and corrugation. Insert a gasket into the groove and connect to the exhaust pipe, tightening the nut by hand. Corrugate is screwed in the same way.After that, the sink is installed in the seat provided in the countertop, and the corrugation is connected to the sewer. At the final stage, a blank plug is inserted into the drain hole.
Important! Corrugated pipes are best replaced with regular smooth-walled pipes, which are easier to clean in the event of clogging.
You can connect the sink to the sewer yourself. If for some reason you cannot do this, contact a professional. Skilled craftsmen do not even need to read the instructions, because they know how to assemble a sink for any type of kitchen sink.