How to assemble and install a sink siphon in the kitchen: step-by-step installation instructions
If you look under the sink in the kitchen, you can see a curved plastic tube through which dirty water flows into the sewer. This siphon is a single pipe with a bend or a system of several pipes, a mandatory plumbing design. The question arises: why do we need to install a siphon in the kitchen? Why not use a regular straight pipe to drain?
Purpose and standard siphon
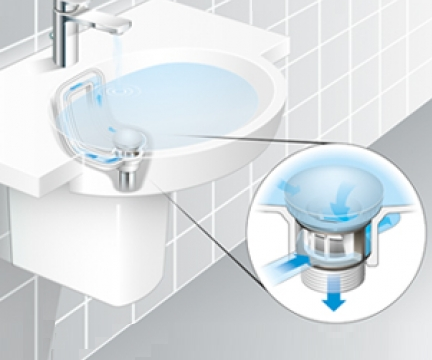
The main secret of the siphon is in its bend. Water does not completely leave the pipe, remaining in this curved section of the pipe. It turns out a kind of permanent settler. Thanks to the water lock, unpleasant odors from the sewer can not penetrate into the room - bathroom, kitchen, toilet. Thus, a slight bend in the pipe, an elementary design protects our apartments from sewer "aromas".
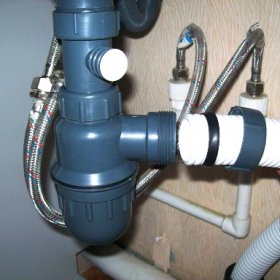
Almost all sinks and sinks are provided with siphons. Therefore, when installing a new sink in your kitchen, you need to provide for the installation of a siphon - a simple procedure that takes a minimum of time. The simplest device is designed for sinks with a single drain hole. This is a siphon with a compact body, the diameter of the nozzle of which is 32 mm. The product itself and the overflow channel look as one.

The simplest kind of sink siphon is a model with one drain hole; and plastic as the material of manufacture is the best option for the kitchen
To better understand how to assemble a sink siphon, consider the standard equipment:
- product body;
- plastic exhaust pipe;
- plastic cuffs;
- conical cuffs made of rubber (32 mm);
- plastic nuts (32 mm);
- rubber gaskets;
- rubber stopper;
- bottom plug;
- screed screw;
- decorative overlay for draining the sink.
The best material for this type of product is plastic (for example, polyethylene or propylene). Its advantages are obvious: it does not lend itself to corrosion and decay, is durable and resistant to wear. Some use pipes made of bronze and brass, but they have one drawback: over time, their surface oxidizes and accumulates dirt.

The diagram clearly shows the joints that tightly twist
Siphon assembly process step by step
With each product in the kit there is an instruction with a diagram containing information on in what sequence and how to assemble a siphon for washing. Even for a beginner, assembly will not be difficult, however, to prevent further leaks, some nuances should be taken into account:
- The main thing in the installation process is compliance with the tightness of all connections. You need to start by checking the bottom plug, since it is she who experiences constant drainage pressure. Even at the time of purchase, it is worth checking the product for defects, paying particular attention to the integrity of the thread.There should be no chips, burrs, sharp protruding and catching elements that could damage the gasket.
- When installing the bottom plug and other connections, the gaskets must be fixed. To do this, they are lubricated and fixed with sealant. Twisting is carried out until it stops, without strong pressure. From the siphon to the sewage system, either an integral assembly or a corrugated tube leading to rigid pipes leads. The standard diameter of the nozzles is 32 mm, 40 mm, 50 mm, although there are also universal options with a set of nozzles.
- It should be remembered that for the joint in the area of the decorative lining, two gaskets are used. Black is for the top of the pipe, and white, thinner, is placed under the pad.
- After mounting the exhaust pipe, tighten the fastening screw and get rid of excess sealant. A plastic nut is mounted on the release, then a conical elastic. By means of the outlet of the nozzle, the height at which the siphon is set is adjusted.
An example of installation work on the video:
Construction Installation Technology
Putting on a nut and elastic, install the product. First of all, fix the outlet in the sewage system by attaching it at the required angle. Then connect the assembled siphon using a rigid system or corrugated pipe. At this stage, it is necessary to ensure that the assembly sections do not sag, and for this each section of the assembled structure must have a minimum length.
The video shows the installation process of the sink in the bathroom, where the installation of the siphon on the sink is clearly visible. It is easy to notice the features of fixing the metal siphon.
Mounting with adapter sleeve
Sometimes the design and location of the sink require the use of a large siphon equipped with an adapter - a rubber cuff. It is necessary for connecting a pipe with a diameter of 32 mm to the sewer pipe with a transition of 40 mm. Only one cuff is mounted: either under the drain hole, or transitional. It should not be installed just so that there are no unnecessary details: the instruction will tell you how to install a siphon in the kitchen without problems.
Suppose a sink in the kitchen has only an outlet, which means that the siphon can only be attached to the thread using an annular gasket. Necessarily the diameters of the siphon and the outlet must fit together. Sometimes a gasket replacement is required. A sealant is not needed in this case.

Sometimes the interior of the bathroom requires the use of a metal siphon with a chrome finish
After installing the product and checking the joints, you can turn on the water and check for leaks. If there are no leaks, and water flows freely into the sewer, the siphon is installed correctly.


1 comment