Fixing the toilet to the floor: analysis of 3 "correct" technological methods
Installation of plumbing equipment is carried out in strict accordance with construction rules and regulations. Home masters are often afraid of such work. This is used by service companies that request very decent money for performing fairly simple operations. Meanwhile, fixing the toilet to the floor is quite affordable for independent performance of the event. It is important only to carefully familiarize yourself with existing work technologies, choose the most suitable, and follow all instructions exactly.
Regardless of the chosen method of fastening the toilet, installation work begins with the assembly of the drain tank. The device is assembled in accordance with the instructions and secured in its intended place. Also, before installing the toilet, units for supplying and discharging water should be prepared. There are several methods for attaching devices. The main selection criterion is the floor material on which the equipment will be installed. We will consider in detail the most common methods.
Content
Method number 1: installation on dowels
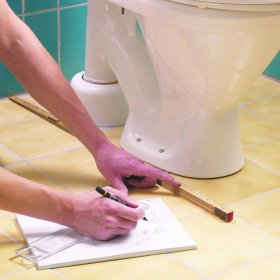
The most practical method to install the device with the least effort and time. It is optimal for use on an even, smooth foundation, since the slightest differences in height negatively affect the quality of flushing. It is preferable to use this method of attachment for lightweight compact structures, since the fixation may not be completely reliable. Plumbers are advised to install the equipment on a special gasket, which can easily be done independently from old linoleum or a sheet of thin rubber. The toilet is installed on the workpiece, circled by a contour marker. Then, with a sharp knife or just scissors, a gasket of the desired shape is cut out.

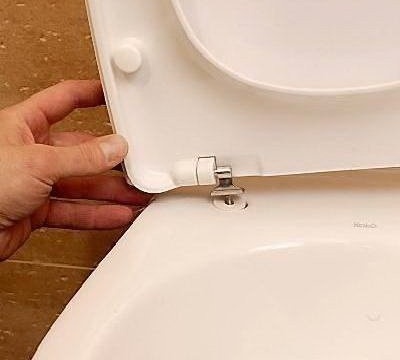
The device is fixed to the floor using dowels or special plumbing fixtures. Fasteners usually come with new hardware. It can also be purchased at specialized stores.
Now you need to markup. In the place prepared for the equipment we “try on” the toilet bowl and circle it along the contour. We remove the device. We apply a thin layer of sealant and glue a gasket on it. This design will be the most reliable, although some craftsmen prefer to do without a substrate at all. You can start drilling holes for fasteners. As practice shows, if the gasket is glued on high quality and the diameter of the drill is selected so that the holes for the fasteners are slightly larger than it, then further installation will be much easier. This is due to the fact that the rubber substrate acts as a kind of "contact spot" for the floor and the device.
It happens that you do not just need to fix the toilet to the floor, but also slightly raise it.This is true if there are several devices in the apartment. Then the last one in the system needs to be raised by about 3-4 cm. In this case, use a piece of a two-inch board, which is used as a stand. It is cut exactly along the contour of the toilet and is laid on the floor, a rubber substrate lays on top of it. All this is sealed with a sealant and forms a reliable and durable construction. We drill holes for fastenings directly on the gasket.

Tighten the fastener on the base of the toilet bowl very carefully. Excessive force can damage the ceramic of which the device is made.
As fasteners, you can use long metal dowels or special plumbing fixtures. The latter, usually come with new equipment. The quality of fastening is approximately the same, so you can use both options. We hammer in the dowels prepared in the floor of the hole. We install the toilet and gently screw it. It must be remembered that if the force is tightened excessively, the ceramic of which the device is made can be damaged.
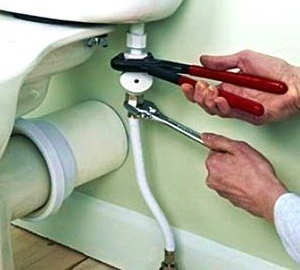
Now you need to connect the device to the sewer. At this stage, we pay special attention to the corrugation. Lubricate both of its edges with silicone. We insert one of them into the socket of the sewer, and the second we put on the toilet. All joints should be carefully pressed with your fingers to ensure that the seal is of good quality. As an additional measure, you can use metallic tape, which can be used to seal joints. We connect the water supply and the device is ready for use. There is a similar mounting method that is detailed in the video.
Method number 2: mounting on glue
Of all the methods how to fix the toilet to the floor, this is the simplest, but at the same time, and the most time-consuming. It takes about 12-15 hours to harden the epoxy mixture, which is used as glue. This method can only be used on a smooth surface. Most often it is used to fix equipment on floor tiles. The method is very simple to execute. First, both glued surfaces must be well cleaned of dust and debris. Floor tiles can be cleaned to make them rougher. This will improve the adhesion of the material. The surfaces are degreased with any solvent or acetone.
Cooking glue. You can buy a ready-made epoxy compound or prepare it yourself. For this you need to take 100 parts of epoxy resin ED-6, 200 parts of cement, 20 parts of a solvent or plasticizer and 35 parts of hardener. The sequence of adding components to the solution is important. First, the resin is heated to 50 ° C, a solvent is added to it, after the hardener and at the very end - cement. The composition must be constantly mixed in order to form a plastic, homogeneous mass.

In order for the toilet bowl to be securely fixed in place, the floor covering is prepared: they are cleaned for better adhesion and lubricated with a small layer of glue. Excess composition that comes out under the weight of the equipment is immediately removed with a damp rag.
Properly prepared adhesive mixture can be used within one and a half hours. We apply it to the base of the toilet so that the solution covers an area of at least 20 square meters. cm, and the layer thickness was at least 4 mm. We install the prepared equipment in the right place, combining the sewer bell with the outlet, and press it to the floor with force. After which the device is left for at least 12 hours. This period is necessary for the curing of the adhesive composition. During this time, it is not recommended to even touch the toilet. Then we connect the equipment to the water supply and sewerage.
Method number 3: mount on taffeta
Most often, this method is used to install toilets on a wooden floor. Taffeta is a solid wood gasket to which equipment is attached.The thickness of the board from which the element corresponding to the shape of the toilet bowl support is cut out should be 28-32 mm. In order to protect the part from moisture, it must be carefully treated with drying oil. For reliable fixing to the floor from the bottom of the taffeta, the anchor is mounted. The simplest option is nails driven in a checkerboard pattern, which should protrude 2-3 cm from the part. The recess prepared for installation of the toilet bowl is poured with cement mortar. Taffeta is sunk into it down with anchors. As a result, it should be flush with the floor.
After about 12 hours, during which the solution finally dries, you can begin to fasten the equipment. The device is fixed with screws. Rubber washers are laid under their heads, which will prevent possible damage to the toilet bed when tightened. Experts advise lubricating the screws with grease or graphite before work, so that later they can be easily unscrewed if necessary. Wood taffeta can be replaced with a rubber backing. It is cut from sheet material with a thickness of 5 to 15 mm, possibly even from an old rubber mat. Such a substrate should be 1-2 cm smaller than the toilet stand.

Fastening the toilet to taffeta involves the use of a special wooden insert. The diagram shows all the elements of such a mount
The ways to attach a standard toilet to the floor are varied. They differ significantly in complexity and time spent on installation work. It is important to choose the fastener method correctly. It depends on the material from which the floor is made in the room. Installation work can be carried out independently, but if there is no experience or desire, it is better to contact professionals. They will quickly and competently carry out all the work, guaranteeing a long and perfect service of the new equipment.