Installation and fastening of a tank to a toilet bowl: built-in, suspended and for a toilet bowl compact
A living room can be called landscaped only when all equipment installed for human comfort, including the toilet, is functioning properly. Its full-fledged work depends on whether the tank is correctly mounted to the toilet and whether it is hermetically connected to the water pipe. Ideally, there should be no leaks and problems with draining the water.
What is your drain tank?
The correct installation of the toilet bowl depends on its type. The division into species is related to the location and method of installation of the equipment.
There are three main types:
- The bottom element of the kit is a compact toilet. The bowl of the toilet has a wide shelf to which a drain tank is mounted. Water is released by pressing a lever or button.
- Autonomous. He is upstairs suspended from the wall, connected to the toilet with a drain pipe. To drain the water, you must pull the chain (or rope) hanging down.
- Built in. Special model designed for hanging toilet. The toilet is attached to the wall, a tank of water is inside it. Drain by pressing a button in the wall. To save water, use two buttons: for full or partial drain.
Installation of a toilet bowl compact
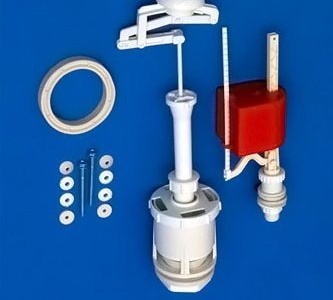
Before installation, prepare the necessary details:
- drain fittings, which will be located inside the tank;
- a gasket for sealing between the main parts - the tank and the toilet;
- flexible hose for connection to a water pipe;
- a set of mounting bolts, nuts and rubber gaskets conical shape;
grease to prevent corrosion on fasteners.

The toilet bowl compact is sold as a set and, after installation, forms a single unit with the toilet
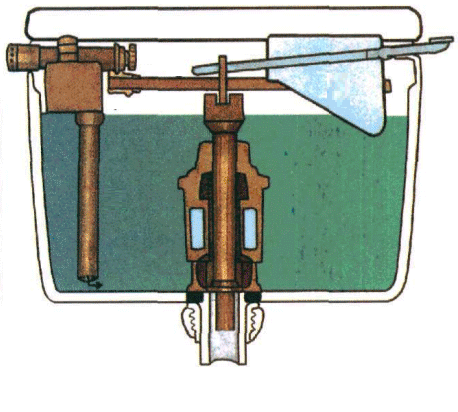
After preparing the parts, it is necessary to gradually mount the drain tank to the toilet. A self-adhesive sealing gasket is placed on the shelf of the bowl, which will prevent leakage. A drain tank is placed on it and attached to the shelf with fixing bolts, which are fixed with nuts on the back side. A fixed tank using a flexible hose is connected to a pipe with cold water. The gasket in the washer also prevents leakage. After completion of work, water should be collected and a test drain should be made. The absence of leaks and the correct operation of the drain valves indicate proper installation.
Install a standalone mounted model
The tank is located separately, installation is made to the top of the wall. The tank and toilet bowl are interconnected by a drain pipe.

A self-contained drain tank is installed above the toilet: either at the level of the classic design, or very high - under the ceiling
Installation procedure:
- we attach the pipe to the toilet, marking the place of the lower fastening on the wall;
- calculate the height of the tank, lifting it on the pipe;
- mark the attachment points, check their horizontal position using the level;
- we fix the container with the pipe to the wall using brackets and dowels;
- we connect the pipe and the toilet;
- connect the tank to the water pipe.
At the end of the work - a test test.
Installation of the tank in the wall
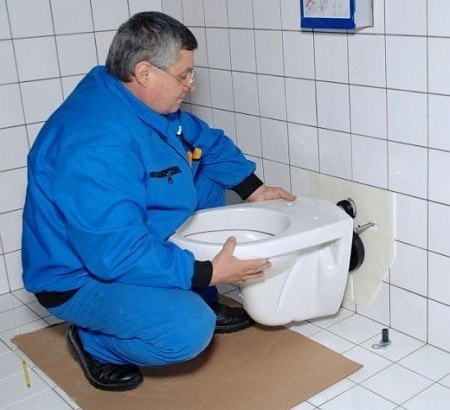
The built-in tank comes complete with a toilet attached to the wall. The tank, made of durable plastic, is hidden in the wall from plasterboard panels.
Such a kit takes up less space and looks aesthetically pleasing. Often a suspended model is purchased paired with a bidet. A big plus of the built-in tank is its safety. The only negative of the whole set is the high price.

The installation of the toilet flush cistern ends with the installation of the wall so that only the buttons on the decorative plate are visible from the outside
Fasteners for installation (mounting frame, bolts) are usually included. How to install toilet bowl, described in detail in the installation instructions, which is also usually attached. The tank is suspended on a frame, then the volume of discharge is regulated. Two buttons allow you to select full or partial discharge, for example, 6 l and 3 l. This is intended to save water.
If you need to replace the old drain tank?
The phased replacement of the toilet bowl takes place according to the following algorithm:
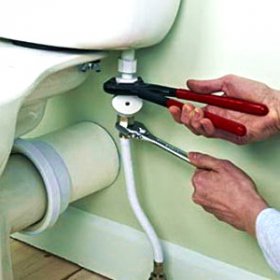
- Disconnecting the old tank from the water pipe. Before this, water should be shut off.
- Dismantling the tank - loosening the bolts with a wrench. Cleaning shelves from traces of rust or lime.
3. Installing a new tank. It is made as described above.
4. Connection of equipment to the water supply.
5. Setting the water level.
6. Installing the cover and drain button.

When replacing the toilet flush tank, be sure to check all fasteners and gaskets
Correct installation of the drain tank is a guarantee of long, healthy operation of the equipment.