Installing a bidet and connecting it to the sewer: step-by-step installation instructions
Everyone knows about the existence of a bidet, but not everyone uses this modern good of humanity. Recently it has become popular to equip toilet rooms with sets of plumbing equipment, and if the room allows, then buy beautiful furniture and decor. Based on this, it will not hurt to know how to install a bidet - a universal hybrid of a toilet bowl and sink, whose tasks are very extensive and do not end with the description in the technical passport.
Content
The design of the bidet and their main types
Externally, the bidet is very similar to the toilet - most often it is a large oblong bowl located at a certain height from the floor (standard - 40 cm). The difference is in the water supply. Instead of a drain tank, a small faucet with hot and cold water is installed, which can be adjusted.

King Palace Italian bidet made of porcelain in retro style, has a traditional oval shape
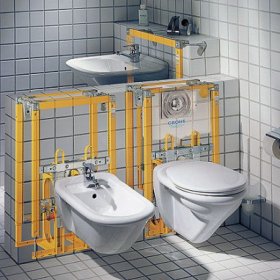
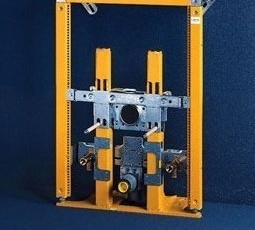
Like the toilet, the bidet has two main varieties - floor and hanging, which differ in the installation method. The floor product is screwed to the floor, and for the installation of the mounted one, a special installation is required, which is sold as a set. The installation, in turn, disguises itself in the wall.
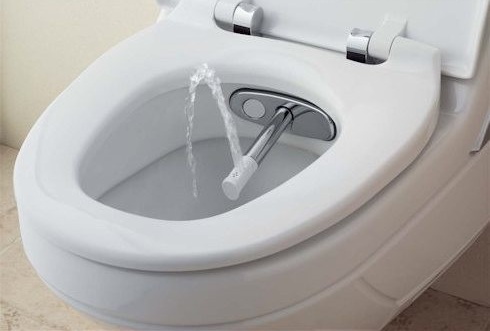
Faucets arranged according to the type of sink are the first water supply option, the second is a model with the so-called “upward flow”. Simply put, a small hole is equipped at the bottom of the thicket, from where a stream of heated water is supplied under pressure, resembling a fountain. On the way to the exit, the water moves inside the seat rim, as a result of which it heats up and adds comfort to those who use the bidet while sitting. The installation of equipment is more complicated, since first you need to assemble a mechanism for supplying water.

A sample of a hanging bidet is an Italian product of the Daytime series, made of sanitary ware in a modern style. To mount it, installation is required.

One of the budget options is a French-made porcelain bidet Patio.
Self-assembly instructions
Let us consider in more detail how to install a classic bidet - a floor type with a water supply from the mixer. As a rule, it is located in close proximity to the toilet, but taking into account the minimum “working” zone, which is 70 cm wide, the product itself plus the area around it.
Stage # 1 - Equipment Preparation
Before installing the bidet, you should carefully read the instructions and check whether all the necessary equipment is available. First you need to deal with the holes in the bowl.Their standard number is three, of which one (top) is intended for mounting the mixer, the other two are inside the tank and are related to overflow and siphon.

Before buying in the store, as well as installing the product, you should carefully check its integrity, absence of cracks and chips
Typically, a mixer and siphon are not included in the product package, so you should take care of purchasing them in advance. It is desirable that all parts of the equipment make up a stylish unity - a bowl with a retro-style decor requires a suitable “antique” tap.

There are two options for mixers - external, traditional, and internal, when installed, only valves and an outlet for water discharge are located on the shelf
In addition to the tap on the shelf, the bidet bowl is distinguished by its rear part. The toilet is equipped with a direct outlet for draining into the sewer, while the presence of a siphon is mandatory here - sinks have a similar device. The mixer has one feature that is useful for its use - a divider, which allows you to change the direction of water depending on the purpose.

The back of the bidet serves to keep the bowl horizontal. The upper niche is for hoses, the lower hole is for the installation of a siphon and a branch pipe
Stage # 2 - installation of the mixer and siphon
As a sample, we take the most common inexpensive option - a mixer for hot and cold water with a pair of valves. To connect it to a source of water supply, you will need two thin eyeliners, reinforced on the outside with a metal braid. Also included in the maintenance kit is a set of nuts, studs, washers, and rubber gaskets. The traditional siphon (diameter - 40 mm) is partially made in the form of a body and a corrugated pipe.

The bidet siphon consists of two components - a solid body and an elastic, often corrugated outlet pipe. Unassembled for sale
The installation of the mixer presents several steps, some of which are associated with pulling eyeliners:
- we fix the ends of the flexible hoses in the sockets of the mixer;
- insert them into specially provided holes on the shelf (in the upper part of the bowl);
- fix the mixer with a nut that is suitable in size.
To maintain the integrity of porcelain or faience between the washers and the body of the product, be sure to insert rubber gaskets. In the process of tightening the nut, there is one difficult moment: it is located so that the open end wrench is locked and does not reach the nut in an elementary way, that is, there is no way to manipulate it. The way out is to use another tool - an end head and tongs that are not held perpendicular to the bolt, like a key, but in parallel.

Studs, nuts and rubber gaskets are sold complete with a mixer. Brass products are more durable and reliable, but their cost is higher

Heavy metal tongs can damage fragile porcelain or earthenware, therefore, when tightening the nut, it is necessary to act extremely carefully and slowly
After installing the mixer, screw the drain grate (neck). Next, we install the siphon and outlet corrugated pipe in a certain order:
- connect one end of the siphon to the neck from the inside;
- tightly tighten the joints (manually, so as not to spoil the thread);
- the second end - the outlet pipe (corrugation) - we pull out from the back side.
After the "internal" work, it remains to fix the product on the floor and connect it to the water supply and sewage system.
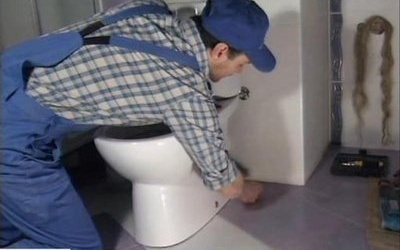
Stage # 3 - floor fixing
The initial markup will help you not to make a mistake in fixing the bidet correctly. We install the product in the intended place and check whether the length of the eyeliners is sufficient. On the floor we mark the places of fastenings.To fix the fasteners, you will need holes that are most easily drilled with a perforator or impact drill (the floor in the bathrooms is most often a concrete or tile coating). To preserve the integrity of the tiles, we drill at low speeds. We remove garbage and fasten the bidet with the help of dowels and bolts using rubber gaskets.
A set of fasteners can be bought at a construction supermarket - a similar one is used to install toilets. The edges of the product adjacent to the floor surface can be further treated with silicone sealant for strength.

In addition to dowels, bolts and nuts - the main mounting kit for installing a bidet, glue or various types of sealants are used for fixing
Stage # 4 - connection to the sewage system
Sewer pipes should be prepared in advance. It is important to make the wiring in such a way that the attachment points of the hoses are directly behind the bidet: the shorter the wiring, the better the system will function.

Open pipes provide an excellent opportunity to determine the place of leakage and make quick repairs, but more often the water supply and sewage systems are masked in the wall behind plastic or plasterboard panels
Sometimes a bidet is connected to the sewer after all the pipes are masked in the wall - 3 outlets remain on the surface - one for draining and two for cold and hot water. We connect the hoses to the water supply system, and insert the outlet pipe into the sewer socket. The final step is to check the performance by starting up the water.

To check the operation, it is necessary to open both valves: a good pressure of water and the absence of leaks at the joints of pipes indicates a correctly done job
5 comments