How to glue the curb onto the bath: disassemble ceramic and plastic options
Water is one of the main enemies of building materials. No matter how beautiful the decor of the bathroom interior is, with poor-quality waterproofing, it will quickly lose its attractiveness. Therefore, many want to know how to glue the curb onto the bath. Without special materials, the joint between the wall and the equipment is difficult to make tight, which threatens the appearance of mold, fungus and other troubles.
What types of borders exist?
Before you start work, you need to determine the type of border that will be installed in the bathroom.
Depending on the interior decor of the room and personal preferences, you can choose:
- Self-adhesive tape element. It is a tape made of polyethylene with an adhesive composition applied on one side, providing a tight connection with the surface. This is a very practical and inexpensive option, available in different widths and different colors. With this material, the problem of how to make a border in the bathroom is solved very simply. The backing layer is removed from the back side of the tape, and the element is firmly pressed by one half to the wall and the other to the bath. The service life of this decor is very limited.

For the initial stage of insulation, this option is quite suitable, for example, if you have not yet decided which option is better to use - plastic or ceramic
- Plastic borders. A universal element that can be fixed both on the tile and under it. There are many options for such parts, differing in size, width, texture and color. The advantages include the relative ease of installation and low cost of materials. Of the disadvantages, a limited service life should be noted.

The plastic border for the bath can be of different configurations
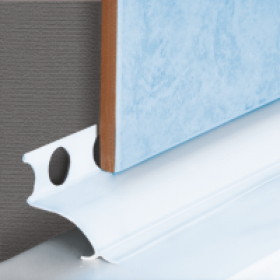
- Ceramic elements. They are corners of various textures, widths and colors, made of ceramics. They are very durable, provide reliable waterproofing and have a long service life. However, there are also disadvantages. Often laying the curb in the bathroom will require the work of professionals, since it is quite difficult to do it yourself. In addition, ceramics are a brittle material that, if handled carelessly, can be broken both before and after laying.

Laying the ceramic corner should preferably be carried out at the stage of laying the main tile
Steps for mounting a plastic element
Before installing the PVC border, you need to purchase all the necessary materials. In this case, you need to prepare the required number of decorative strips, the number of which is easy to calculate by measuring the length and width of the bath. In addition to them, you will need silicone, preferably aquarium, liquid nails, masking tape and a construction gun.
In the recommendations on how to install the curb on the bath, you can find the following steps:
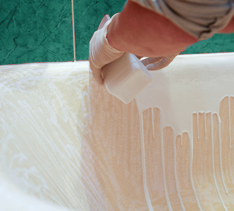
- Competent preparation of the foundation.It consists in thoroughly cleaning the edges of the bathtub and the wall adjacent to it from dirt and fine dust. At the end of the work, you can wipe the surface with a cloth moistened in a solution of bleach and dry the base well.
- Using a construction gun, the gap between the surface of the wall and the edge of the equipment is closed with sealant, and then carefully dried.
- To avoid damage to the enamel, the edge of the bath is covered with masking tape.
- Using a construction gun, liquid nails are applied to the base on which the curb is laid and is pressed as hard as possible with one edge to the wall and the other to the bath. At this stage, it’s best to use someone else’s help, since the adhesion and the life of the border depend on how much the tape is pressed.
- The glue that may appear from under the plate is carefully removed. Joints of borders are additionally insulated with sealant.
Ceramic corner laying technology
Some do not dare to choose ceramics because they do not know how to put a border in the bathroom so that it is right and beautiful. You can entrust the work to professionals, but if you wish, it is quite possible to cope on your own. Before starting work, you need to prepare the required number of ceramic blanks. Their number is calculated based on their length and width of the bath with a margin in case of possible damage or undercutting. In addition to direct elements, you will also need corner, sealant, waterproof tile adhesive and grout.
Actually installing the curb on the bath includes the following steps:
- Foundation preparation. Dirt and dust must be removed, and the base itself must be well dried.
- Covering the gap between the bathroom and the wall. If it is small, it will be enough to process the joint with silicone. The wider slots are pre-foamed, after which the seam is processed and dried.
- Tile glue is diluted in accordance with the instructions attached to it, then with the help of a spatula it is applied to the back side of the curb, laid on the right place and glued. Nearby parts are laid as tightly as possible to avoid gaps between them.
- Corners are formed using special corner elements. To fit them, two straight parts are cut off at an angle of 45 °. Perform this operation using the "grinder" with a diamond disk, but you can also use pliers. Draw a cut line on the part and carefully “bite” the pieces with the tool until the desired configuration is obtained, after which the resulting cut is polished.
- The next day, the laid borders are poured with water to better fix the adhesive.
Silicone sealant or special moisture-resistant grout eliminate small transitions and gaps between the tiles and corners.

Ceramic bath curbs are available in the form of straight and angular elements
On the tile ceramic border is installed much easier. The work is carried out similarly to the case with plastic plates.
Elements are glued to any moisture-resistant adhesive, most often to liquid nails. Details are strongly pressed to the base until the glue is “grabbed”.
The joint between the bathroom and the wall is not only not aesthetic, but also potentially dangerous in terms of the appearance of dampness, mold and fungus. It must be sealed with special elements. The material from which they are made depends on how to stick the border onto the bathtub. No matter which decor is chosen, a sealed joint will delight with its appearance and good performance.