Restoration of the enamel coating of the bathtub with liquid acrylic: we disassemble the "bulk" method
Not so long ago, cold enameling was the only way to restore a bath that became unusable. New enamel in several thin layers was applied to the prepared base and, after complete drying, the equipment could be used. Despite the simplicity of the method, it was not widely recognized. The main drawback is the fragility and fragility of the new coating. Whereas the later restoration of the bathtub with liquid acrylic is becoming more and more popular, since it is devoid of the main disadvantages of its competitor.
Why is it better to use liquid acrylic?
The material becomes the basis of a durable coating, which gives the restored structure new properties. In fact, the owner receives equipment that successfully combines the advantages of a cast-iron and acrylic bath. And all this without the laborious dismantling of the old and the installation of a new device. After restoration with liquid acrylic, the design acquires new advantages:
- Low thermal conductivity, which allows you to maintain a comfortable water temperature for longer.
- Smoothnessexceeding the original. Thus, the coating “repels” pollution and maintains cleanliness.
- Increased strengthsince acrylic is very hard to wear. The service life of the restored enamel, provided that it is correctly applied, is about 15 years.
- Easy care. The coating does not turn yellow; dirt is easily removed from it with a mild soapy solution.
To restore the worn enamel coating of the bath, you can use different materials. Most often, this is a two-component high-density acrylic enamel. The most popular brand can be considered Stakril, as well as the Yaroslavl "EcoVannu" and the Moscow "AlfaVannu". These are high-quality compounds that consumers trust.

Another advantage of liquid acrylic restoration is the ability to choose the right shade, to create which you need to add tinting paste to the finished solution
Topic article: Enamel for bath restoration: a comparative overview of the 4 most popular options
When buying liquid acrylic, you need to pay attention to the time it dries. The use of quick-drying compounds suggests that after a day the bath will be ready for use. However, they usually give a less durable coating. It is better to choose long-drying acrylic and get a guarantee of the reliability of new enamel.
Analysis of the method of "bulk bath"
Restoration work using acrylic is quite simple and quite affordable for independent execution. Typically, the procedure is divided into several stages.
Preparatory work
We start by removing the old cover. To do this, you can use sandpaper. It cleans the surface on which the abrasive cleaning powder is previously applied. It is also possible to use a drill with an abrasive wheel.This method is less time consuming, but very dirty, since large amounts of fine dust are formed. Experts recommend using a respirator when working with these tools.
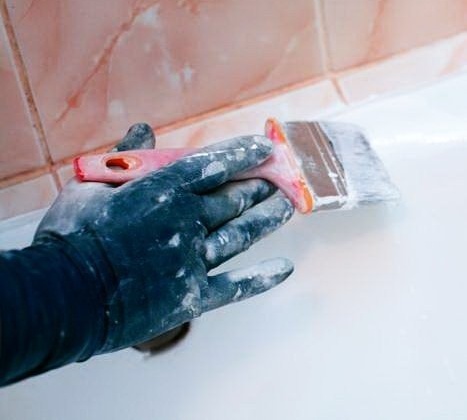
After processing, all chips and cracks must be cleaned. When properly performed, the surface becomes rough, which improves its adhesion with new enamel. All dirt formed during the grinding process is carefully removed, the bath is rinsed with clean water. Now degrease the coating. This can be done with a solvent or regular drinking soda. Dissolve it to a state of slurry and apply to the walls and bottom of the container. Wash off with hot water.
We process chips and deep cracks with quick-drying car putty. In order for acrylic to lie evenly, a warm surface is required. We fill the bathtub with the maximum possible hot water and leave it for 5-10 minutes. Then we drain the water and quickly wipe the surface with a cloth that does not leave villi on the surface. We dismantle the overflow and drain, we substitute the dishes under the drain hole. The remains of acrylic will be collected in it. The equipment is ready for restoration.
Enamel recovery technology by filling
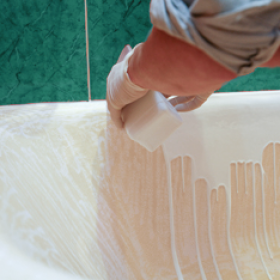
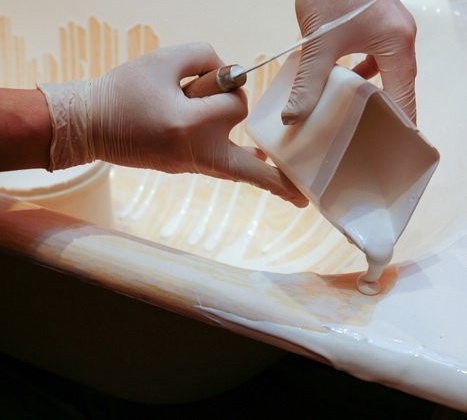
This technique can be used both for the restoration of acrylic bathtubs and for the restoration of cast iron. First, prepare the mixture for work. We mix the components of the composition in the right proportions and mix thoroughly. Part of the finished solution is poured into a small container from which it will be poured into the bath. Pour acrylic in a thin stream in a circle onto the equipment edge. A layer of the order of 4-6 cm should form, and the draining liquid should cover approximately half of the wall of the bath. We carry out the filling evenly, practically without stops, until the circle closes.
All smudges and sag arising during the restoration process, no need to try to fix it. In the process of drying, they should disappear on their own. The next step is to fill the acrylic from the middle of the bath. It is made similar to pouring from the side. Gently, moving in a spiral, carefully cover the entire surface of the container. Excess solution is collected in dishes installed under the drain hole.

For competent application of the composition to the surface, a certain skill will be required. The liquid is poured on board around the entire perimeter of the bath in a thin continuous stream

Restoration by filling involves only two main stages: surface preparation and applying acrylic to the surface
Restoring enamel to a bathtub with liquid acrylic requires strict adherence to the instructions. In particular, it is necessary to accurately withstand the drying time of the composition, which is indicated on the label of the product. It must be remembered that while the coating dries, it is better not to even approach the equipment. The smallest debris, water droplets or dust that accidentally spills onto drying acrylic can ruin the enamel.
How to extend the life of a new coating?
The new coating has increased strength and is resistant to cracks and scratches. However, it is very sensitive to deformations, breaks and similar major damage. Therefore, the new bathroom must be handled very carefully. Do not allow heavy objects to fall into the equipment or hit hard against its surface. After each use, the inside of the bath is best wiped dry.
In addition, do not allow severe enamel contamination, since the use of abrasive cleaning products for acrylic is prohibited. The surface is easily cleaned using a solution of ordinary washing powder or detergent. Soaking laundry with bleaches should be discarded, as well as baths with salts, which contain a large number of dyes. Do not allow aggressive chemical compounds to get on the restored surface - all this leads to equipment damage.
Using liquid acrylic to restore the enamel of the bath with your own hands is quite simple.The key to success is the strict implementation of all the requirements of the instructions and the purchase of high-quality composition for the restoration of enamel. Those who are not confident in their abilities or simply do not want to do this on their own should turn to professionals, they will quickly and efficiently restore the enamel coating of the old bathtub.

6 comments