DIY enamel bathtub painting: a step-by-step guide to restoration
When carrying out repairs in the bathroom, there is not always enough money to purchase new plumbing. In this case, the restoration of the enamel coating will help restore the old look to the old bath. For paint work, it is better to invite experienced professionals who are popular in the market for these services. After all, painting the bath with your own hands may not lead to the desired result the first time.
To minimize the number of errors during independent work, it is necessary to familiarize yourself with the methodology for painting the inner surface of the bath. The main thing is to properly prepare the product for staining, acquire high-quality paint and stock up with a convenient tool. We should not forget about the safety precautions, the rules of which require working in rubber gloves and a respirator that protects the respiratory system from toxic fumes of paints and solvents.
This video tutorial details and shows how enamel painting is carried out. After reading this video, all questions and doubts will go aside, and their place will be taken by full confidence in their abilities. It turns out that giving your beloved bath a second youth is not difficult at all.
List of necessary materials and equipment
So, we need:
- two-component epoxy enamel to restore the coating of the bath, consisting of a base and hardener, which are mixed immediately before application;
- a drill and a special nozzle in the form of an grinding wheel, with the help of which the old factory coating is quickly and easily removed;
- soda, allowing effective degreasing of the surface of the bath;
- two glass half-liter cans in which paint is diluted for applying the first and then the second layer;
- a flat hard brush, the width of which should be at least 70 mm, made of natural bristles;
- a measuring cup or syringe for introducing the exact amount of hardener;
- solvent 646 added to the enamel for better enamel flow;
- rubber gloves;
- respirator;
- overalls.
If microcracks and chips have formed on the surface of the bath, it can be repaired with liquid acrylic. Read more about this technology in our next article:https://aquatech.tomathouse.com/en/santehnika/vanna/vosstanovlenie-vanny-zhidkim-akrilom.html.
How to prepare a bath for a staining procedure?
If the preparation of the bath for painting is carried out correctly, then the applied paint layer adheres perfectly to the surface of the product and does not wear out for a long time. Preparation begins with the cleaning of the old coat of paint, for which they use an electric drill and grinding wheel. Some craftsmen use a grinder to grind the surface, while they are not confused by the huge amount of dust generated. The use of a drill in this regard is more convenient.

Preparing the bath for painting is done by removing the old coating with an electric drill with a nozzle in the form of an grinding wheel and degreasing the surface with soda or other cleaning agent. After this, restoration work can begin.
Important! It is advisable to degrease the coating of the bath not only after the grinding process is completed, but also before it begins. Due to the lack of grease, the grinding wheel will not slip. Surface roughness will provide better secondary adhesion. enamels with a primary coating applied at the factory in the manufacture of the bath.
To degrease the surface, you can use ordinary baking soda, which is washed off with hot water. Then give time to dry the surface of the bath from the water. You can use a hairdryer to speed up the process. The area around the drain hole needs special drying.
Features of the dilution of epoxy enamel
Do not save on buying good enamel. Therefore, it is advisable to purchase paint produced by well-known manufacturers in construction stores that value their reputation and are not involved in the sale of goods of dubious quality. Acquired two-component enamel after dilution should be applied within 45-50 minutes, although up to an hour can be written on the label. However, in practice, after 50 minutes, the enamel becomes too thick and does not fit well.
Important! A little solvent can be added to the enamel to improve the enamel's consistency during application. Note that the solvent should account for no more than 10% of the total volume of prepared enamel.
Therefore, it is necessary to start mixing the enamel components after completion of all preparatory work and complete drying of the cleaned surface. Depending on the amount of base taken, the correct amount of hardener is added. The ratio of these components is indicated by the manufacturer on the packaging.
Do not rush to look for a replacement for the old cast-iron bath, because it can be easily updated, and it will become as good as new. In our next article, you will learn several restoration methods:https://aquatech.tomathouse.com/en/santehnika/vanna/kak-obnovit-chugunnuyu-vannu.html.
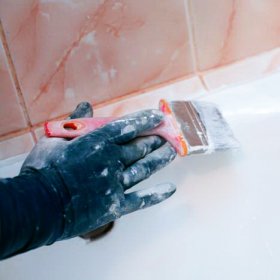
Application of the coloring composition to the bath
First, construction tape is glued to surfaces directly adjacent to the bathtub. The bathroom floor is protected with plastic wrap or old newspapers.
Then the diluted enamel is applied with a wide brush to the inside of the bath, with vertical strokes alternating with horizontal. This application of paint reduces the number of smudges, which, after the completion of staining, are pulled out with a thin brush from the bottom up.

Enamel is painted with a flat brush made of natural bristles.
Important! If a new brush leaves the villi, then they should be removed immediately with a sewing needle.
The application of the second layer of enamel is started immediately after the end of the first penetration. They do not wait for the drying of the first layer of the coloring matter, which is why the enameling method is called “wet on wet”. After eliminating smudges, the bathroom is closed for five to six days, during which the final hardening of the applied coating takes place.

Acrylic painting is carried out by pouring a coloring composition onto the surface of the bath and spreading it evenly over the entire surface of the restored product.
How to speed up the restoration process?
The restored product can be used the very next day after work if the bath is painted with acrylic. To carry out such an operation, experience is needed, since acrylic is applied by the filling method.
Using a spatula, the master smoothly distributes the composition on the surface of the bath, achieving uniform coverage of the entire area. More details about the technique of this operation can be seen in the video.
Of course, acrylic painting of the bath has more advantages over the method of applying enamel. One of the main advantages is the long service life of the acrylic coating, ranging from 8 to 15 years. In addition, when working, it smells nothing, which is important for families with children, as well as for pregnant women and allergy sufferers. Acrylic coating allows you to hide dents and chips on old bathtubs.
If you decide to paint the bath yourself, an article about choosing a special paint for these purposes will be useful:https://aquatech.tomathouse.com/en/voprosy/16584.html.
You can do the restoration of the bath yourself, but no one knows what will result from such an initiative. Therefore, adequately evaluate your capabilities. It is clear that professionals will cope with painting the bath in any of the listed ways faster than an amateur novice. And the quality of work, of course, will be better.
3 comments