DIY enamel bath: all about surface restoration with liquid acrylic

Do not make hasty decisions and hurry to part with a bathroom that has lost its attractive appearance. There are modern technologies with which you can eliminate such unsightly things as cracked enamel, calcareous deposits, rust. To save money, enameling a bath with your own hands will help, which is done at home and does not require dismantling.
There are three ways to restore the coating of an old bath:
- to cover with new enamel;
- install an acrylic liner;
- fill the surface with liquid acrylic (glass).
Let us consider the latter method in more detail.
What is the essence of the method, and what is liquid acrylic?
The technology of “filling baths” using a unique material - liquid acryl allows to obtain a perfectly smooth and glossy surface as a result of restoration.
The essence of the method is that without the use of a roller or brush, but simply by pouring a glass on the surface and spreading it evenly throughout the bath, we get a reliable and durable coating.
Now about what liquid acrylic is. Improvement of the technology for restoring the bath with this material contributed to the appearance of its varieties. So there were "Stakril" and "Epoksin". In addition to liquid acrylic, they contain epoxy resin, which, interacting with the hardener, polymerizes, giving strength to the coating, and various additives. Their task is to improve the quality characteristics of the applied layer.
They realize bulk glass in the form of two separate components: hardener and semi-finished acrylic, which are subsequently mixed in certain proportions. Such enamels are classified as two-component compounds, because they consist of two main substances, which, when combined, form a coating with the necessary technical characteristics.

When mixing the components, strict proportions are necessary
Before use, the components are kept at room temperature, then they are mixed. Hardener in small portions, with constant stirring, is added to acrylic, observing the ratio of 9.5% of the hardener to 100% enamel. Stirring must be thorough. Then the resulting material needs to stand for 10 to 20 minutes, after which the enamel is ready for application by pouring.
Surface preparation for processing
Self-enameling bathtubs with liquid acrylic begins with surface preparation. It is necessary to remove the old coating. The algorithm of actions is as follows:
- In the presence of yellowing and small scratches, the surface must be well sanded. You can cope with the task using sandpaper. Pour cleaning powder into the bathtub first. If enamel damage is more serious (stubborn rust, deep scratches), then remove the old layer with a grinder with an abrasive wheel.Removing the old layer of enamel with a grinder or drill leads to the appearance of a huge amount of dust in the air, so we recommend using a special protective mask.
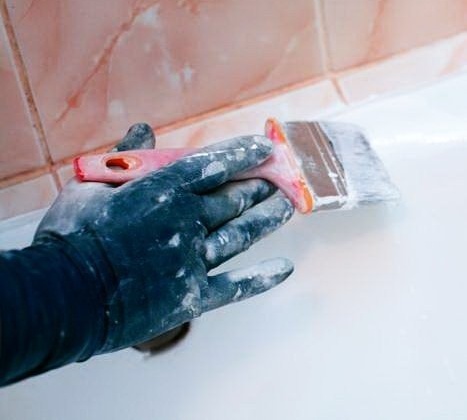
- After thorough processing of the walls and bottom of the bath, the dirt formed during cleaning is washed off. Enamel often remains in the corners, which is difficult to remove. You can cope with this by dissolving it with acid.
- Next, the surface is degreased with a solvent. Sometimes baking soda is used for this purpose, diluting it to the consistency of gruel. After processing, rinse with hot water.
- In the presence of chips and cracks, it is possible to use auto-putty, which dries very quickly.
A uniform spreading of enamel can only be achieved on a warm surface. The bath should be filled with hot water, left for 5-15 minutes and drained. Then the surface must be quickly dried with a cloth that does not leave a lint.

The old coating is removed using a grinder or an abrasive wheel drill.
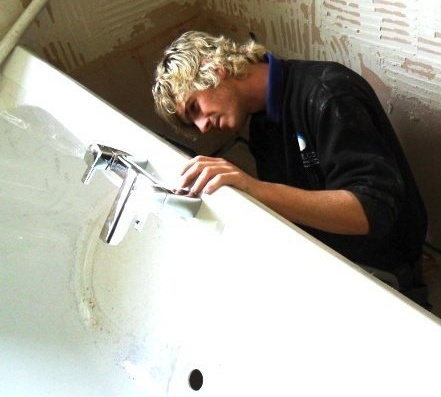
To prevent acrylic residues from entering the sewers, dismantle the lower and upper plums. Any container is installed under the drain hole.
The preparatory work is completed, now we will consider how the enameling of the bathtubs is carried out directly at home, the main stages of its implementation.
Enamel bath with a new mixture
About how to mix the components of the mixture, it is said above, but still it is always better to follow the instructions on the packaging for each specific material. After combining the components, part of the mixture is poured into a separate container, from which it will be convenient to pour the composition onto the surface of the bath. Work order:
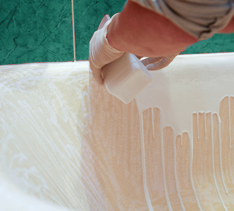
- First, a thin strip of acrylic is poured onto the side, with a spatula push the mixture under the edge of the tile.
- Do not pour the mixture in a strong stream. It is carefully poured onto the edge of the rim so that a layer of 4-6 mm is obtained. In this case, acrylic should drain to about the middle of the bath.
- The jet is moved around the perimeter along the side until the circle closes. Long breaks are not allowed here.
- After completing the first round, continue to pour acrylic in the middle of the bath. So, advancing in a spiral, capture the entire surface.
The remainder of the composition flows through the drain hole into a prudently installed container.

The mixture is poured onto the side of the bath so that a layer of 4-6 mm thickness is obtained
Worth paying attention to! You should not try to correct the formed influx or sag - this will only exacerbate the problem. When dried, they disappear by themselves.
After pouring, hardening can last from 6 to 24 hours. Much depends on the percentage of hardener and on the composition of the mixture. It is recommended that you wait a few days before operating. It is better to follow the instructions given in the attached instructions. After waiting for the acrylic coating to dry completely, the old (or new) drain valves are connected.
How to get a glass of a different color?
If the snow-white color for some reason does not suit you, you can make a bulk bath of your preferred shade.
The main thing is to coordinate your choice with households, take into account the color of the rest of the plumbing and the design of the room itself. Agree, next to the blue sink the yellow bath will look strange.

The color scheme can be any - just apply the desired color
To obtain a filling bath of the desired shade, tinting paste is added to the glass. But this part should not exceed 3% of the total amount of material. Otherwise, the strength characteristics of the coating will suffer. With the right ratio, the color of the bath will be a muted, delicate shade.
The advantages of this restoration method
If enamel bathtubs with acrylic is carried out in accordance with all the rules, the result is impressive. An impeccably smooth surface is able to withstand the effects of water, temperature extremes and mechanical stress for a long time.Moreover, without losing the glossy shine. Liquid acrylic is practically not subject to wear and has outstanding strength characteristics. And its low thermal conductivity contributes to the preservation of water temperature for a rather long time.
Leaving is absolutely not burdensome. The acrylic bath is elementarily rubbed with a soft sponge with soapy water. But such a reliable and durable coating does not allow the use of any abrasive products. When cleaning, liquid detergents, soap, or soluble powders may be used.