The main stages of installing a bath with your own hands: acrylic, cast iron and steel options

During the overhaul of the bathroom, outdated plumbing is replaced. Dismantling the cast-iron bath is the most troublesome, because you have to make a lot of physical effort. When buying a new bathtub, the Russians had the opportunity to choose between cast iron, steel and acrylic products. More and more consumers are leaning towards modern acrylic bathtubs with a more attractive design. Manufacturers produce a variety of models that differ in size, shape, and color. However, cast-iron and steel bathtubs also find their connoisseurs. In any case, after the purchase is required to determine the installation. Entrust it to professionals or try to do all the work yourself, given that installing a bath with your own hands is not so difficult. The main thing is to deliver the product evenly and reliably complete all the connections so that there are no leaks.
As a rule, do-it-yourself installation of an acrylic bathtub begins with the assembly of a metal frame attached to the product in the kit. The main stages of the assembly process are reflected in this video.
Content
Acrylic bath installation procedure
When performing work, it is necessary to adhere to the following algorithm of actions:
- prepare a platform for placing the bath;
- carry out the installation of auxiliary fastening equipment (frame);
- install the bath, having previously prepared it for this procedure;
- perform a number of finishing work.
Preparatory work - substrate device
Acrylic bathtubs, like cast iron products, are installed on the legs. However, for greater stability, experts recommend installing an additional frame - metal or brick.
If the model is accompanied by a factory frame, then there is no need to do anything other than its assembly and subsequent installation together with the bathroom attached to it.

Installing an acrylic bathtub on the legs supplied by the manufacturer with the product
If such a frame is not included, then under the acrylic bath lay a substrate of brick, foam concrete blocks or a wooden beam. This is a rather time-consuming job, but necessary, because the substrate will provide stability to the product and extend its life.
Important! Before starting work on the construction of the substrate, it is necessary to mark the projection of the drain hole on the concrete floor in order to provide a niche in this place for bringing the drain and its subsequent maintenance.
There are two traditional options for the device of a strong substrate:
- A solid masonry substrate erected under the entire supporting part of the acrylic bath.When calculating the height of the masonry, leave 2-3 cm for filling the pillows from polyurethane foam. On top of the foam layer, a pre-prepared sheet of OSB or 10 mm moisture-proof plywood is laid. They install the bathtub by pouring a liter of water into it, and putting the building level on the edge to level its position. While the mounting foam has not hardened, adjust the product so that the level shows “0” and the water is evenly distributed around the drain hole. After reaching the desired position, the bath is filled with water halfway and left until the foam completely dries. Then, the edges of the bathtub are outlined on the walls and removed to attach a supporting metal corner at the level of the lower cut. Instead of a corner, you can use a wooden block treated with antibacterial impregnation. The brick substrate on the sides is covered with sheets of plywood.
- When arranging the substrate according to the second embodiment, it is necessary to lay out several transverse supports of brick, on which to lay a cement cushion wrapped in a mounting grid. A sheet of moisture-proof plywood or OSB is also placed on top of the pillow and a bathtub is installed.
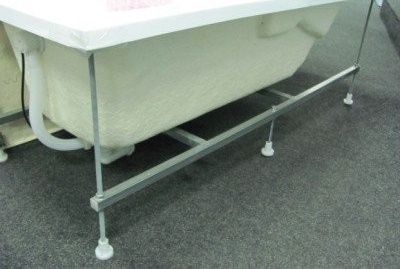
Important! Do-it-yourself acrylic bathtub is easier to install if comes complete with a metal frame and decorative trim elements. At the same time, everything is quickly and easily assembled according to the instructions, installed and connected to the sewer.

Installing an acrylic bathtub on such a metal frame increases its stability and reliability
How to connect a bath to the sewer: installation of release
What scares many people is not how to install the bathroom, but how to properly install the exhaust. However, this operation is not as difficult as inconvenient. After all, the water outlet is located at the lowest point, spaced from the floor at the minimum possible distance. In the existing gap and you need to install a siphon. To less suffer, the siphon is connected to the sewer pipe before installing the bathroom. At the same time, a rubber sleeve is inserted into the socket of the sewer pipe, into which the siphon pipe is then inserted.
Important! It is advisable to lubricate it with silicone sealant before installing the coupling, both externally and internally.
After installing the siphon, the bath itself is placed. It is better to do this together, having called an assistant, especially if you are installing a cast-iron bathtub that weighs more than 100 kg. One person presses the outlet of the siphon from below to the drain hole, and the second master inserts the neck, and then twists it.
Important! Do not forget to separate the gasket, greased on both sides with silicone sealant, the outlet of the siphon and the bottom of the bath.

Connection diagram of the bathroom to the sewer pipe - do not forget to pre-provide additional space for fittings when installing the substrate, otherwise there may not be enough space
Having dealt with the neck, they proceed to the installation of the overflow, performing the following steps in sequence:
- connect the hose to the overflow neck, while putting a plastic nut on it, and then a wedge-shaped gasket, which should be turned with a narrow part to the edge of the hose;
- insert the hose into a thin tube, tightening the nut, which pushes the wedge-shaped gasket into the tube, securely fixing the hose;
- securing the second end of the overflow hose to the installed siphon,
Important! Do not forget about the washer, which must be lubricated with sealant and put between the overflow housing and the bath.
All connections are hand-tightened without using a tool. A fork wrench is required to tighten the throat of the main outlet and overflow. In the absence of such a key, pliers can be used. Tightness is checked empirically by pouring a small amount of water into the bath and releasing it. If water leaks, tighten the connections.
Features of the finishing work
Installation of an acrylic bathtub, like any other, ends with finishing work, the implementation of which proceeds after checking the stability of the structure and the absence of leaks in the connection of the drain hole to the sewer pipe. The finishing operations include the following operations:
- hermetic sealing of the joints of the bath with the wall surface, which is carried out using special decorative plastic skirting boards attached using silicone sealant, or slopes made of tiles made at a slight angle;
- fixing a plastic panel covering the frame structure (a decorative panel is included or purchased separately).
Important! If the external finish of the front surface is done with your own hands from drywall, bricks, foam blocks, then the master must provide for the availability of technological niches that will allow you to service the water supply, electrics and sewage.
Features of installation of steel and cast-iron bathtubs
When installing a steel bath, the construction of a frame structure is required, since these products are subject to deformation. Also, experts advise using a mounting foam to increase the thermal insulation characteristics of a steel bath, otherwise the water in it cools very quickly. In general, steel models are not popular among buyers. Proven cast iron bathtubs, as well as modern acrylic models, especially corner ones, are more attractive.

Installation of a cast-iron bathtub on special height-adjustable legs included
Least of all the preparatory work requires a bath of cast iron, which you just need to bring and put on the legs, adjusting their length. Some craftsmen additionally fasten the structure to the wall, as well as make a brick support for better stability. Otherwise, installing a cast-iron bathtub with your own hands is no different from acrylic and steel products.
All work must be carried out efficiently, since the safety and comfort of the operation of the bathroom will depend on this. If you feel that you do not quite understand how to install the bath yourself, then invite specialists. Do not engage in amateur performances in the case of installing expensive plumbing with many additional features. At the same time, choose a company specializing in plumbing works and giving a guarantee for installed equipment with a connection.


2 comments