Do-it-yourself installation of batteries (radiators) for heating - the main technological steps
Self-installation of heating appliances is a task for the solution of which you need to carefully prepare. The slightest violations of the simplest in the opinion of the amateur process often lead to negative emergency consequences. Therefore, it is advisable to entrust the replacement of batteries in city apartments to plumbers, on whose powerful shoulders the entire burden of responsibility will fall, and in a private house the installation of heating batteries with their own hands can be successfully performed by the owner. However, in order not to have to repair the floors and re-glue the wallpaper after a hot "flood", you should familiarize yourself with the information on the basic rules and nuances of installation.
Content
Preparatory phase of work
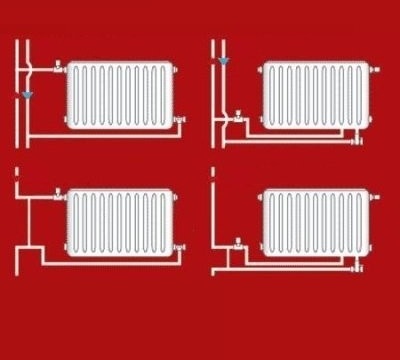
The first step is to find out what type of wiring was used to organize the heating system. The owners who arranged it themselves should be aware double pipe or single pipe the heating network provides heat to their suburban possessions.

Before you start installing the radiator, you should find out the one-pipe or two-pipe heating circuit in the house, the choice of parts and their number depends on the wiring diagram
Parts required for installation
Depending on the design features, parts are selected. For a battery built into a single pipe heating, it will be necessary bypass. This element will allow in case of any malfunction to turn off only a device equipped with a bypass without blocking the entire heating system, which is extremely undesirable in frosty weather.
The wiring diagram and type of radiator also determine the number of connecting and functional elements necessary for a competent installation. According to the scheme and dimensions, adapters, couplings, nipples, angles are selected.

An inexperienced performer should not get carried away with parts for mounting a radiator that are unnecessarily difficult to install: 1) corners, 2) radiator shut-off valve, 3) “American”, 4) faucet with American
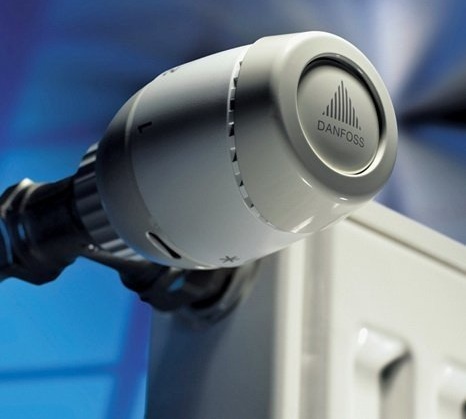
Future installers will also need shut-off valves. It is recommended to choose the radiator type of stop valves, not being carried away by too complicated ball valves with an "American", requiring professional skills from the performer. To ensure tightness without experience is problematic. To connect the battery to the pipeline, it will be necessary to drive with the appropriate dimensions of the radiator and pipe threads. A sleeve will still be screwed onto the drives, which is then twisted and inserted into the battery.

With the help of overhangs, it is simpler and easier to connect the radiator to the heating circuit - no need to weld the joints of the inlet and pipe
It is important to note that when acquiring cast iron batteries for installation, you must first of all check whether the brackets included in the kit match the type of material from which the walls are built.
In order to let air out of the battery, it needs to be equipped with a Maevsky crane. Usually it is available at the factory, but in the absence it will be necessary to buy.

An important detail necessary for the correct installation of the heating radiator - the Majewski tap, is necessary for the air discharge from the device
How to calculate the location?
If you want to install the radiator yourself, you should know that the pipe sections leading to the devices must be positioned with a slight slope directed towards the movement coolant. In the case of a strictly horizontal installation, as in the case of a slight skew in the installation of the radiator, air will "collect" in steel or cast-iron batteries. It will have to be constantly blown manually to avoid a decrease in heat transfer.
It is desirable that the central axis of the radiator coincides with the axis passing through the center of the window opening. Permissible deviations of 2 cm, absolutely not visually determined. This recommendation does not apply to the category of strict requirements.
In the list of strict rules:
- The elements of the connection to the heating devices should be located so that the slope is 0.005, it is recommended to increase it to 0.01. That is, one meter of the pipeline should be inclined towards the circulation by at least 0.5 cm. The angle of inclination should be calculated along the length of the installed pipe sections.
- From the floor plane to the battery 6-10 cm or more.
- From the bottom line of the window sill to the top line of the radiator 5-10 cm.
- From the wall surface to the radiator 3-5 cm.
When installing a radiator, a prerequisite is the observance of horizontals and vertical directions.

Standards and rules for installing the heating device: distance from the floor, walls, windowsill
In order to increase the performance of the radiator, a specialized shield made of heat-reflecting material can be installed on the wall behind it before installation. You can simply cover the wall surface with a composition with similar properties.

For aesthetic and technological reasons, radiators in one room are located on the same level.
Marking batteries with brackets
The sectional principle of selecting heating devices allows you to accurately determine the number of sections required to heat a room with specific technical conditions. Information on the rules of calculations must be found and studied before purchase. But according to the installation rules, 1 m² of the heating surface of the battery is equipped with one bracket.

Brackets for mounting radiators: home-made on top, factory-made on the bottom, if desired, the home master will be able to make his own hands, by analogy with factory products, battery mounts
So here is what you need to do:
- Given the above rules, mark the installation points of the brackets.
- Before drilling holes, all distances are checked again.
- We insert dowels into the drilled holes, into which then we screw the fasteners.
If the marking was done correctly, the battery will firmly “lie down” on all the installed supports, firmly resting on each of them. Further installation of the radiator with your own hands is to connect the device to the communication system.
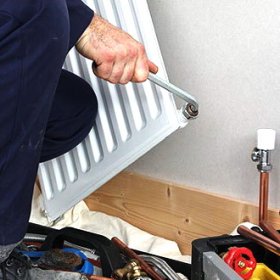
Tools and Supplies
The contractor will need torque wrenches with dimensions that allow to observe the torque moment with high accuracy. Since the coolant moves through the system under pressure, insufficient tightness will lead to the emergence of a jet from the junction. Excessive constriction will cause thread failure with similar consequences. Therefore, you should carefully follow the instructions that came with each device. They indicate the value of the torque moments.
It will be necessary to stock up with sealant, tow, soaked in oil paint, or a special sealing tape.
Direct installation process
Before starting work, it is necessary to completely shut off the heating circuit, drain the system from the system, and the pump will help to qualitatively remove the remains of which. Carefully check with the help of a level the battery mounted on the supports vertically and horizontally.
- Unscrew all plugs from the device.
- Connect a bypass equipped with a valve, required only for a single pipe circuit. A bypass is not needed to connect to a two-pipe circuit; only a bypass with a valve connected to it is used for the connection.
Using threaded overhangs, we connect the battery to the system to seal joints using a tow or other sealant (if you have experience in welding, you can weld the joints between the overhangs and the pipeline).

Bypass is required for connection to a single-pipe circuit - connection diagram: 1 - tee for plastic pipes; 2 - direct control valve; 3 - direct shut-off valve; 4 - adapter for plastic pipes; 5 - rotary valve for air discharge
It is important to note that until the installation is completed with aluminum, bimetallic and steel appliances do not need to remove the packaging shell.
Installation is completed, but more will be required. crimping. For its implementation, it will be necessary to call the plumbing. Both his experience and the device will come in handy, which does not make sense to buy for the sake of installing several batteries.
Cast iron radiator installation specifics
No matter how intensively manufacturers of innovative batteries promote their aesthetic ultralight aluminum and bimetallic products, many adherents of cast iron remain. Not pleasing with elegance, the material retains heat for an incredibly long time, gradually transferring it to the heated space. If you want to know how to properly install a heating radiator made of heat-resistant cast iron, you should familiarize yourself with the specific features of the design of the device and its installation:
- Cast iron battery before installation, you need to unscrew, adjust the nipples, and then reassemble the device. Dismantling is carried out on a workbench, wielding a pair of radiator keys inserted into the nipple holes. To increase the applied force and to fix in the eye of the key, designed to unscrew the lower nipple, insert a crowbar. To avoid skewing, both nipples located above and below unscrew at the same time. The work is more convenient to do together. When unscrewing a cast-iron radiator, pay attention to the direction of the thread. On opposite sides of a radiator made of cast iron with opposite directions. Deployed? Remove the section.
- By analogy, you need to unscrew all sections, and then, in a strict reverse sequence, group into a single device with the required number of sections for heating a particular room. The assembled battery must be pressure tested, if a leak is detected, adjust the nipple in the problem place.
- Cast iron wall-mounted batteries can be fixed on brick and foam-concrete walls. Walls made of wood will not bear the weight, so the owner of a wooden house will need radiators with special floor supports. However, supporting walls must also be installed on the walls.
- Since in private houses the heating is mainly single-pipe, a bypass is installed. In the wiring diagram, there must be a Mayevsky crane and corresponding shutoff valves.
Connection to the pipeline is carried out by means of threaded sleeves. In wooden buildings, it is better not to use a welding machine.

Technology for unscrewing and assembling cast-iron batteries: a - nipples capture the thread of sections (2-3 threads); b - twist the nipples, dock the sections; in - mount the third section; g - group two radiators

The difference in the schemes of fastening a cast-iron battery to the walls of different building materials:
a) a wooden wall: 1) a supporting strip, 2) a stand
b) a brick wall: 1) a window sill, 2) a niche, 3) brackets
Whether or not to save on installing batteries is a private matter of the owner. In fact, there is not a single particularly difficult moment in installation technology. Clearly observing the sequence, knowing the rules, having studied the information on how to install a heating radiator, you can safely get down to business with your hands, confidently holding radiator, torque wrenches and other tools. True, to be successful there will not be enough confidence alone. The strict observance of the installation rules and the formation of impeccable tightness, guaranteeing a complete absence of leaks, will definitely help.