How to connect a doorphone do-it-yourself
Many people who have private homes or cottages are increasingly starting to think about a convenient security system and access control to their territory. The simplest and most affordable option today is an individual intercom, which can be easily installed on its own without the involvement of specialists. For this, it is only necessary to strictly follow the manufacturer's instructions. With such a device, you can completely protect yourself from the visit of uninvited guests.
Content
Why do I need to install a doorphone in a private house
The main task that the intercom should perform is to ensure the safety of the owners of the house and protect them from unauthorized visitors. It is very important to have an audio or video intercom if older people live in the house or there are young children who most need the maximum degree of protection. The presence of an intercom will help protect people from the danger that may arise due to excessive carelessness.
Installing a video intercom in a private house helps to ensure the safety of residents due to full control over the area in front of the gate
Thanks to the intercom, you do not have to leave the house and go through the entire yard to the gate in order to see who came, as you can communicate with the visitor via audio or video and, if necessary, skip it by pressing a button on your device.
But before you purchase such a device, you need to determine exactly what purpose it will be used for and how much you are willing to spend on your safety. That is why every person should know what types of intercoms currently exist, what functions they perform, what types of locks exist for these devices, and how much all this equipment costs. It is also very important to know if it is possible to install an intercom in a private house if necessary.
Types of intercoms and standard schemes for their connection
According to their design features, intercoms differ in the type of signal transmitted by them. Devices can transmit a signal from the call panel to the main unit in audio or video mode:
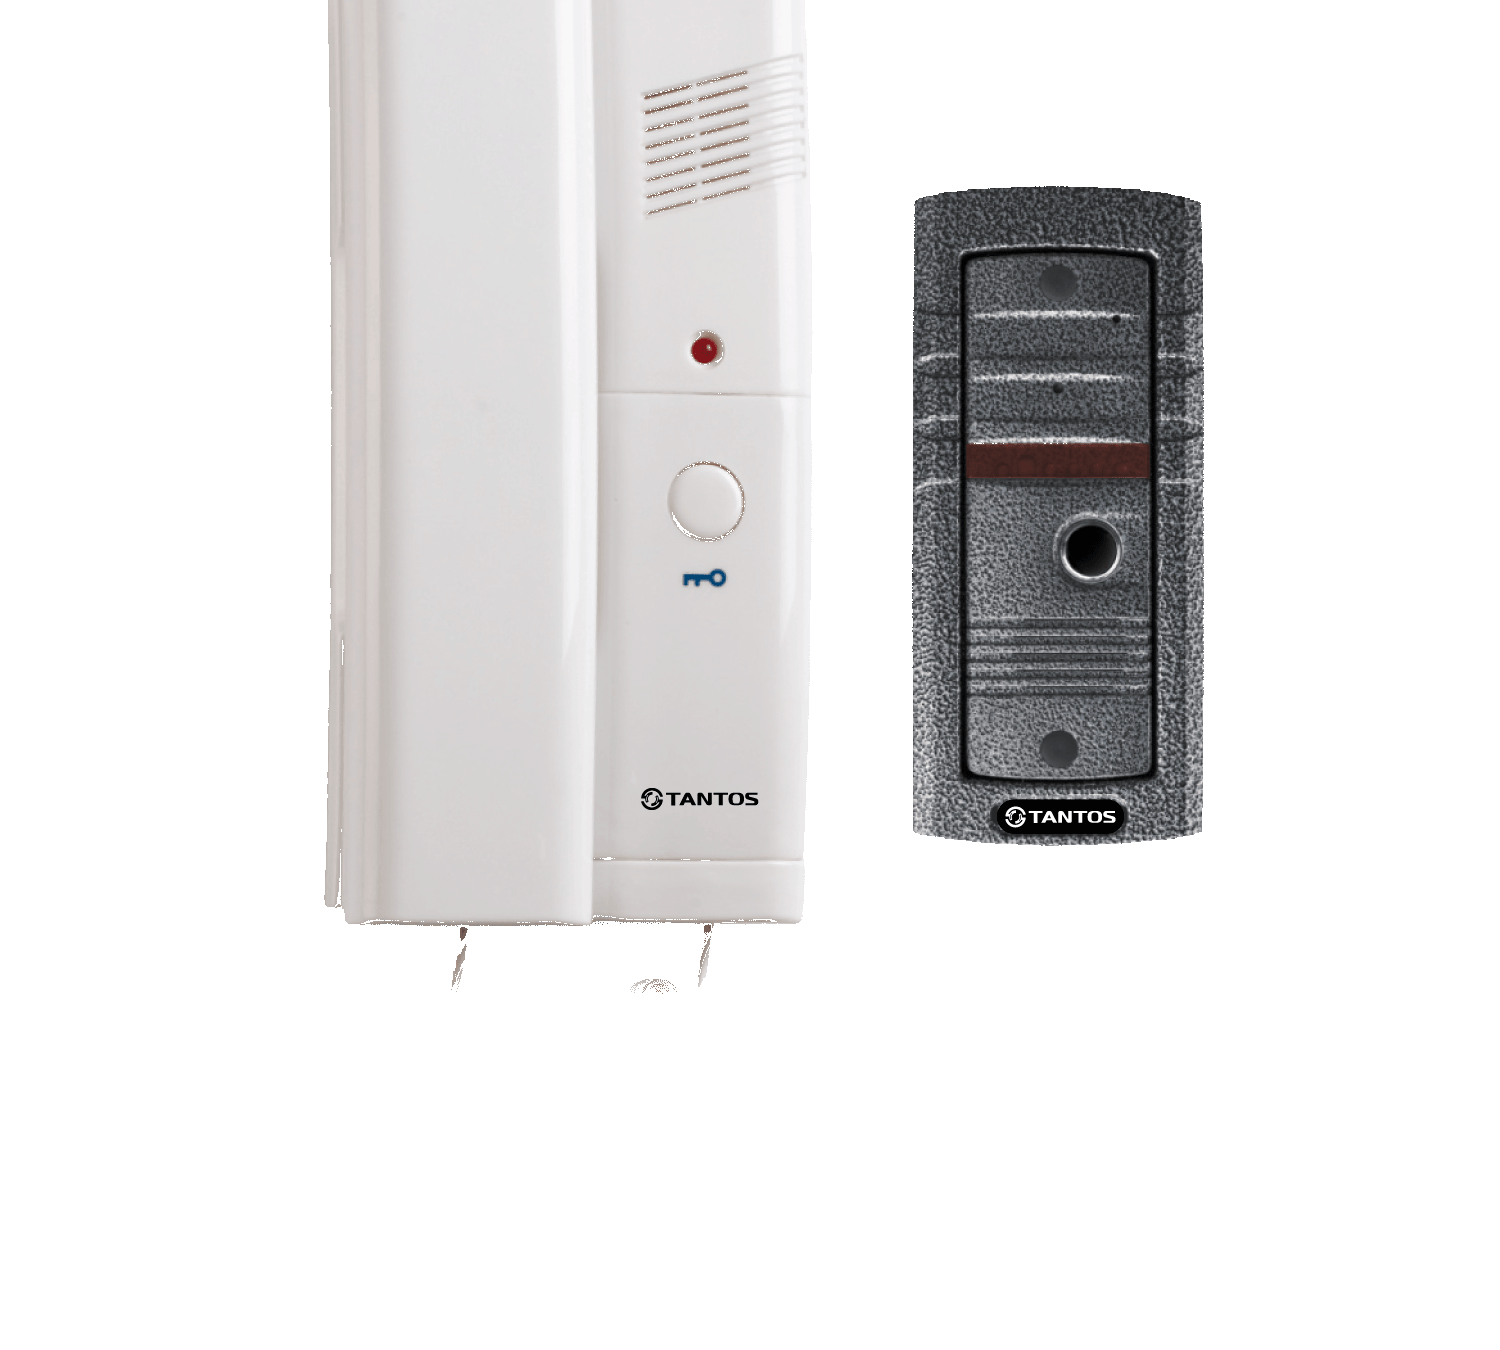
- The audio doorphone is the most simple, inexpensive and widespread type of equipment, which consists of two units: an external call station and an internal call station.When receiving a call signal, the person turns on the audio device for negotiations by pressing a button or off-hook. If it is necessary to let the visitor in, the corresponding button on the intercom is pressed, and the electromagnetic or electromechanical lock opens. Usually the indoor unit is mounted in a house near a door or in another place convenient for the owner;
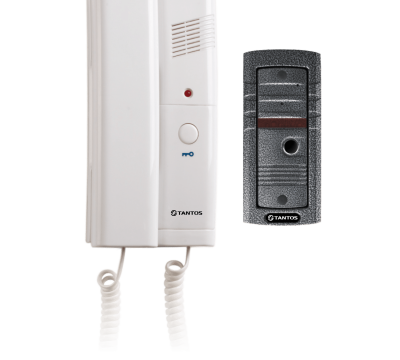
The audio doorphone can only transmit a voice call without a video signal
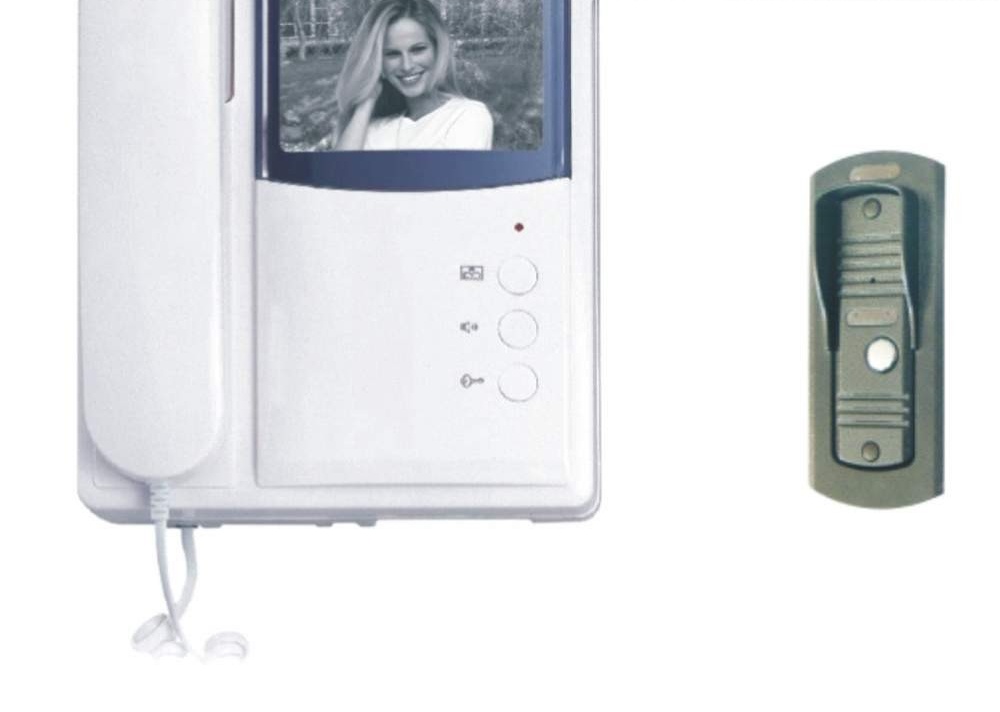
- The video intercom has a monitor that allows you not only to talk with people who come, but also to see them on the screen. The external unit is equipped with a backlit tracking video camera.

The video intercom allows not only to hear, but also to see the visitor
Often, audio door phones are mounted in the entrances of multi-storey buildings, where they mainly play a warning function. The video intercom is more useful for private houses, since in a high-rise building it is installed only near the door of the apartment and is not intended for general use.
In the private home ownership, the video intercom will play a big role, as the owner can not only hear, but also see the visitor and, if necessary, not let him into his territory.
Modern intercoms, in addition to the basic elements (a ringing device, a lock, a negotiation tube and a power supply), can be equipped with additional functionality:
- answering machine. If the owner is not at home, then thanks to this function he will be able to listen to the recordings that were left by the people who arrived, and even get them on his mobile phone;
- motion sensor. This device captures the visitor who is in the zone of his action. When a person appears near the device, his image is instantly transferred to a TV monitor connected to the intercom;
- block of memory. Thanks to this function, the visitor’s image is recorded on a special device from the moment the call button on the intercom was pressed. As the memory becomes full, old records are erased and replaced with new ones.
At the request of the owner of the house, the intercom can be equipped with an unlimited number of monitors and additional surveillance cameras.
Basically, all intercoms are connected to the door panels using wires. There are wireless devices, but their range is quite limited. To date, there are three typical schemes for wired intercom connection:
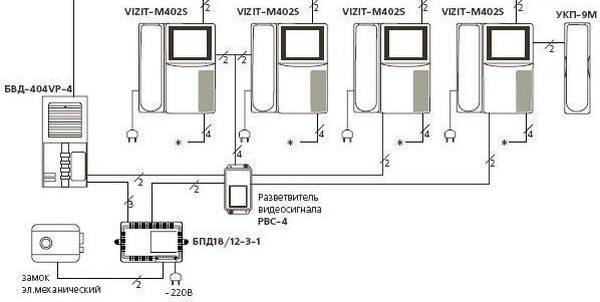
- For a multi-storey building. This scheme is quite complicated and is not needed by owners of private houses, since it involves connecting a large number of audio doorphones and connecting them to a common network using special devices. This system is quite expensive, so it is acquired by all the residents of the house in a fold.
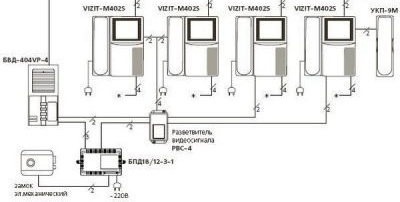
In a multi-storey residential building with one door panel installed on the entrance door, you can call any apartment
- For individual use with electric lock control. This is a standard option for connecting a doorphone in a private house, as it allows you to connect the device and the lock into a common circuit. From the first time it may seem complicated, but for a person who is at least a little versed in electrical circuits, it will be quite accessible. Here, from the monitor, which is located inside the house, it is necessary to lay one with a four-wire cable to the door station, which is located, as a rule, on the entrance gate. At the gate itself, it is necessary to install a key reader with which the owners will enter the house, the lock controller and the power supply, which will supply voltage to the system. From the side of the house, the exit button for the hosts is placed on the gate. All of the listed components of the access control system are usually located next to each other and connected with short pieces of wire. The wiring diagram is included with the controller.
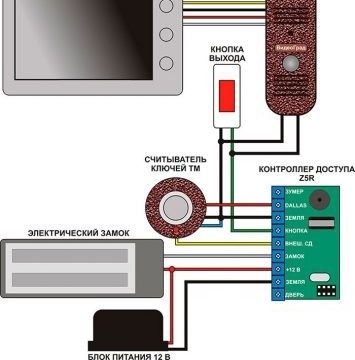
When connecting to the circuit of an electric lock, a user from the house can see the visitor, talk with him and, if necessary, open the door to him
- Simple layout for individual use. In this case, the connection of the outdoor unit to the indoor unit will be made using four wires. Two of them are for power transmission, and two for audio and video. According to this scheme, each owner of the house will be able to independently connect the intercom, connecting four contacts on the outdoor unit with the corresponding four contacts on the indoor. An electronic lock is not provided here.

In the simplest version, you can see the visitor from the monitor and talk with him, but to skip it, you have to go to the gate

Home intercom device
Video intercoms are very popular among owners of private houses. Therefore, we will consider their device in more detail.
Call bar
The outdoor unit, which is mounted at the entrance to the house, is equipped with a video camera and a call button. There is also a device for negotiations, which allows you to communicate with the owners if there is little video communication. The camcorder can transmit black and white or color image.
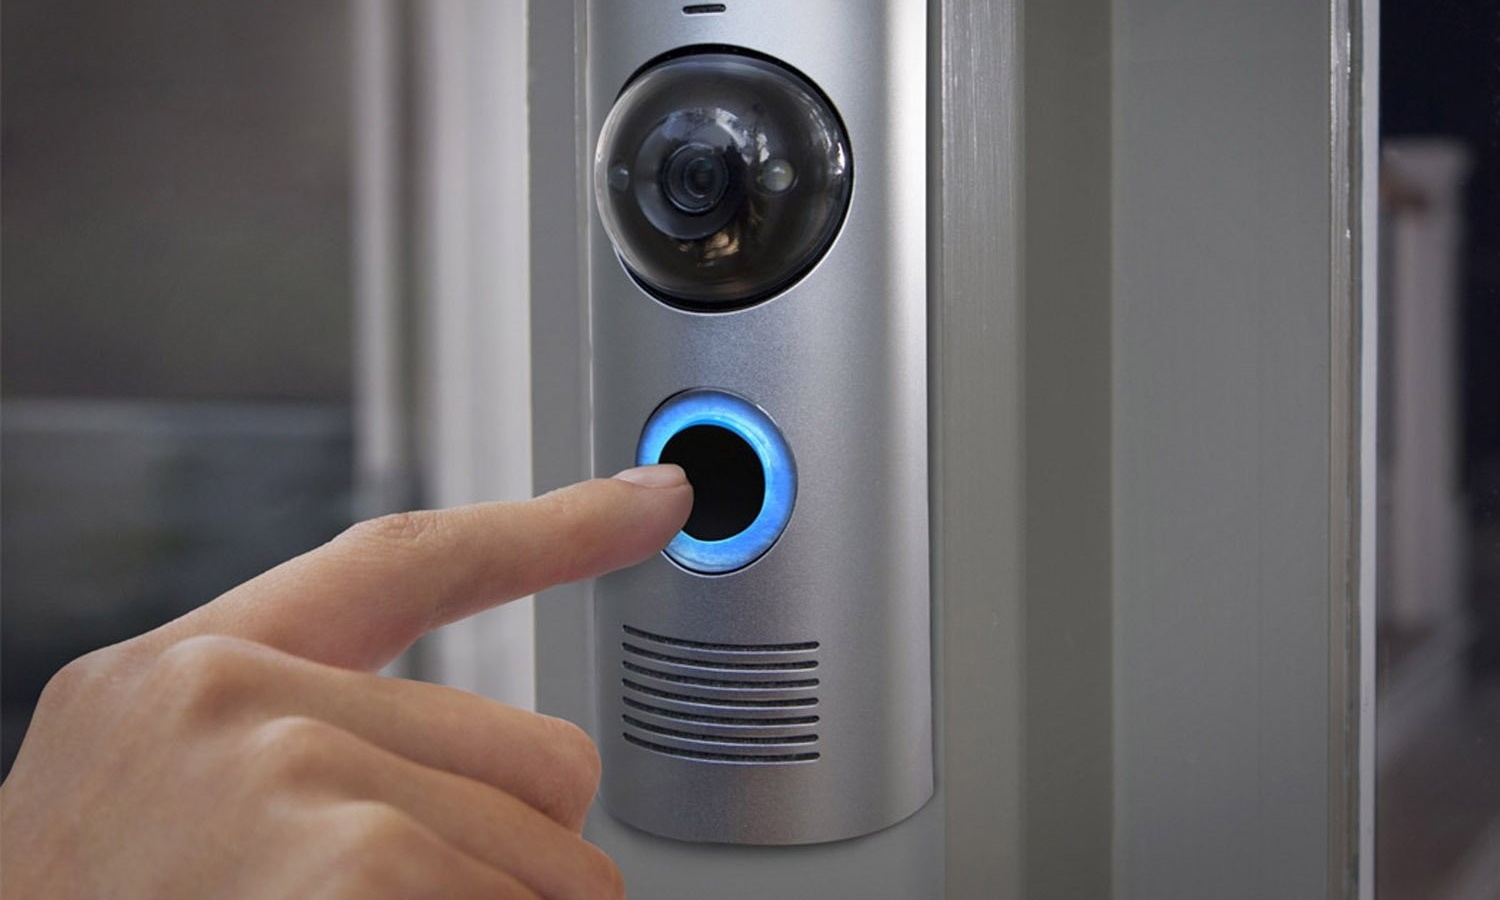
From the call panel, you can call the monitor and talk with the hosts, who will see the visitor on the screen
According to the installation method, call devices can be mortise and overhead:
- mortise panels are more expensive, but they are better protected from breaking and various climatic conditions;
- overhead units are available in durable plastic cases, however, they still wear out more and undergo various mechanical damage. For such panels, domestic manufacturers offer durable protective pads that protect the device from breakage.
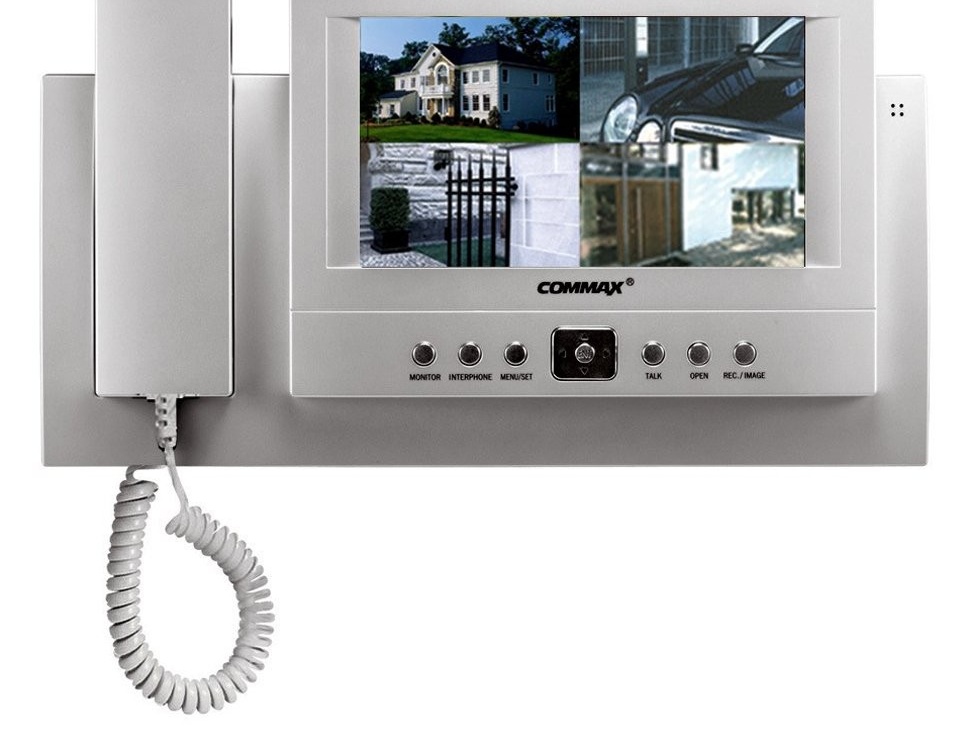
Indoor unit (monitor)
The indoor unit is a black and white or color monitor, depending on the model. Black-and-white monitors are already a thing of the past and are practically not available. Color models are equipped with a screen with a diagonal size of 10 cm and a handset or hands-free button to answer a call. The monitor also has a button for opening the lock, additional function keys and buttons or knobs for adjusting the sound and image.

Most modern video intercoms have a speakerphone button instead of a handset
Types of locks for intercom
An electromagnetic or electromechanical lock can be connected to the intercom. Both options work from the network, so we will consider the principle of their operation and characteristics.
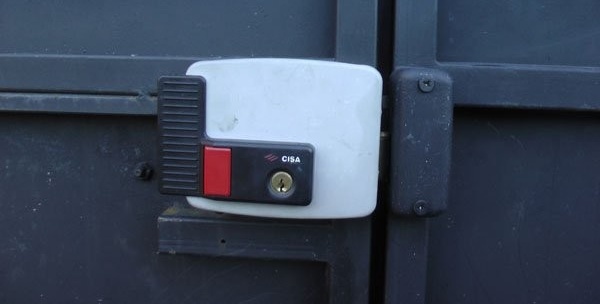
Electromechanical lock
The electromechanical lock is a modern locking device for the intercom, which opens at the touch of a button or with a special key. It operates on 12 V, so a step-down transformer is needed for it.
Castle benefits
- Allows you to open the gate or door at a certain distance (when connected to the intercom).
- It can work even in the absence of electricity (without the possibility of remote control).
- It is made with a high level of privacy and security.
- It can be equipped with a motor that runs on a small electric motor.
- It has an electric latch that opens by turning the handle.
When choosing such a lock for outdoor use, it must be borne in mind that on its front side there is a button that you can reach with your hand, bending over the fence, and open the gate. A street lock with electromechanics can be mortise and laid on.
You must also know that when the power is cut off, only the invoice version of the lock will be able to work.
Before acquiring such a lock, you need to find out what type of door leaf it is suitable for and what is the principle of its operation. Specialists recommend Polis or Fass Lock locks for a private home.
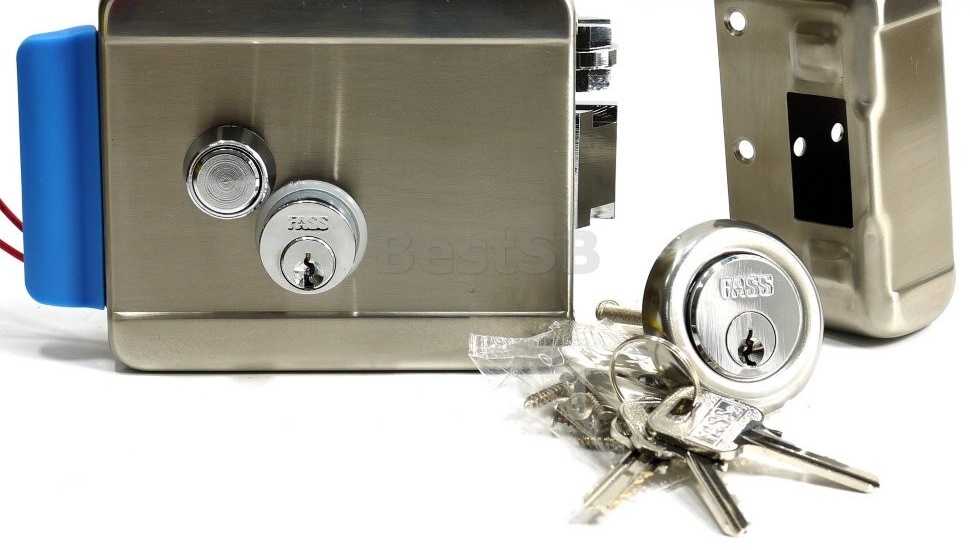
The electromechanical lock has a manual opening button, so attackers can enter undetected by bending through the gate or reaching the button through slots in the canvas
Electromagnetic lock
The electromagnetic action lock is designed to close the door or gate and keeps them closed by means of a powerful electromagnetic circuit board that attracts a steel plate mounted on the door or gate. The electromagnet is mounted on the door frame or wiring harness, and the steel plate is mounted on the door or wicket itself.
In the closing mode, a current is supplied to the magnet winding, which creates a powerful electromagnetic field that quickly attracts a steel plate to itself. As a result, the wicket held by the magnet is in a closed state. In order for it to open, the voltage must be removed from the lock. This is done by pressing a button on the intercom: the circuit opens, the electromagnetic field disappears and the gate opens.
The electromagnetic lock only works when the voltage is applied to it, so if you suddenly turn off the electricity, the gate may remain open
By their design, the locks can be tear and shear, as well as overhead and mortise.
The most popular are overhead models that work on the gap. Due to the fact that such locks do not contain moving or rubbing elements, they serve for many years and can work in any weather conditions.
But if the power supply suddenly stops, the lock will stop working and the door will remain open. To prevent such situations, you will have to install an uninterruptible power system.
Electromagnetic locks vary in the strength with which they hold the front door. This value is set in kilograms and should be much larger than the weight of the gate. For medium-sized wickets, a lock with a hold of 300-400 kg is sufficient.
How to independently install and connect a video intercom
In order to start installing the intercom, we need the following tools:
- Sharp knife.
- Powerful rotary hammer and drill.
- Electric screwdriver.
- Shovel and lance or stroborez to create a strob in the walls.
- Grinder and discs for cutting metal.
- Various screwdrivers.
- Convenient pliers.
- Good hammer.
- Spatula and utensils for kneading.
In addition, you must prepare:
- Cable for power supply (length is calculated individually).
- UTP cable (twisted pair).
- Several outlets.
- Circuit breaker
- Self-tapping screws and dowel-nails.
- Electrical tape, protective clothing.
- Corrugated pipe for wires (you can use a straight line).
- Cable channels.
- Putty mixture for sealing the strob.
- Drills of various diameters.
- Perforated tape and hardware.
Step-by-step installation diagram of video intercom with electromechanical lock
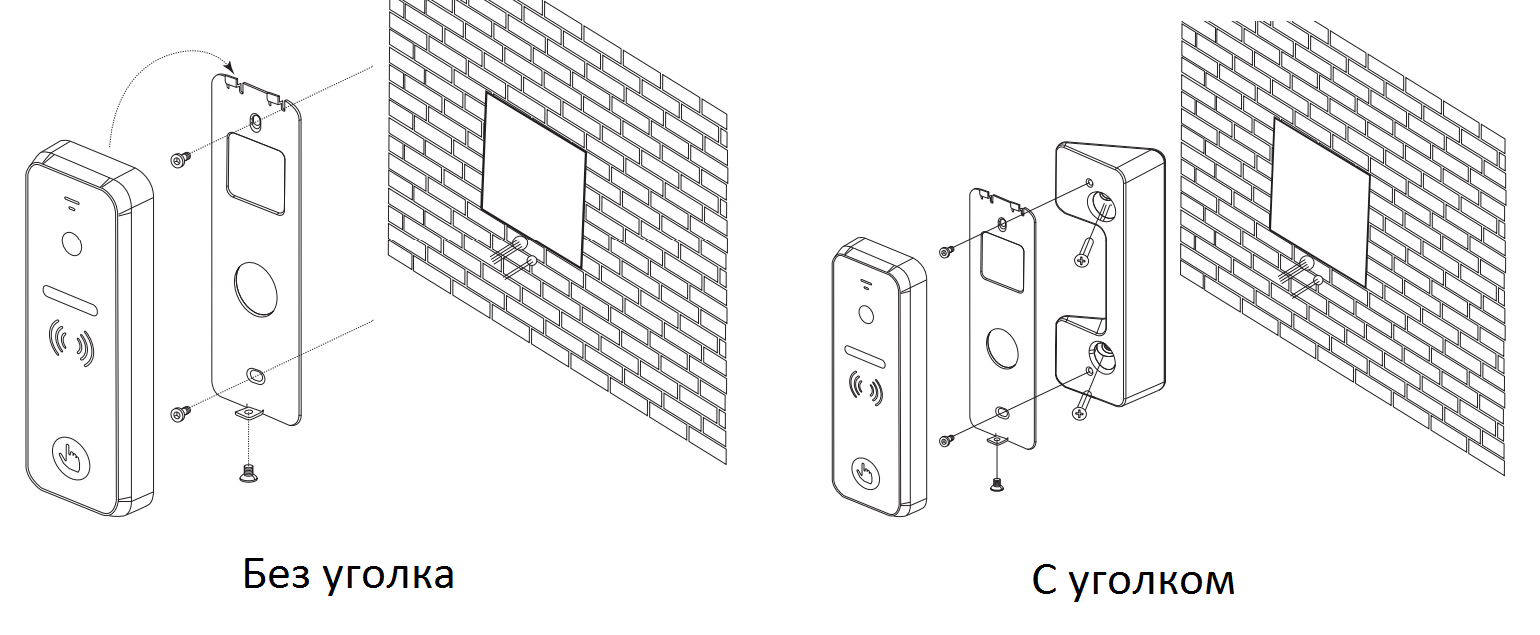
- We choose a convenient and affordable place on the gate or gate to place the door station. We disassemble the panel and mark the place of its installation. We drill holes for fasteners and wires.

The calling panel can be installed at an angle to the surface of the gate, for which the kit has a special adapter
- From the front side, we launch the four-wire wire and connect it as indicated in the instructions.
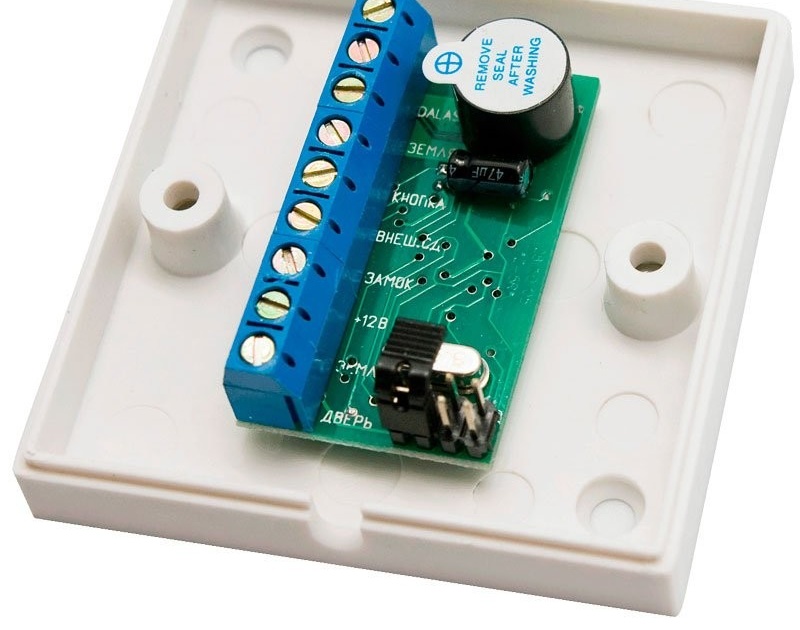
- We lead the cable to the installation site of the controller, which is a plastic box located near the lock. So we will have to start fewer wires and it will be more convenient to make connections. The controller can be installed in a shield on the street or walled up in a wall.
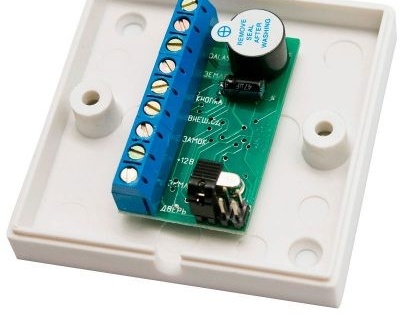
The lock controller is a small circuit board that can be mounted in a plastic box next to the lock or walled into a wall
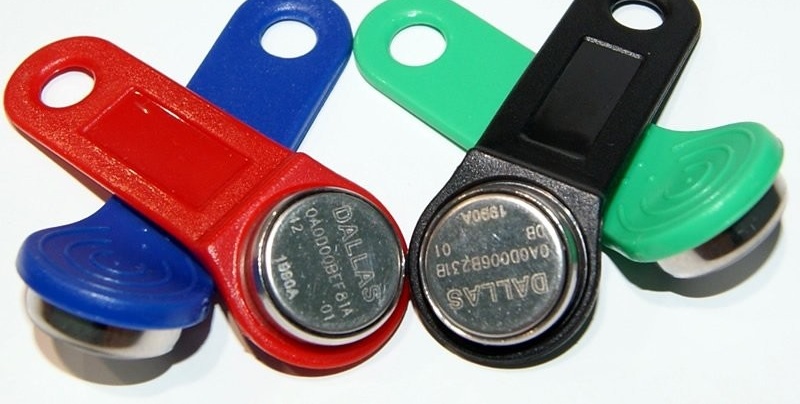
- Next to the door station, install a reader, and on the back of the gate - exit button. The wires (two cores) from each of the devices are reduced to the controller and connected to the appropriate connectors (DALLAS and "EXT.SD ”for the controller and“ BUTTON ”for the exit button). We connect wires from the call panel in parallel to the exit button.
- We check the correctness of all connections. We unwind the call panel, screw its back wall with screws to the installation site. Putting it back.
- Next, go to the house and install a monitor. We fasten the bracket supplied with the dowels. Nearby should be a 220V outlet. If it is not, you have to get the power cable from the electrical panel. Then it is better to connect the equipment to a separate machine and sign it. So it will be much more convenient to deal with wires in the future. After that we hang the monitor on the bracket.
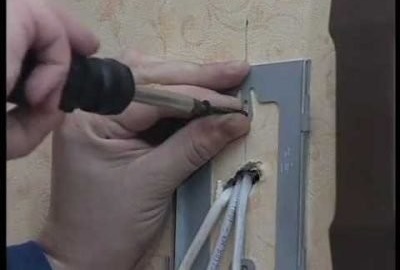
The video doorphone monitor is hung on a bracket that is attached to the wall with self-tapping screws
-
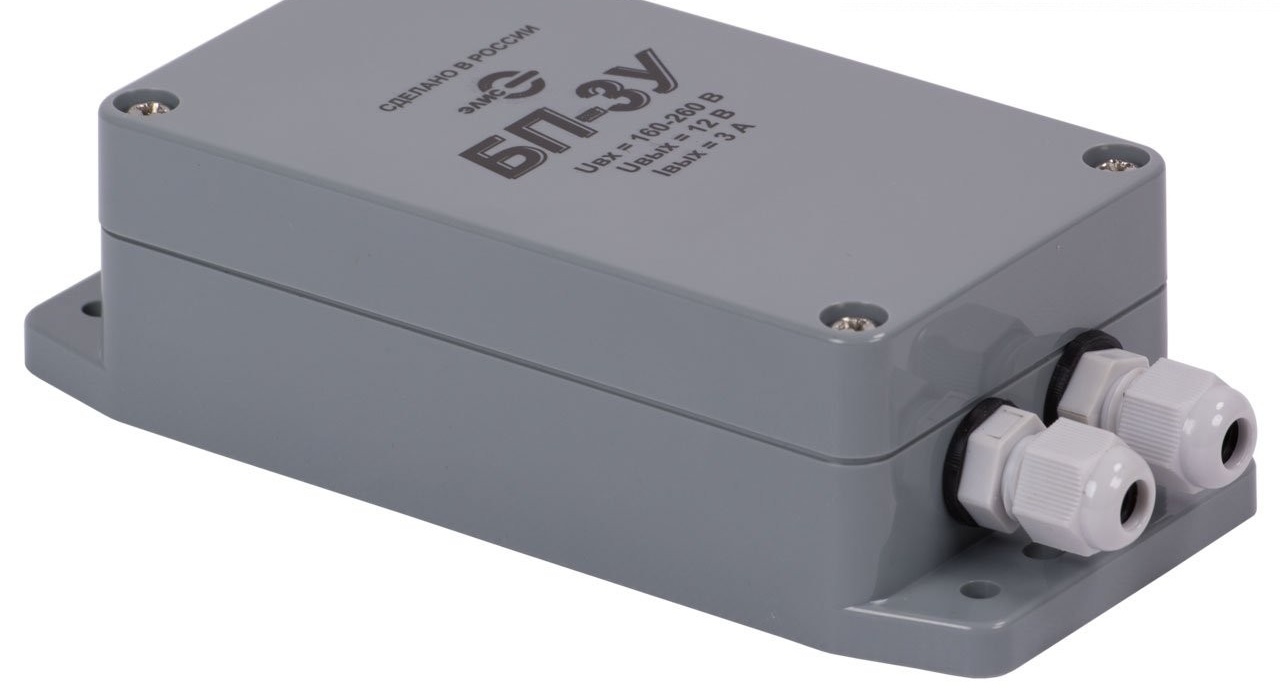
Install the power supply. It must supply voltage to the lock and all devices located on the gate. It is best to use a street-mounted device and mount it next to the lock. For electromechanical locks, a 12 V and 3 A power supply is needed; for an electromagnetic locking device, a 12 V and 1 A source is enough

The lock, controller and other components of the access control system should be powered from a source located nearby
-
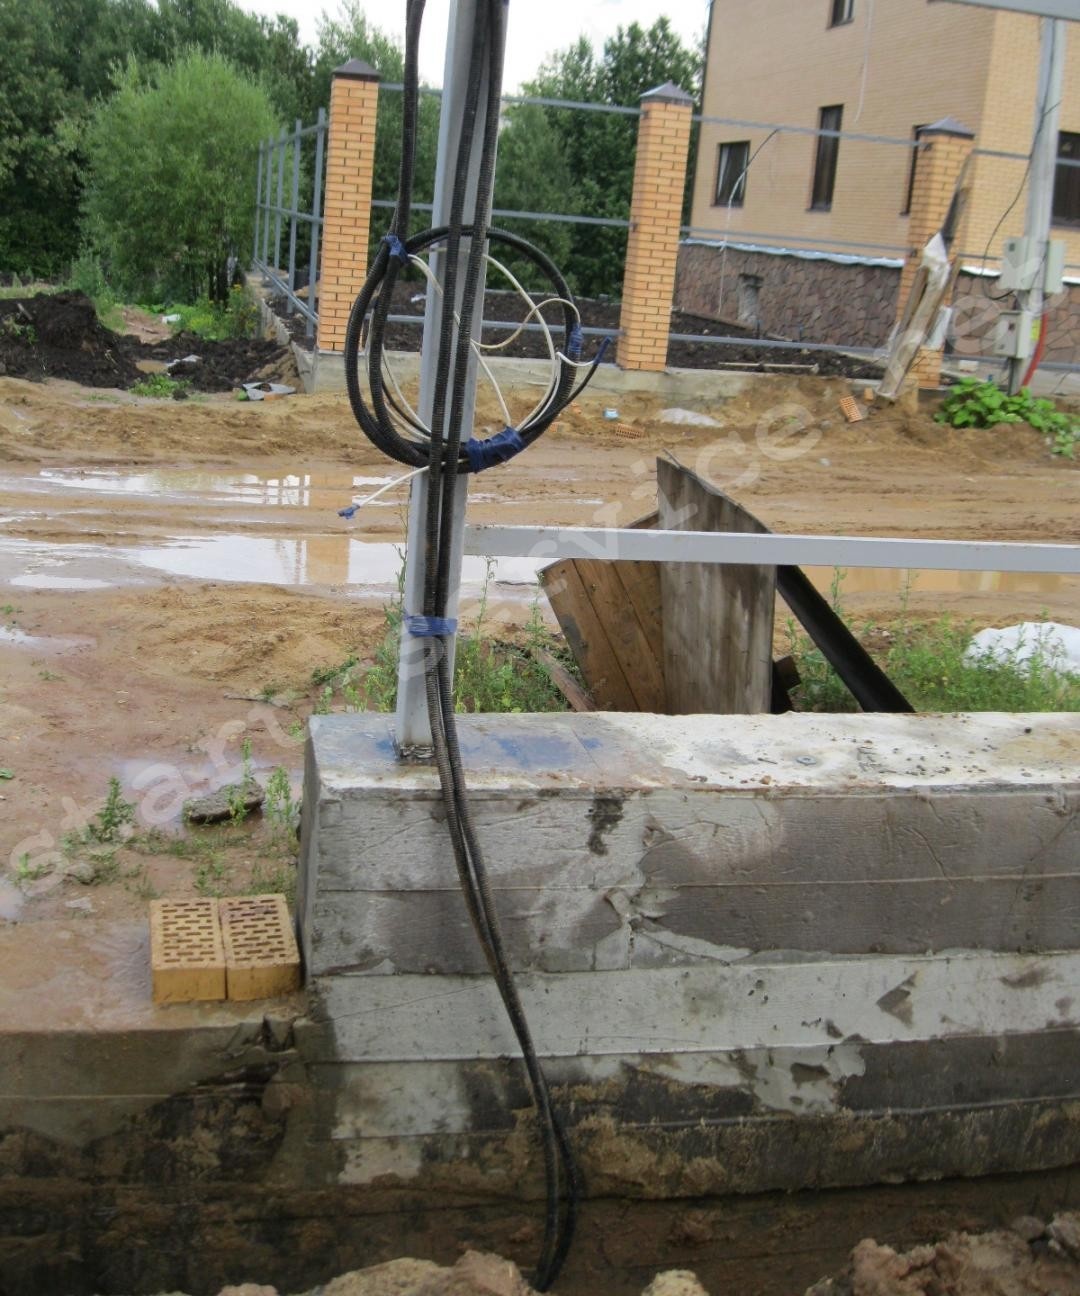
Lay the cable. We run the wires going down the street underground in special engineering pipes made of plastic or metal. In total, you need to lay one four-wire cable for connecting the monitor and the calling device and one two-wire cable for supplying voltage of 220 V. But since the cables go underground, it is better to lay them with a margin, given the appearance in the future of new elements of the system: additional video cameras, gate control devices, security sensors, etc.
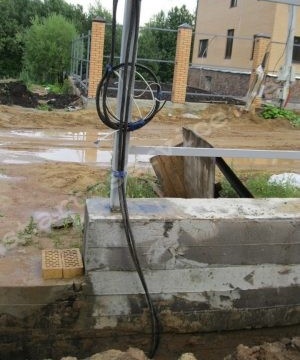
For underground installation, cables are pulled into corrugated hoses and laid in an dug trench in plastic or metal pipes
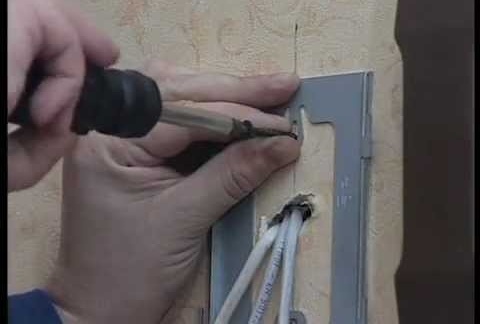
- We make wiring in the house. It can be either open or buried in the walls. But for the hidden laying of the wire, we will have to ditch the walls, and then cover them with putty and alabaster. It is best to do preliminary closed wiring for the intercom when the house is just under construction or under repair. If there are no embedded cables, but you do not want to spoil the wallpaper or paint, we select the open type of wiring. To do this, lay the cables on the walls outside, running them into plastic cable channels.
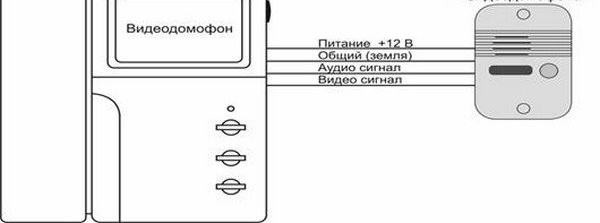
- We connect a four-core cable to the intercom according to the following scheme:
- yellow - audio channel;
- black - general;
- red - 12 volts ("plus");
- white - video image.
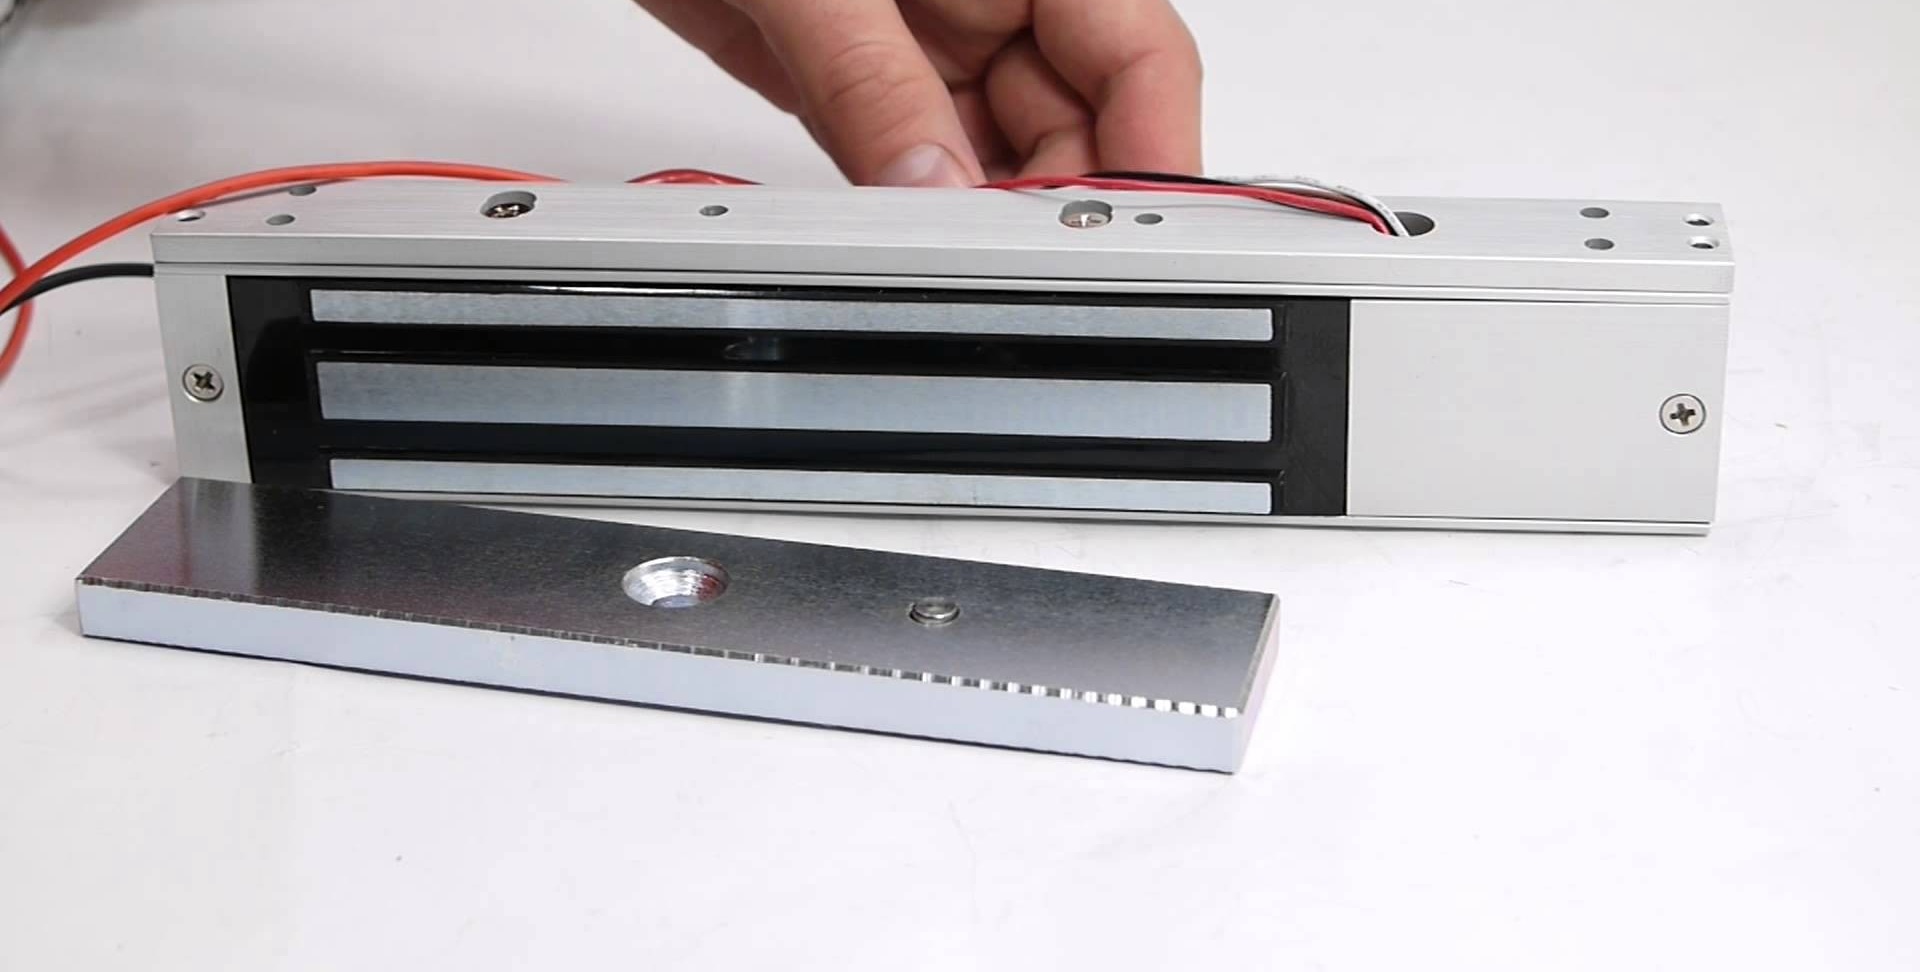
- We install the lock on the gate. The surface of the counter plate must be installed without distortions, since otherwise the lock will not fit snugly against it and close. Since the lock is operated by means of a relay, a common wire is connected to it, and a positive contact is made to the controller (terminal “+12 V”). All work must be carried out with the power off.

The electromechanical lock has a tongue that must fit snugly into the strike plate
- We program keys. So that the owners can enter the house, you need to provide them with access keys. Information about each identifier is recorded in the controller memory. On the first inclusion, it will respond with infrequent signals, sound and light. First you need to create a master key according to the special procedure described in the instructions. Then, in turn, we bring each subscriber key to the reader and wait for the confirmation signal. In this way, we record in the memory the necessary number of identifiers, making sure that the time between entries is no more than 16 seconds.

After programming, information about the access code from each key is recorded in the controller memory, and the device is allowed to pass
- Check the operation of the intercom. To do this, make a call from the panel - the monitor should give a signal. We pick up the phone, speak, to check the volume and sound quality, and also try to open the gate.If all the steps were successful, then we installed the intercom correctly and can be used. Typically, difficulties arise with the installation of the lock and controller. Therefore, when troubleshooting, the first thing to do is to carefully check the correctness of all connections to this device.
Video: how to install a doorphone do-it-yourself
Device and features for connecting a video intercom
To connect a video intercom, you need a cable with four wires. In the store you can buy a special wire, where two copper conductors are located next to the coaxial two-wire wire. It is called a combined video cable. Typically used cable brand KVK-P 2x0.75.
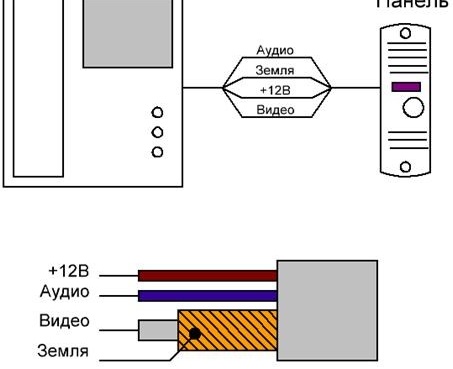
The video doorphone is connected to the call panel with a combined video cable, which has one shielded core
Two more wires are added to the lock, which will allow controlling its mechanism without leaving the house. The call panel is usually screwed at a height of 150 cm from the ground.
Quantum QM-4HP video on-door speakerphone
Many people prefer to install the Quantum QM-4HP convenient, practical and reliable video on-door speakerphone in their private home.
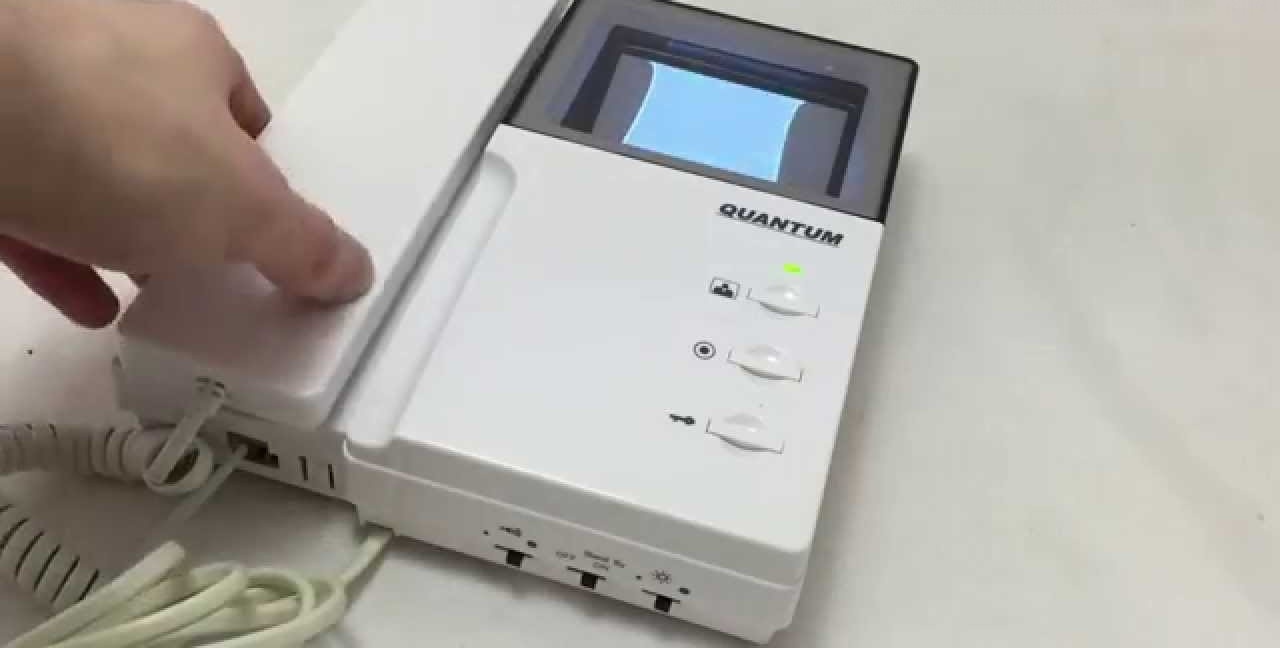
Quantum QM-4HP is one of the most popular models among owners of private houses
Its main characteristics:
- four-inch (approximately 10 cm diagonal) CRT monitor;
- parallel operation of up to 4 monitors in one system;
- door open button;
- connection of one calling panel;
- installation of a video memory unit;
- connecting an additional audio handset.
Connection diagram of the Quantum QM-4HP video on-door speakerphone
The video intercom is connected according to the standard four-wire circuit, which we described above. Therefore, this model can be used to install an access control system in a private house according to the step-by-step instructions given by us.
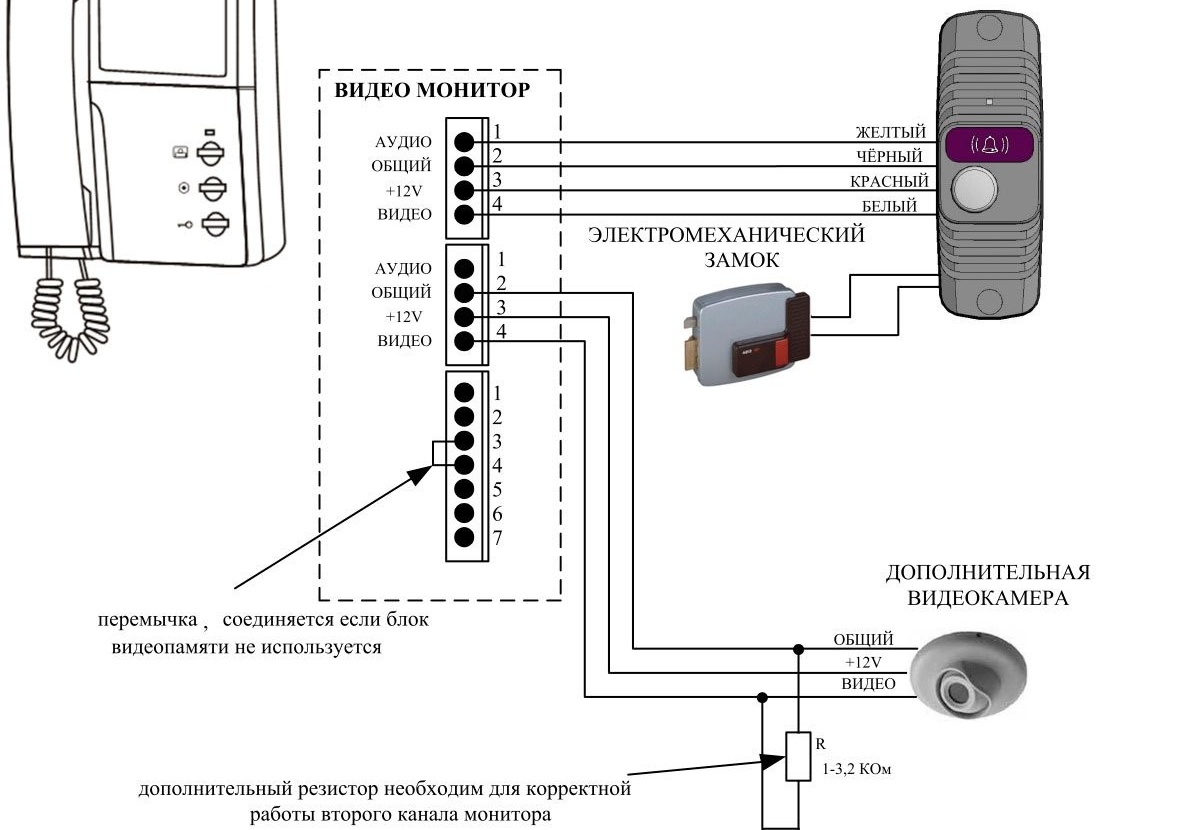
The Quantum QM-4HP video on-door speakerphone can be used with an additional video camera and a 32-frame memory unit
In order to install the intercom correctly, you must accurately follow all the manufacturer's recommendations and understand the intricacies of installing electrical wires and devices. If everything is done according to the instructions, then you will not have to attract specialists and spend additional funds on installing this device. And in the end, you will get a great intercom with audio or video system, which will greatly facilitate your life in a private house.