How to make a box and hide pipes in the bathroom: examples of work and useful tips
No communication systems in the bathroom can not do. However, water and sewer pipes are unlikely to give your room an aesthetic appearance. Therefore, most residents, in the process of repair, try to hide all communication. To implement the plan, there are several ways: hide the pipes with furniture, boxes, shutters or walled in the wall. When choosing a disguise option, it is worth considering the possibility of maintenance of communications. So that in the event of a breakdown, you do not have to break the decor of the room. By installing a pipe box in the bathroom, you can make a collapsible design or build small doors for access to communications.
Depending on the location of the highways, the box can be installed in two ways: by closing only the pipes or the entire wall on which they are located. In the first option, closing only those areas where there are pipes, you save on material. Sewing the entire plane on which the lines are located looks more aesthetically pleasing, but reduces the useful area of the bathroom. In order to at least somehow use the space in the box not occupied by pipes, small storages are built there for various things.
Content
What is the best way to make a box?
Before closing unsightly communications, it is necessary to choose the right material for the duct, which will hide the pipes in the bathroom. It must meet several requirements:
- have sufficient resistance to moisture;
- light weight and thickness;
- be made from environmentally friendly ingredients that do not emit harmful substances.
According to these criteria, from the commercially available materials for making the box in the bathroom, you can use: MDF, moisture-resistant plywood, moisture-proof drywall or plastic.
Preparatory stage
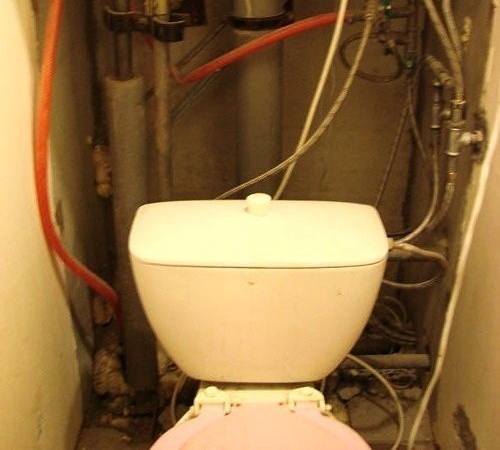
Most often, problems with the pipeline occur at the joints. Therefore, the fewer the better. If the installation of the box is carried out after laying new pipes, care must be taken to ensure that the line has as few connections as possible. If replacing the pipeline is not included in your plans, before you hide the pipes in the bathroom, you must conduct a thorough inspection. Inspect all lines for defects and, if any, to eliminate.
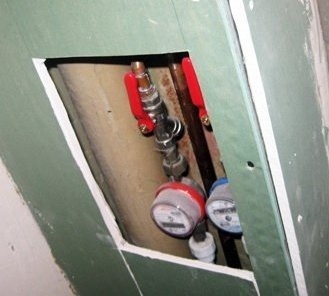
It is believed that without fear of leaks, sealed and welded joints can be closed. But fittings with threaded connections should be freely accessible. It is necessary to periodically inspect them. Therefore, threaded connections cannot be bricked.It is also necessary to provide free access to gates, sewer audits, meters, filters.
Making the box step by step
Installation of the box in the bathroom consists of several stages. Let's consider each of them in more detail.
Measurement and sizing
Before sealing pipes, you need to make the necessary measurements and clarify the location of the box. In places of unreliable connections to meters and valves, a removable part or door must be provided. The layout of the room on a scale on which all structural details will be marked out does not hurt. During the measurements, do not forget about the thickness of the finishing material.
It is necessary to calculate the amount of material for manufacturing. The marking for the frame of the duct covering the vertical pipes starts from the floor. The distance from the pipes to the duct should not be less than 3 cm.
Having determined the contour of the future structure on the floor, using a plumb line, transfer it to the ceiling, and then make markings on the walls.
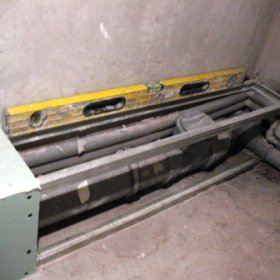
Mounting the frame for subsequent cladding
Before you sew up communications in the box, you must install the frame around the pipes. It is best to make it from a galvanized profile. Since the air in the bathroom is constantly humid, the use of wooden bars is undesirable. If you still decide to use them, choose bars made of rot-resistant rocks. And before use, treat all wooden parts with an antiseptic.
The adhesion of the frame elements to each other is carried out with self-tapping screws or with the help of a notch. To fix the profile to the wall, dowels and euro screws are used.

It is necessary to mount profiles to the wall, taking into account that the finishing material does not subsequently lie adjacent to the pipes
The first step is to mount the profile on the walls. Then install the racks forming the front face.

Depending on the design of the future box, there can be several or only one front struts. They are attached using their own curved edge or suspensions.
Then mount the rails on the ceiling and floor.

It is convenient to fasten vertical and horizontal profiles to each other using a notch
If the length of the racks is more than 1.5 m, you must make jumpers between them. They will be needed for the frame, the width of which is more than 0.25 m. The distance between the jumpers makes no more than a meter.

For structural strength, jumpers are mounted on racks more than 1.5 m high.
When using a wooden frame, process cut points with building mastic. This will protect the box from damage and prevent its deformation in the process of temperature-wet vibrations.
Covering the frame of the box with sheet material
Cutting out the details for the box, try to make solid elements, and not from pieces. First cut the side parts. They are cut in such a way that the edges do not protrude beyond the profiles of the frame, but are flush with them. After that, cut out the front of the box. It should cover the side elements.
After cutting the material, it is mounted on racks. Do it with self-tapping screws (3.5-4.5 cm). The distance between them should be no more than 2.5 cm. Such a box will have sufficient strength, so it is not necessary to fasten the material to the jumpers. To control the weaknesses of the pipeline, inspection holes with doors are left.

A hole must be left in the box for easy access to valves, counters and filters. It can be buried with a door purchased in a hardware store.
They can be built independently or purchased ready-made. For hand-made manufacturing of access points to the pipes, the door is made of material that is used for the box itself. So that it does not open, furniture magnets are fixed on them.

The door for the control hole can be finished with the same material as the entire box. So it will be less noticeable
You can make a fully collapsible box.For this, sheets of finishing material are mounted on screws to the very edge. When finishing, they are not covered with tiles.
In conclusion, fix plastic corners or a plinth. When it is necessary to dismantle the box, the plinth is removed, the screws are untwisted and the finishing material is removed.

Self-tapping screws, covered with a plastic corner, are easily twisted for dismantling the box in case of emergency. After that, the box remains intact and can be mounted in place
The final decorative finish
The final stage of the installation of the box is its decoration. It depends on the material of which the structure is made. Plywood, drywall and MDF can be tiled or painted. Plastic panels do not need further decoration. They themselves look pretty attractive. Unlike drywall, plastic does not reduce the area of the room.

To decorate the bath, a frame is constructed from the profile
In the same way, the pipes are closed under the bath itself. First, the frame is mounted, and then sheathed, leaving the control doors.

On top of the frame from the profile, a moisture-proof drywall is mounted and a tile is installed on it. Be sure to leave the door for pipe maintenance
Now knowing how to mount the box, you can decorate any pipes in the bathroom and make the room more attractive from an aesthetic point of view. Hiding communications in the bathroom improves the design of the room. In addition, after closing the pipes with the duct, the noise level coming from them is reduced.