How to cook with welding: a complete guide for beginners
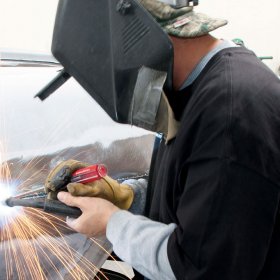
A welding seam is one of the most reliable ways to connect parts. It is used in industry and in everyday life. Every home craftsman uses welding from time to time. Well, if he knows how to cook himself, but often have to turn to specialists. But welding is quite possible to learn. You should start with the simplest thing: electric welding for beginners is, first of all, training in the implementation of various seams. More complex work can only be done with experience. Let's look at the basics of technology and some tricks of the welding process, as well as the equipment and materials used.
Content
Types of welding machines
For the correct choice of the welding machine, it is necessary to take into account all the pros and cons of various types and models of welders.
Transformers - the simplest and most traditional devices, quite heavy in weight, made on the basis of a step-down transformer, which brings the voltage value to the required value for operation. A feature of transformers is that they operate on alternating current, which creates an unstable arc. In combination with an increased amount of slag and gas impurities, such an arc promotes metal spraying and spoils the appearance of the seam. A high-quality seam with such a device can be made by an experienced welder with skills on a transformer.
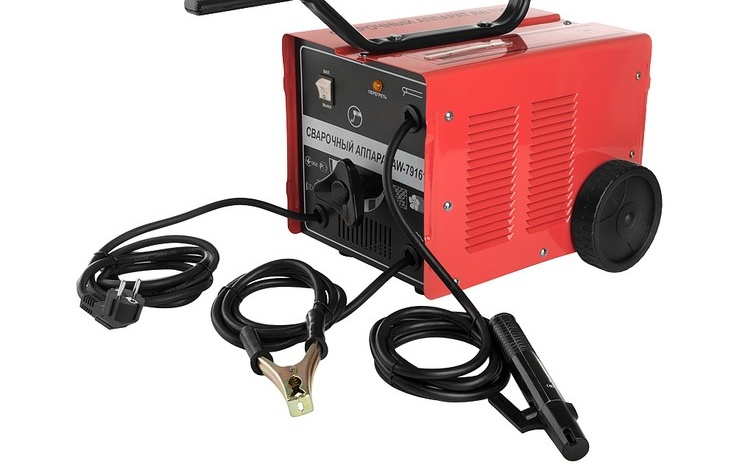
Simple apparatus powered by alternating current
Rectifiers - welders who can convert alternating current to direct and lower the network voltage using semiconductor diodes. Direct current gives a stable arc and allows you to make the welding seam homogeneous and airtight, strong and beautiful. The rectifier is universal, all types of electrodes are suitable for it, all types of metals can be cooked with this apparatus: stainless steel, aluminum, copper, titanium, various alloys.

A universal welding machine suitable for all types of electrodes
Inverters - They are very popular because they are lightweight, have excellent functionality, and have automated settings. Such technical characteristics allow beginners to work on it. The design of the apparatus includes a number of units that convert the alternating current of the network into direct current of high power. The advantage of this type of welders is:
- the ability to fine tune;
- performing a wide range of tasks;
- stable arc;
- resistance to power surges;
- high quality of welding, smooth seam;
- work with all types of electrodes;
- connection of all types of metals of any thickness and position in space.
- It has additional functions that prevent sticking of the electrode and tear drop;
- the ability to set fire to the electrode at maximum current supply;
Of the minuses, it can be noted:
- the need for frequent dust removal;
- limited cable length equal to 2.5 m;
- the inability to work at air temperatures below - 15 degrees.
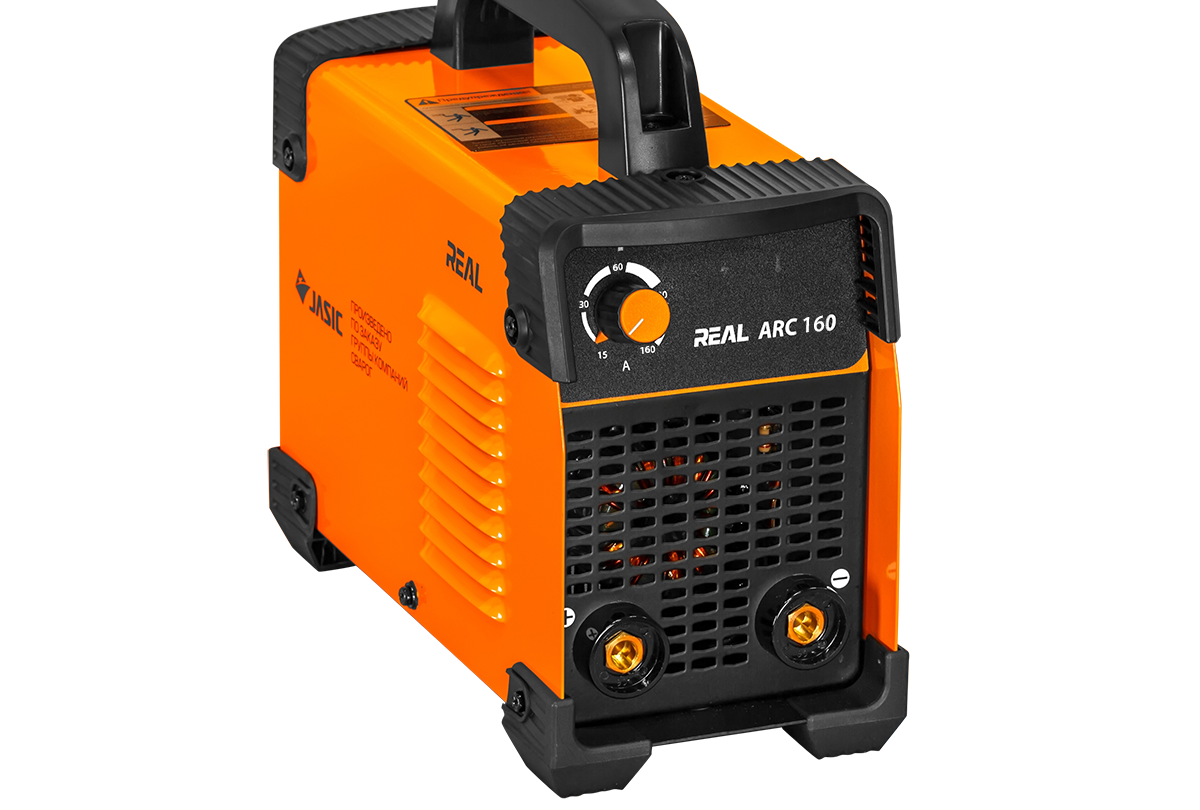
Inverter suitable for novice welders
Semiautomatic devices - There are two types. The former increase welding productivity through continuous wire feed. In this case, it is not necessary to constantly change the electrodes. The seam is smooth, continuous and without defects. The second ones work in a gaseous environment, for this they use oxygen, nitrogen and carbon dioxide, as well as argon and helium. Gas welding has the following advantages:
- one device is designed to work with both gas and wire;
- excellent quality and aesthetics of the seam;
- stable smooth arc;
- high functionality;
- the ability to weld complex joints.
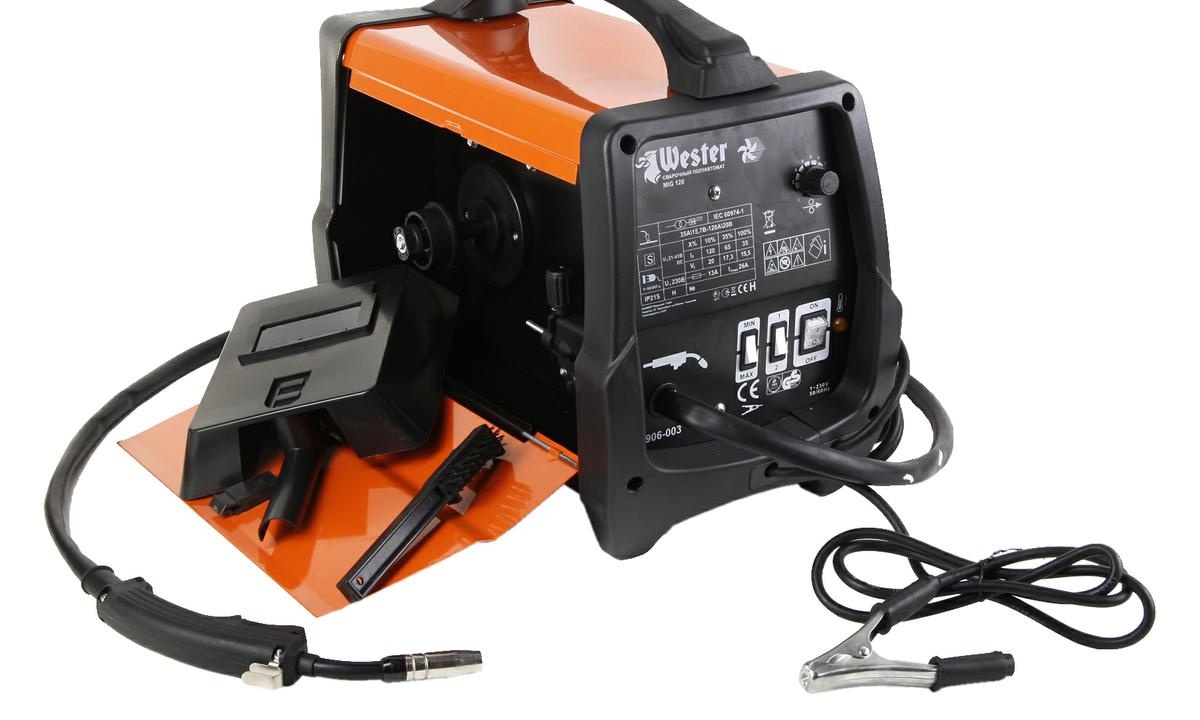
Using this machine, you can make a high-quality weld
What will be required for the work of a novice welder
First of all, you need to prepare equipment and workwear.
Tools and protective equipment
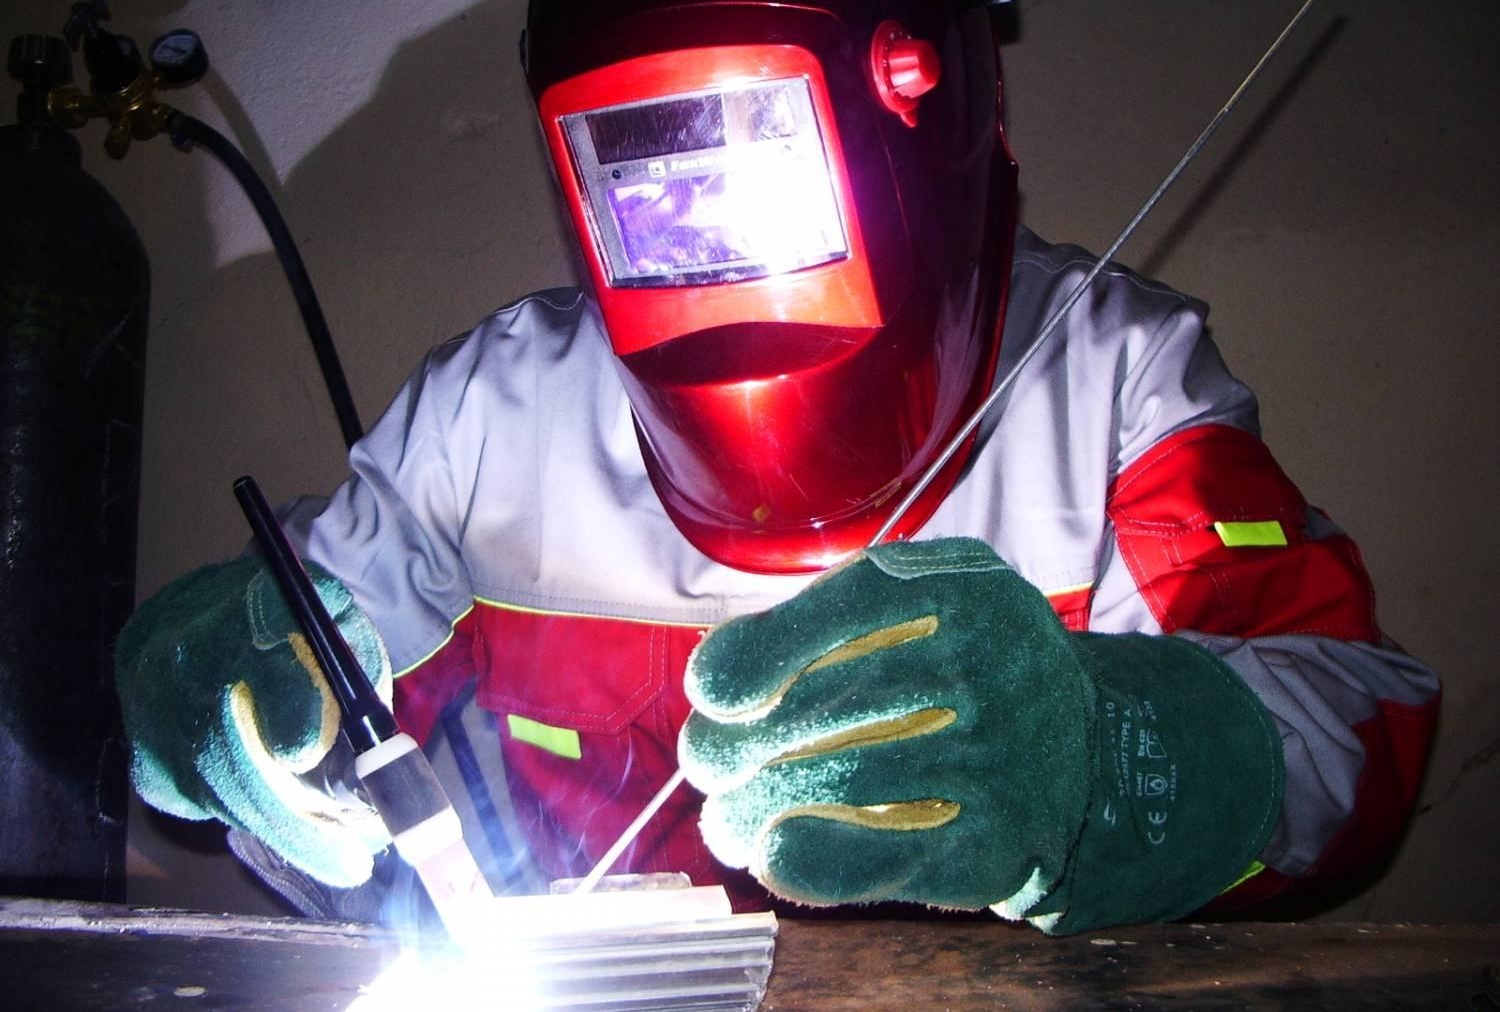
You will definitely need a welding machine, a set of electrodes, a hammer and a chisel for churning slag, a metal brush for cleaning the seams. An electric holder is used to clamp, hold the electrode and supply current to it. A set of templates is also needed to check the size of the seam. The diameter of the electrode is selected depending on the thickness of the metal sheet. Do not forget about protection. We are preparing a welding mask with a special light filter that does not pass infrared rays and protects the eyes. Screens and shields perform the same function. Tarpaulin suit, consisting of a jacket with long sleeves and smooth trousers without lapels, leather or felted shoes for protection against metal splashes and gloves or mittens, canvas or suede with an overlap on the sleeves. Such direct, closed clothing prevents the welder from getting molten metal on his body.
There are special protective equipment that are used to work at heights and inside metal objects when working in a prone position. In such cases, you will need dielectric boots, a helmet, gloves, a rug, knee pads, armrests, and for high-altitude welding you need a safety belt with straps.
What electrodes to choose
Electrodes come in various types and brands. This is due to the need to select the metal of the connected parts and the same metal electrode.
Each electrode has a marking that gives the welder all the necessary information. Learning to read markings is easy.
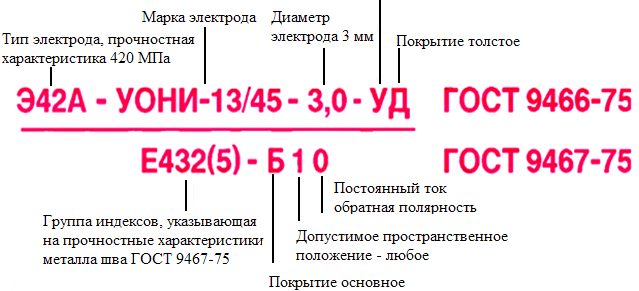
Special markings are indicated on the electrodes.
Often they are coated with various coatings on top, which gives the electrodes the properties necessary for welding different metals and working conditions. Here is a table of classification of electrodes by type of coating and application.
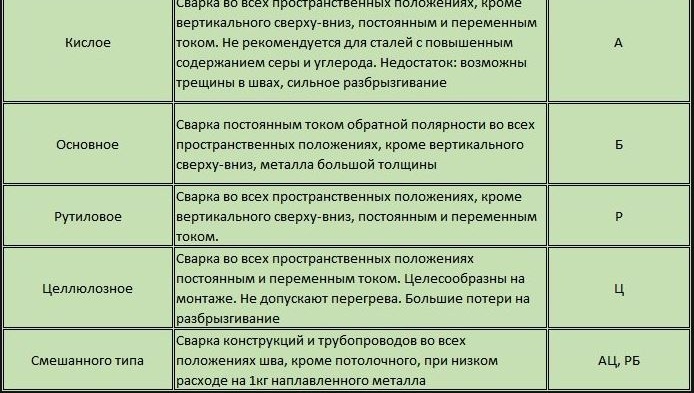
Special coating gives the electrodes special properties necessary for welding various metals
The classification of electrodes by type and purpose is reflected in the product labeling.

Electrodes vary in type and purpose.
Types of welds
Connecting welds are divided by location, strength, technology, design features. Types of location of seams:
- Lower. The simplest and most convenient, thanks to the force of gravity, the metal fills the gap between the parts. This is the most durable and economical seam.
- Horizontal. The workpieces are perpendicular to the electrode and the seam runs horizontally. Part of the metal leaves the welding zone and the electrode is consumed faster.
- Vertical.In this case, the workpieces are also perpendicular to the electrode, but the seam is formed vertically. The molten metal tends to down, the electrode consumption is significant.
- Inclined. The movement of the welder’s hand is inclined. It is used for corner and tee joints.
- The ceiling seam is located above the master.
Design separation:
- Butt The butt joint is quite durable and economical, it does not distort the joint surface. This is a universal connection.
- Lap weld parts when there is not enough space for a butt weld. The thickness of the workpieces should not be more than 8-10 mm.
- It is recommended to weld the fillet weld on both sides, while the workpieces are at an angle to each other. This seam is not easy to perform due to the increase in the heat-affected zone and the high consumption of the electrode.
- The T-joint is an angular seam where the planes of the parts are welded perpendicularly. The seam is formed on two sides, it is quite complicated.
- A seam for electric rivets is used when there is no need for an airtight seam, it is the most economical and inconspicuous.
Welding can be done in one layer or in several layers for thick workpieces.
How to Learn to Cook by Welding - A Beginner's Guide
Welding is a high temperature process. For its implementation, an electric arc is formed and held from the electrode to the welded product. Under its influence, the base material and the metal rod of the electrode melt. Specialists say that a weld pool is formed, in which the base and electrode metal are mixed. The size of the formed bath directly depends on the selected welding mode, spatial position, arc speed, shape and size of the edge, etc. On average, its width is 8-15 mm, length 10-30 mm and depth - about 6 mm.
The coating of the electrode, the so-called coating, during melting forms a special gas zone in the region of the arc and above the bath. It displaces all air from the welding area and prevents the interaction of molten metal with oxygen. In addition, it contains pairs of both base and electrode metals. Slag is formed on top of the weld, which also prevents the interaction of the melt with air, which negatively affects the quality of welding. After the gradual removal of the electric arc, the metal begins to crystallize and a seam is formed that combines the parts to be welded. On top of it is a protective layer of slag, which is subsequently removed.

In the process of performing the weld, the electrode coating is melted, forming a special gas zone. Inside it, the base metal and electrode are mixed
It is best for novice welders to get the first experience under the guidance of a specialist who can correct possible errors and give useful advice. It is necessary to start work, having reliably fixed a detail. For fire safety, you need to put a bucket of water near you. For the same reason, it is impossible to carry out welding work on a wooden base and to neglect even very small residues of the used electrode.
Welding machine connection
For welding to work safely, you need to connect the machine to the network, observing the following rules:
- First you need to check the voltage and current frequency. These data must be the same on the network and on the device.
- We set the calculated value of the current power on the welding machine, which should correspond to the selected electrode diameter. If the welder settings block allows you to select the voltage, you need to set it right away. Connection is made through a special plug and a grounding lug.
- Securely fasten the ground terminal. Check that the cable is insulated and carefully tucked into a special holder.
- Be sure to check all connections, cables, plugs.
- You can use a special extension cord that connects without intermediate connections.
- In older homes with poor wiring, voltage drops may occur. It stops the process and can damage the welding equipment. In this case, you need an electric generator that will provide voltage at the operating level.
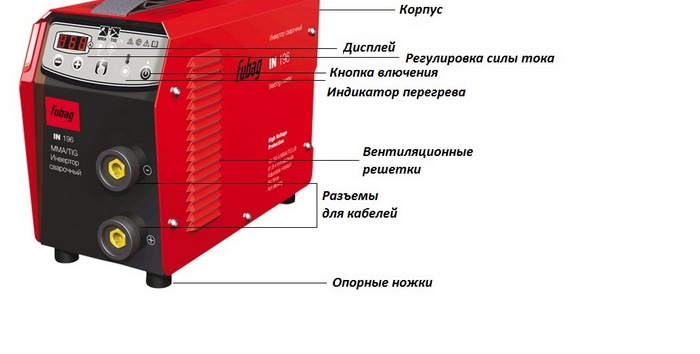
The welding machine is simple
How to choose the right current
Welding current is an important indicator of welding and determines the type and nature of the seam and the performance of the work. The higher the current, the more stable the arc and the greater the penetration depth. The current strength depends on the location of the workpieces in space and on the size of the electrode. The highest value is set for welding horizontal workpieces. For vertical joints, the current value is applied by 15% less, and for ceiling joints - by 20%.
The current strength depends on the location of the workpieces and on the size of the electrode
How to light an arc
The first way is by touching. To do this, install the electrode at an angle of about 60 ° relative to the product. Slowly hold them on the surface. Sparks should appear, now we touch the metal with the electrode and raise it to a height of no more than 5 mm.
If the operation was performed correctly, the arc will light. A five-millimeter gap must be maintained throughout welding. It should be borne in mind that with proper welding of metal by electric welding, the electrode will gradually burn out, so it is constantly slightly closer to the metal. The electrode should be moved slowly, if it suddenly sticks, you will have to slightly swing it to the side. If the arc does not ignite, it may be necessary to increase the current strength.
The second way is striking. It is necessary to bring the electrode to the surface of the workpiece and strike it on the part, as if you are lighting a match. It is possible to facilitate the ignition of the electrode by plastering from its edge.
Tilt and movement of the electrode
After it is possible to ignite and maintain the arc without problems, it is time to proceed to the fusion of the roller. We light the arc, slowly and smoothly move the electrode horizontally, performing light oscillating movements. At the same time, the molten metal seems to “pick up” to the very center of the arc. The result should be a strong seam with small waves formed by the weld metal.
The angle of the electrode for a novice welder is better to observe about 70 degrees, that is, with a slight deviation from the vertical. Below is a diagram of the arc welding.
The angle of the electrode is about 70 degrees
If the electrode burned out almost completely during the welding of parts, and the seam is not yet completed, work is temporarily stopped. We change the used element to a new one, remove the slag and continue working. At a distance of about 12 mm from the recess formed at the end of the seam, which is also called the crater, we ignite the arc. We bring the electrode to the recess so that an alloy is formed from the metal of the old and newly installed electrode, after which welding of the seam continues.

During welding, the electrode makes certain movements, mainly translational, longitudinal and transverse. Different types of seams are made from their combinations, the most common are shown in the diagram
The trajectory of the arc during the welding of parts can be made in three directions:
- Progressive. It involves moving the arc along the axis of the electrode. Thus, it is easy enough to maintain a stable arc length.
- Longitudinal. It forms a filament welding roller, the height of which depends on the speed with which the electrode moves and its thickness. This is an ordinary seam, but very thin. To fix it, in the process of moving the electrode along the welded seam, transverse movements are also performed.
- Transverse. Allow you to get the desired seam width. It is carried out by oscillatory movements. Their width is selected based on the size and position of the seam, the shape of its cutting, etc.
In practice, all three main movements are used, which are superimposed on one another and form a certain trajectory. There are classic options, however, each master usually "sees" his own handwriting. The main thing is that during the work the edges of the connected elements are well melted, and a seam of a given shape is obtained.
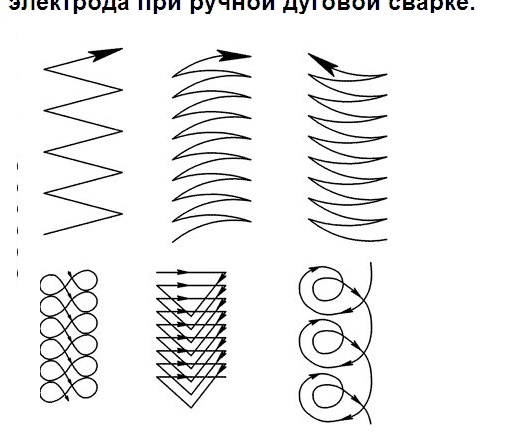
As a rule, all three directions are applied, they can overlap and form a path
Weld seams
Ceiling Weld
This seam is considered the most difficult, since the weld pool is turned upside down and is located above the welder. The electrode is selected no more than 4 mm and is taken a little to the side so that the metal does not spread. Use a short arc and completely dry electrodes, the seam during ceiling welding should be thin. The movement takes place on itself, so it is easier for the welder to control the quality of the seam. There are several ways to do it:
- ladder;
- crescent moon;
- inversely.
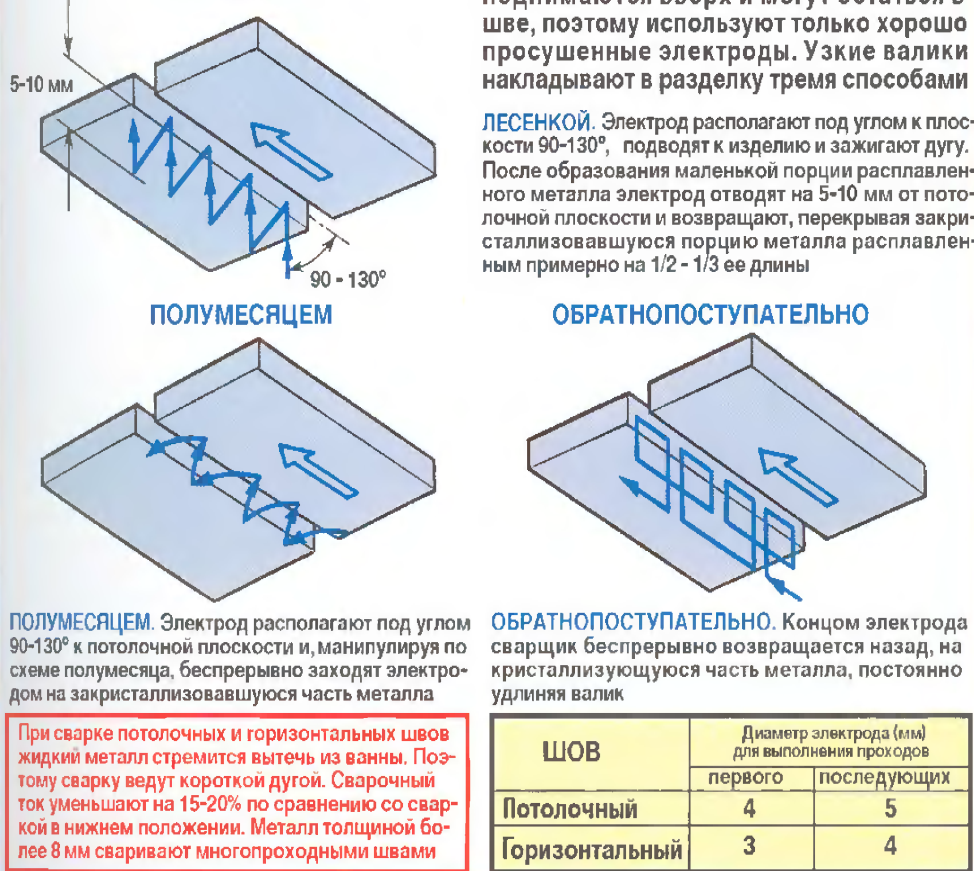
Ceiling joint is considered the most difficult
Video: making a ceiling seam
Vertical
When making such a seam, you can lead the electrode from top to bottom or from bottom to top. To prevent the metal from draining, the electrode should be placed at an angle of 45-50 degrees down from the perpendicular position. Experienced welders recommend making this seam in one run.
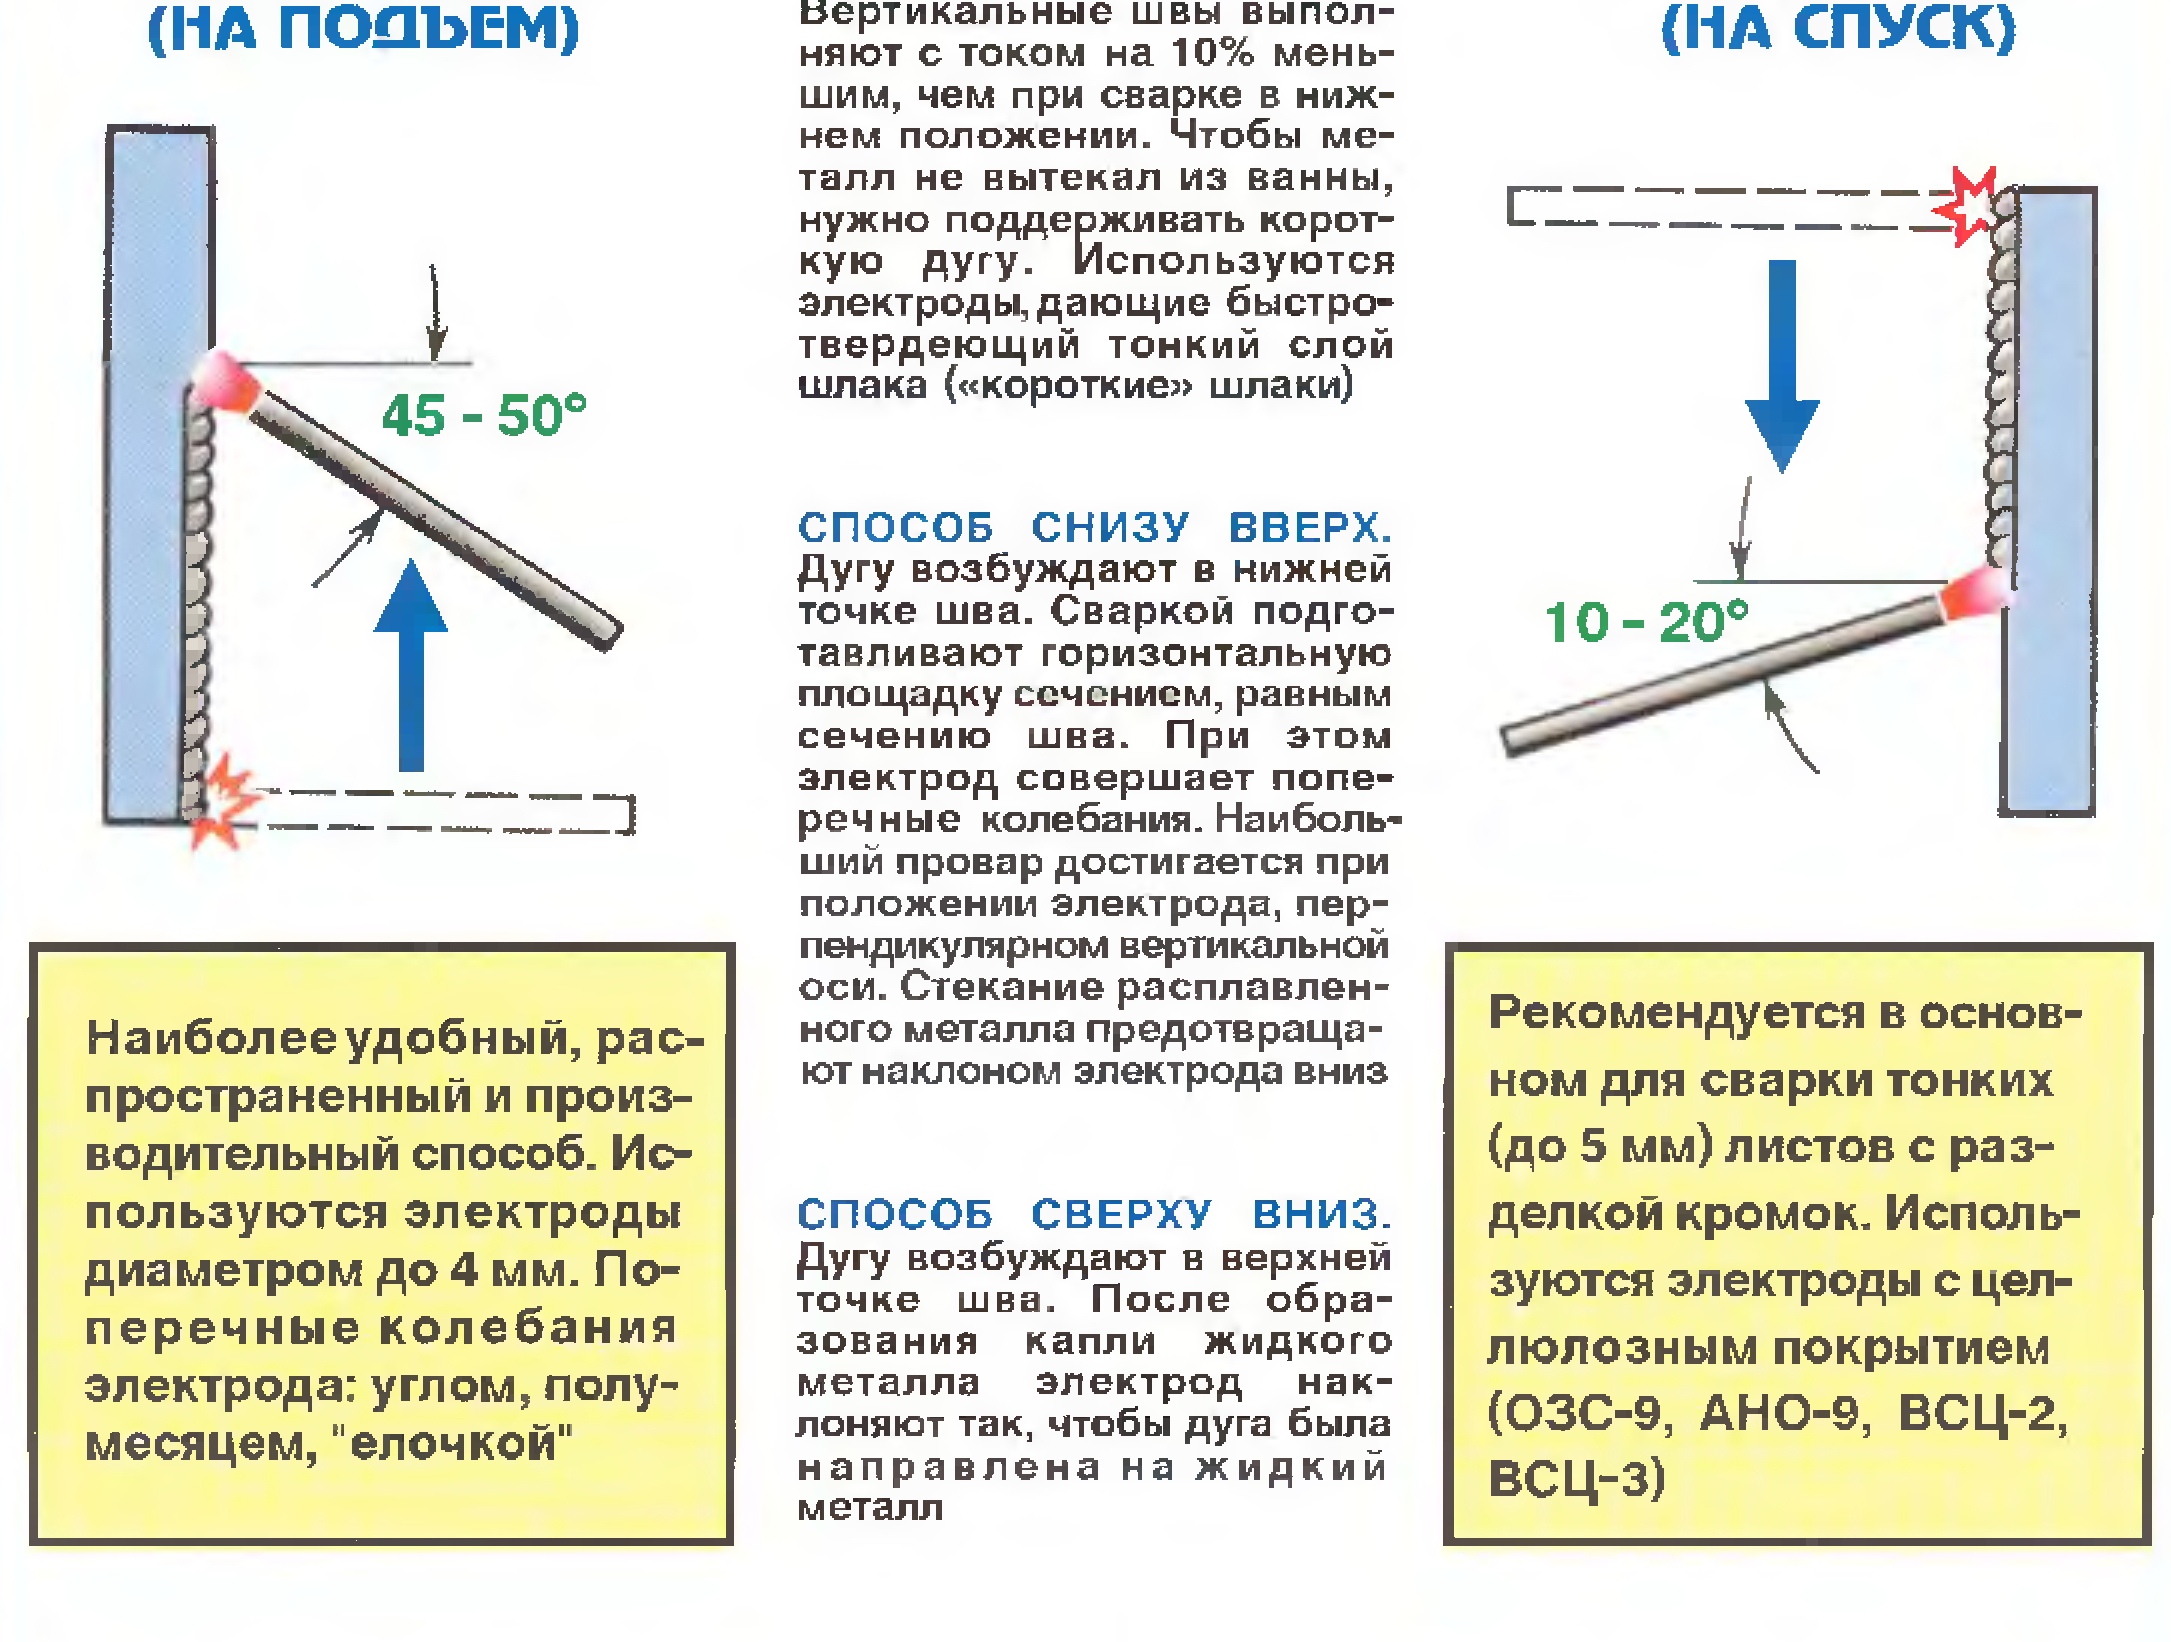
When performing a vertical seam, the electrode is located at an angle of 45-50 degrees
Video: vertical seam
23.03
Horizontal seam
When performing such a seam, the main difficulty lies in the flow of metal down. To solve this problem, the welder must choose the angle of the electrode and the passage speed. Welding is carried out from left to right or from right to left.
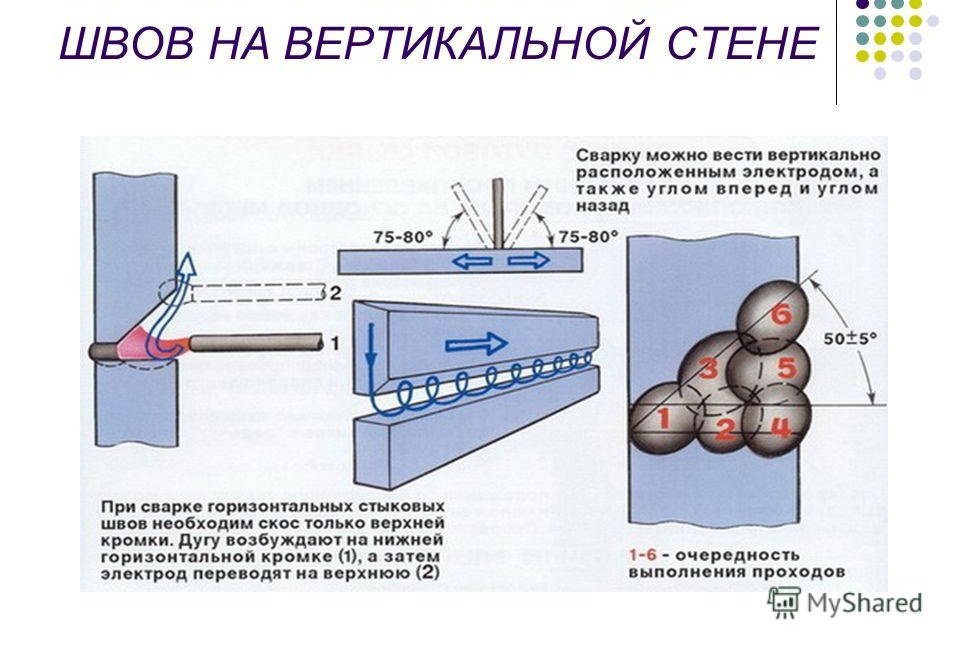
When performing a horizontal seam, you need to correctly select the angle of the electrode and the passage speed
Angular
When forming fillet or T-joints, the parts are positioned at different angles by the boat so that the molten metal flows into a corner. Then they are caught by welding on both sides, one edge of the structure should be slightly higher than the other. The movement of the electrode starts from the bottom point.
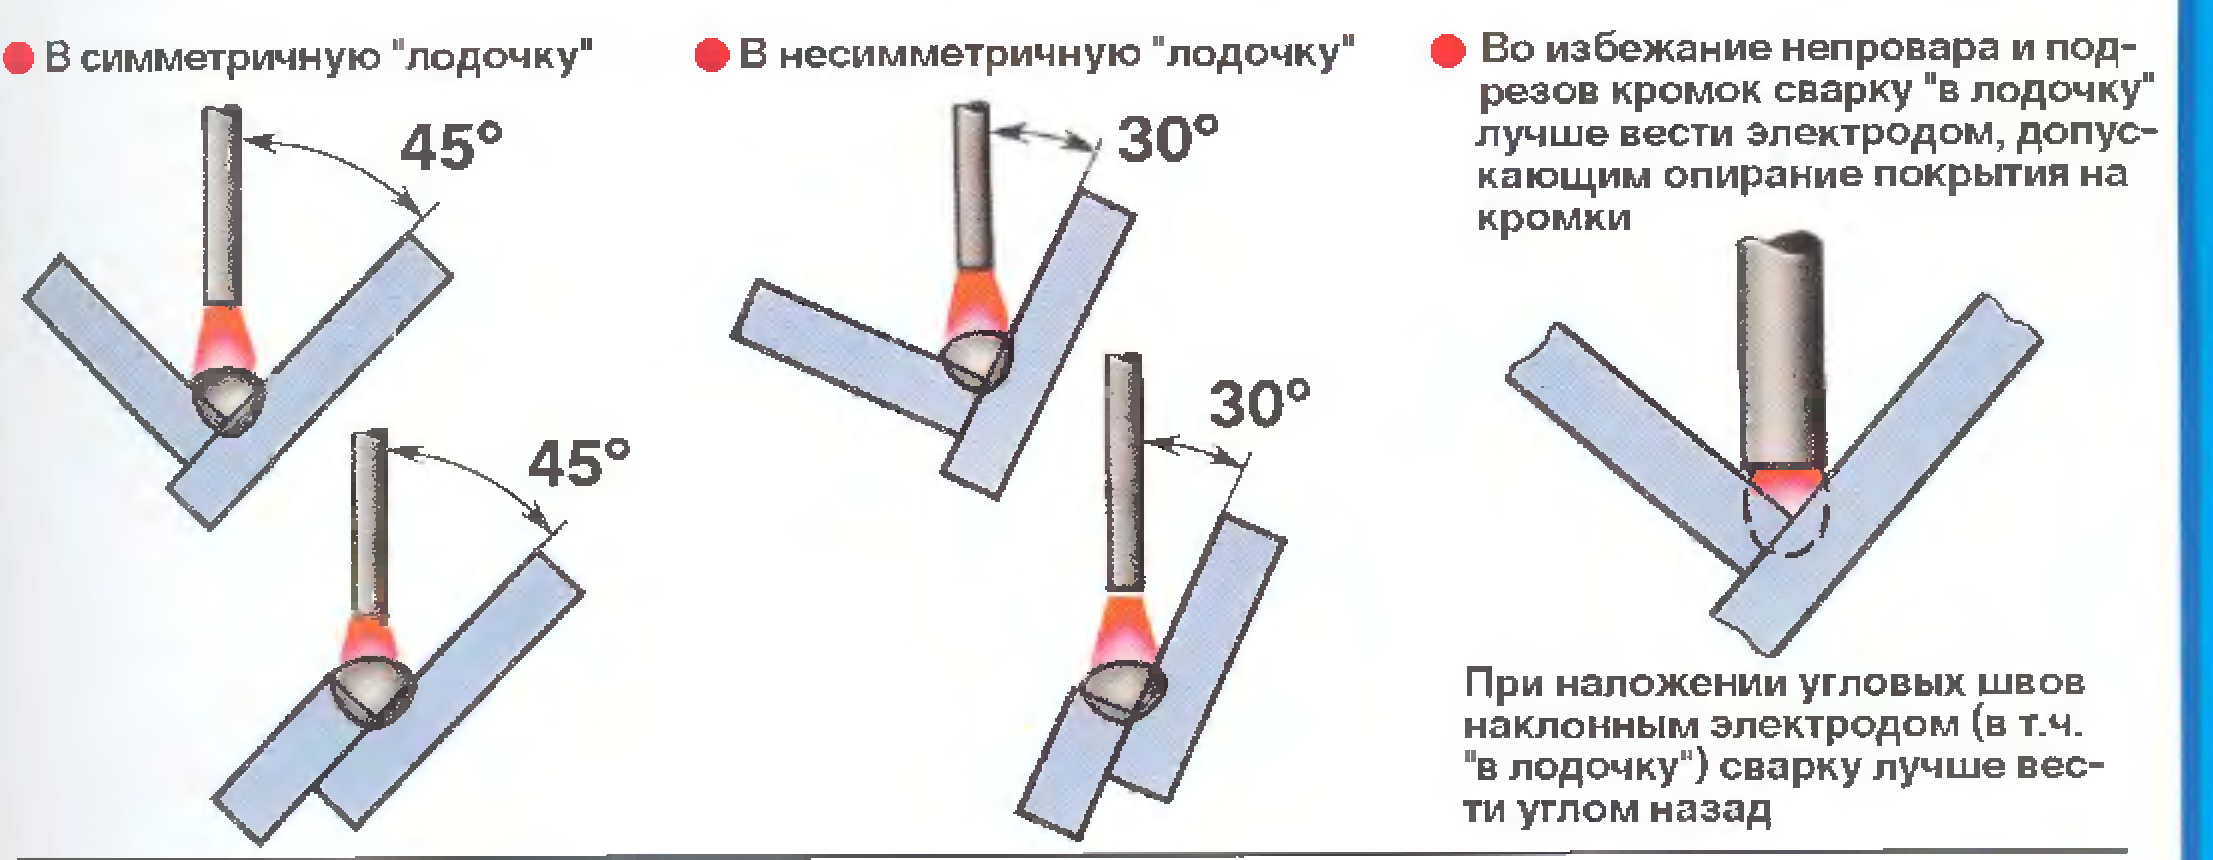
In angle welding, electrode movement starts from the bottom
Features of pipeline welding
By arc welding, you can make a vertical seam, which is located on the side of the pipe, horizontal - along its circumference. As well as the ceiling and the bottom, located, respectively, above and below. Moreover, the latter is considered the most convenient in execution. Steel pipes are usually butt welded with mandatory penetration of all edges along the height of the walls. To reduce the influx inside the pipe, an angle of inclination of the electrode of no more than 45 ° relative to the horizontal is selected. The height of the seam is 2-3 mm, the width is 6-8 mm. When lap welding, the height of the seam is about 3 mm, and the width is 6-8 mm.
Before starting to cook the pipe by electric welding, we carry out preparatory work:
- thoroughly clean the item;
- if the ends of the pipe are deformed, cut or straighten them;
- clean the edges. We clean the minimum of 10 mm of the outer and inner planes adjacent to the pipe edges to a metallic sheen.
Now you can start welding. All joints are processed continuously, up to complete welding. Rotary as well as non-rotary pipe joints with a wall width of up to 6 mm are produced in at least 2 layers. With a wall width of 6-12 mm - three layers are performed, more than 19 mm - four. The peculiarity of pipe welding is that each seam that is applied to the joint must be cleaned of slag, after which the following is performed. The first seam is the most responsible. It should completely melt all the edges and blunts. It is especially carefully examined for crack detection. If they are present, they are smelted, or a piece is cut down and brewed again.

The final layer is as smooth as possible with a smooth transition to the base metal
The second and all subsequent layers are performed by slowly turning the pipe. The end and the beginning of all layers are necessarily displaced relative to the previous layer by 15-30 mm. The final layer is performed with a smooth transition to the base metal and with a flat surface. To improve the quality of pipe welding by electric welding, each subsequent layer is carried out in the opposite direction relative to the previous one, and their closing points must be positioned apart.
Self-welding is a rather complicated event. However, if you wish, you can still master it. You need to learn the basic rules of the process and gradually learn to perform the simplest exercises. No need to spare the time and energy to master the basics, which will become the basis of mastery. Subsequently, it will be possible to boldly move on to more complex techniques, honing your skills.
Material updated 03.03.2018

5 comments