How to work with pipe clamps + an example of manufacturing a clamp from improvised materials
At the first signs of pipeline depressurization, it is necessary to quickly find the damaged area and eliminate the detected defect. When performing emergency emergency work, you can use home-made clamps to stop leaking in the pipeline for a while. Ready-made pipe clamps made in the factory from stainless steel or fire-resistant plastic are used in the installation work on the installation of heating, sewage, water, gas supply systems. These fasteners allow you to reliably fix the position of pipes running along horizontal and vertical surfaces (ceilings, walls), as well as installed on special racks.
In this video, an experienced wizard shows how to make a wire clip:
The design of the simplest clamp
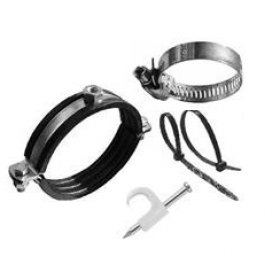
Without exception, all pipe clamps consist of a bandage - a crimp material made by steel manufacturers and of an internal seal called a sleeve. As a sealing material, providing sealing of the damaged area, they usually take special corrugated rubber, which helps prevent pipe deformation when tightening the fixing screws. The presence of a rubber gasket in the design of the product also helps to reduce vibration and noise.
When choosing clamps pay attention to such product characteristics as:
- inner diameter;
- band width;
- steel strip thickness.
The tightening range of the clamp varies depending on the size of the fastener element. The main indicators that determine its scope are the strength of the connection and the level of permissible load.

Metal clamps for fastening and repairing pipes of different diameters consist of a steel frame and a seal made of corrugated rubber
Making a clamp from improvised materials
Find a strip of galvanized sheet, the thickness of which does not exceed one millimeter, and a piece of three millimeter rubber. Look for a pair of bolts (M6, M8, or M10) in your inventory, as well as nuts and washers that match them. Of the tools useful:
- a hammer;
- calipers;
- spanners;
- vise or pliers;
- scissors for metal, which can be replaced if equipped with an electric jigsaw or grinder equipped with appropriate cutting elements;
- drill and drill (M7, M9 or M10, M12).
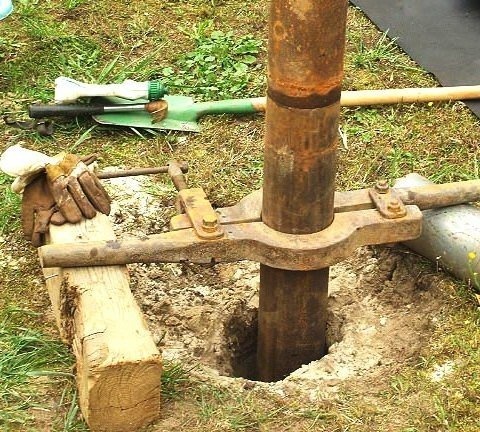
Use a caliper to determine the diameter of the pipe. If the diameter of the pipe is large, then take the necessary measurements using a corner and a ruler. Next, cut the tin frame of the clamp in the form of a strip, the width of which should be 4-8 cm, and the length will have to be calculated. For this, the circumference of the pipe is determined by multiplying its diameter by 3.14 (the Pi number, familiar to everyone from the school geometry course).3-4 cm are added to the result, from which “ears” with drilled holes for fixing bolts are subsequently made.
The size of the holes in the "ears" depends on the diameter of the bolts, and if the washers are wide, then extra 2-3 mm can be added to simplify the installation of the clamp in the future. If the width of the bandage exceeds 6 cm, it is recommended to drill holes not under two bolts, but under three. Mark with a marker the line along which to bend the "ears" at a right angle to the tin strip. This operation can be done manually if the strip is thin. With thicker material, work with a vice or pliers.
Next, the tin is bent around the pipe on which it is planned to put on the clamp, and they try to connect the ears so that the holes drilled in them coincide. If the tin bends badly, then tap the strip with a hammer. A pre-cut rubber gasket tailored to the width of the band is inserted into the clamp.
Algorithm for installing a pipe clamp
Before installing the clamp, the ears are bred to the sides so that they can easily grasp the pipe. In this case, the rubber gasket should well overlap the place of the pipe defect. If everything was measured correctly, then no more than three centimeters should remain between the ears. This distance will necessarily decrease in the process of tightening the clamp with bolts, and this process continues until it is possible to press the rubber seal against the pipe as tightly as possible.

The clamp to eliminate leaks in the pipe of the water supply or heating system of the house is installed at the place of damage with your own hands for several minutes
Installation of clamps in most cases is carried out on a leaking pipe. The supply of water, coolant or waste water is not shut off. Therefore, the effectiveness of the repair will be immediately visible. After wiping the pipe and bandage dry, wait five minutes and make sure that the leak is fixed. Too long bolts, if necessary, are easily cut with a grinder or a hacksaw for metal.
A correctly installed clamp can serve for several years, protecting the object from flooding. However, breakthroughs in water supply and heating systems are desirable to brew or replace defective areas with new pipes.
Insertion into the main water supply system
When connecting the water supply of a private house to the central water supply system, a mortise pipe clamp is used, which allows for pressure work in a short time using specialized professional equipment. A clamp is installed for insertion into a pipe without pressure with a simple fitter using a cutter and a pair of wrenches. It is not intended to use a welding machine. In any case, these works are carried out by employees of services serving the main water supply system in the village, if the client has all the permits.

Stages of installing mortise pipe clamp in the main pipeline. Pipe clamps simplify work on connecting the facility to central water supply systems
Now you know how to make and put a collar on a water pipe. If the pipeline is damaged, you can independently fix the problem at least for a while before the arrival of professional plumbers.