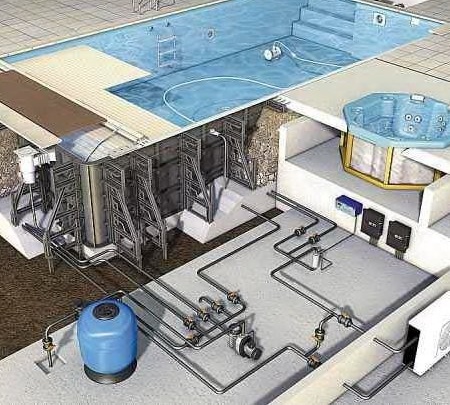
We build a pool at the cottage with our own hands from improvised materials

Each summer resident dreams of an early summer, presents himself on vacation in sunny hot days. In order to refresh yourself with comfort in cool water on vacation, you need to take care of building or buying a bath in advance. Many owners refuse this idea, considering it too costly and time-consuming. In fact, to make a small pool in the country with your own hands is affordable for any beginner builder. You just need to learn different manufacturing methods, choose the appropriate option and follow the instructions in steps.
Content
What improvised materials can be used for the construction of a country pool
You can, of course, buy ready-made of expensive materials and invite a team of installation specialists, but often a modest budget does not allow you to deploy large-scale construction. Many summer residents give up, and the reservoir remains for them a pipe dream. But a zealous owner will surely find improvised and inexpensive materials, and independently make a durable and beautiful pool that will last for more than one year and will become a real decoration of the site.
Going around your property, do not miss the following useful materials and things:
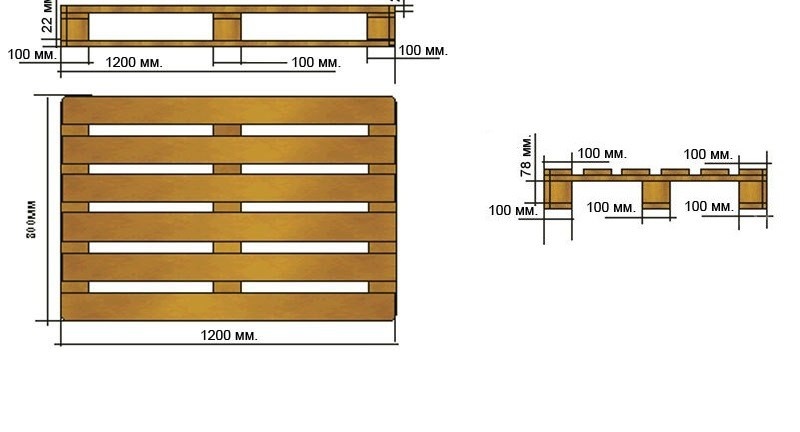
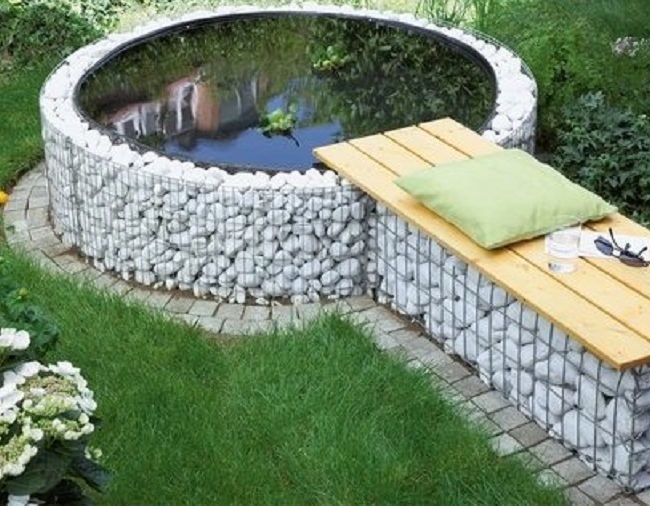
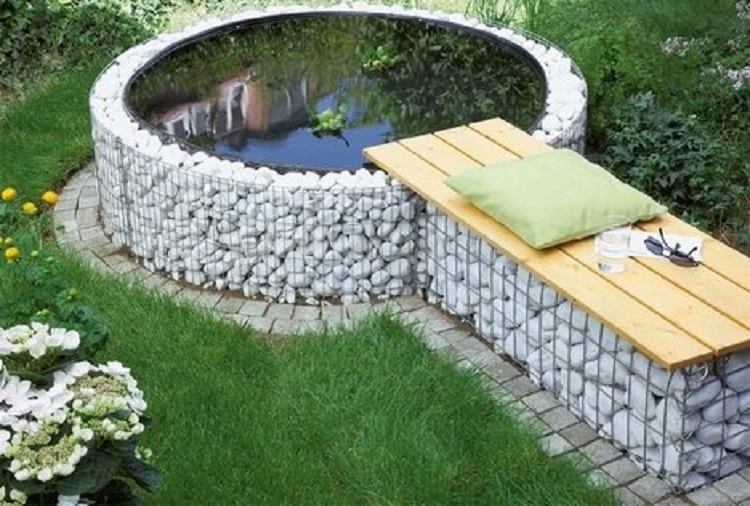
- Old wooden pallets are perfect for the frame base of the pool, from which you will get strong and even sides. It will take 9–11 elements treated with an antiseptic against decay to construct a medium-sized structure. This design is easy to dismantle and move to a new place, you can install it on the surface or in a small pit.
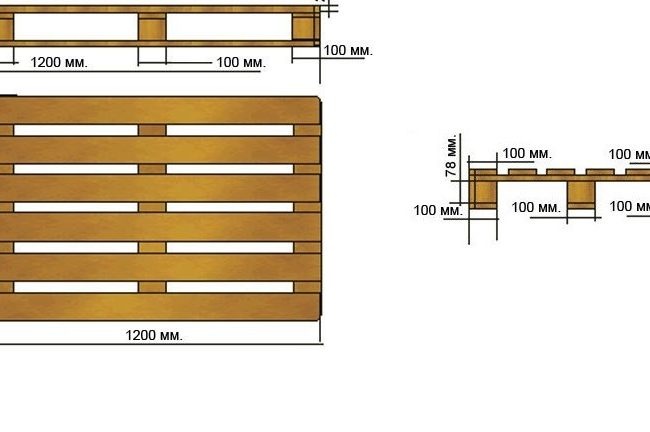
Wooden pallets are a good building material
- A tire from large special equipment, for example, from a tractor or combine, will not tear and will not last for many years. Tire rubber will not lose its properties at sub-zero temperatures in winter and when heated in summer. The only drawback is the small volume of the bowl, which will fit just one or two people. You can buy it for a penny in a car repair shop or in a recycling warehouse.
- The waterproofing film is strong enough to line the bowl of a small pond. The elasticity and flexibility of the material will give the pool any complex shape. A used banner made of thick film is also suitable.
- Plastic pipes are fastened together by soldering, do not rot and do not rust, they will make a strong and accurate frame. In the fall, such a bath can be dismantled and hidden until the next season. The remains of heat-insulating materials and geotextiles are useful for warming and leveling the bottom. The disadvantage is the small volume;
How to make a pool in the country with your own hands - step by step instructions with a photo
It is very important to choose a suitable place on the site for installing the pool.
- It should be smooth, open to the sun for natural heating of the water, protected from the wind. Heating water in the sun will save significant money for paying for electricity.
- If fruit trees and shrubs grow close to the bowl, then foliage, fruits and berries will constantly clog the water.
- It should be taken into account the convenience of connecting water supply and cleaning, the risk of leaks and water falling under the foundation or in the basement of the house. Dirty water from the pool can be used to irrigate the garden if there is no chlorine in it.
- Green spaces or hedges will protect summer residents from the wind and prying eyes while swimming, it is recommended to place plants no closer than 2 m to the reservoir.
- It is not recommended to put the bowl on the cliffs, on the slopes to the river, by the road, on wooden platforms, on an old or unfinished country foundation, on loose or creeping soils. A corner position near a solid fence, without plants near or in an open area with access from all sides, is considered successful.
It is not recommended to place the pool near the trees in order to avoid small dry branches and leaves getting into it.
The choice of place has been made, now it is necessary to draw a sketch with the dimensions and mark the construction dimensions with pegs in place, prepare the necessary tools.
For a pool of any type, it is necessary to make a platform so that the bowl is level and solid throughout the season.
Foundation preparation steps:
- Remove the upper loose soil layer with grass, eliminate potholes, irregularities, remove stones, debris, uproot sticking roots. If you decide to deepen the bowl, then dig a pit with a margin of space for the outer skin of the sides.
- Level the surface exactly horizontally, pour a small layer of rubble, carefully tamp.
- If possible, lay with geotextile, which will protect the pool from being bitten by insects and weeds sprouting beneath it, and also strengthen and level the base.
- Pour a sand cushion 10 cm thick, lay a heater or a special polypropylene substrate under the bottom.
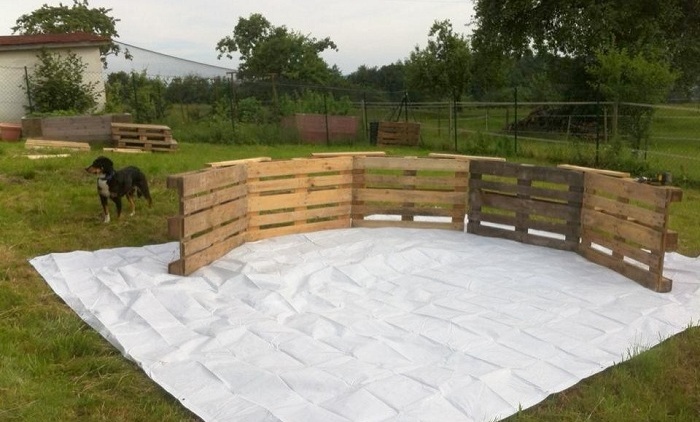
Making a pool of pallets
This design can be built in less than a day and it will cost quite a bit.
To work, you will need the following tools and materials:
- old wooden pallets, at least 9 pieces, depending on the size of the structure. They are made of standard dimensions 80x120 cm;
- level;
- roulette;
- pegs and a cord for a marking;
- jigsaw;
- a planer for processing boards;
- boards;
- nails
- hammer;
- screwdriver;
- screws
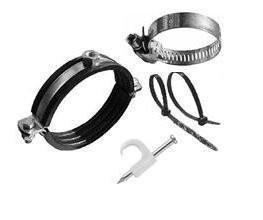
- coupling belts for fastening pallets into a single frame;
- a film for lining the bowl inside;
- construction stapler;
- siding or boards for decoration;
- felt;
- Scotch;
- antiseptic impregnation;
- paint and varnish.
Installation steps:
- Prepare a site or dig a pit if you want to deepen the pool. Spread with foam or other insulation so that the water warms up faster. Spread the tarpaulin or backing on top.
- Treat all wooden elements with antiseptic and antifungal impregnation to prevent decay and destruction of wood.
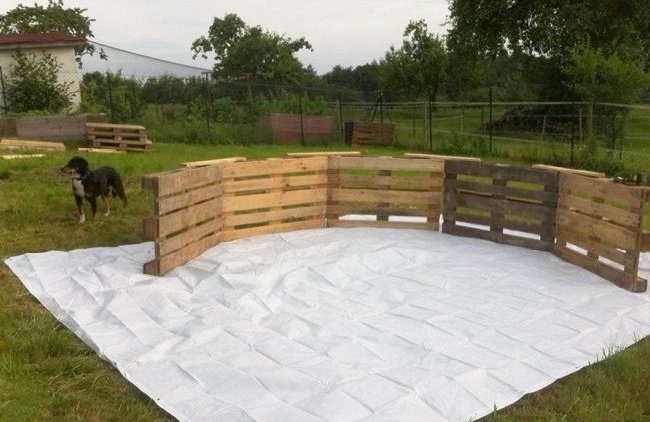
On the platform, spread the substrate and begin to assemble pallets in series
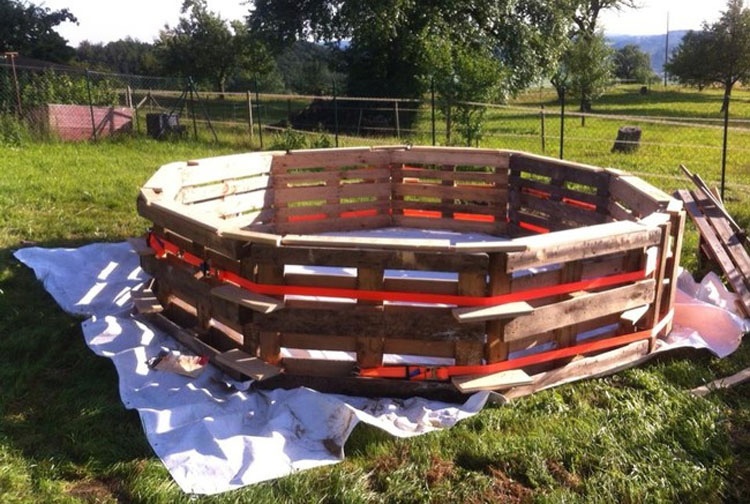
- Align the pallets vertically, forming a round shape, with the plank flooring inwards and knock them down with the help of boards at the top, bottom and in the middle, so that a single frame structure is obtained. To strengthen it with coupling belts, collars or other improvised materials.
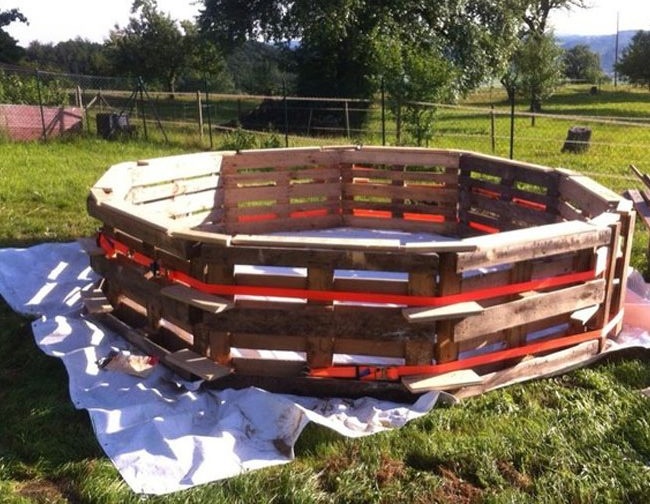
For reliability, secure the pallets using boards and special straps.
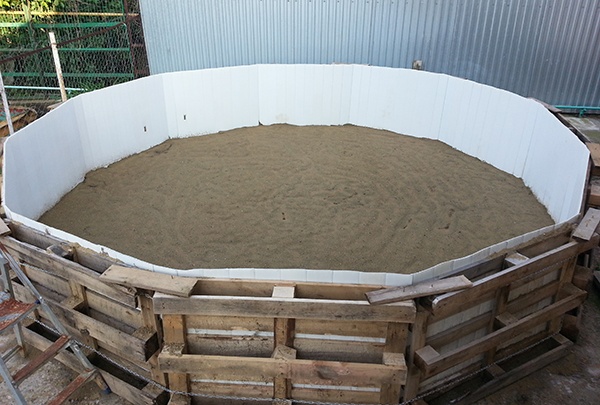
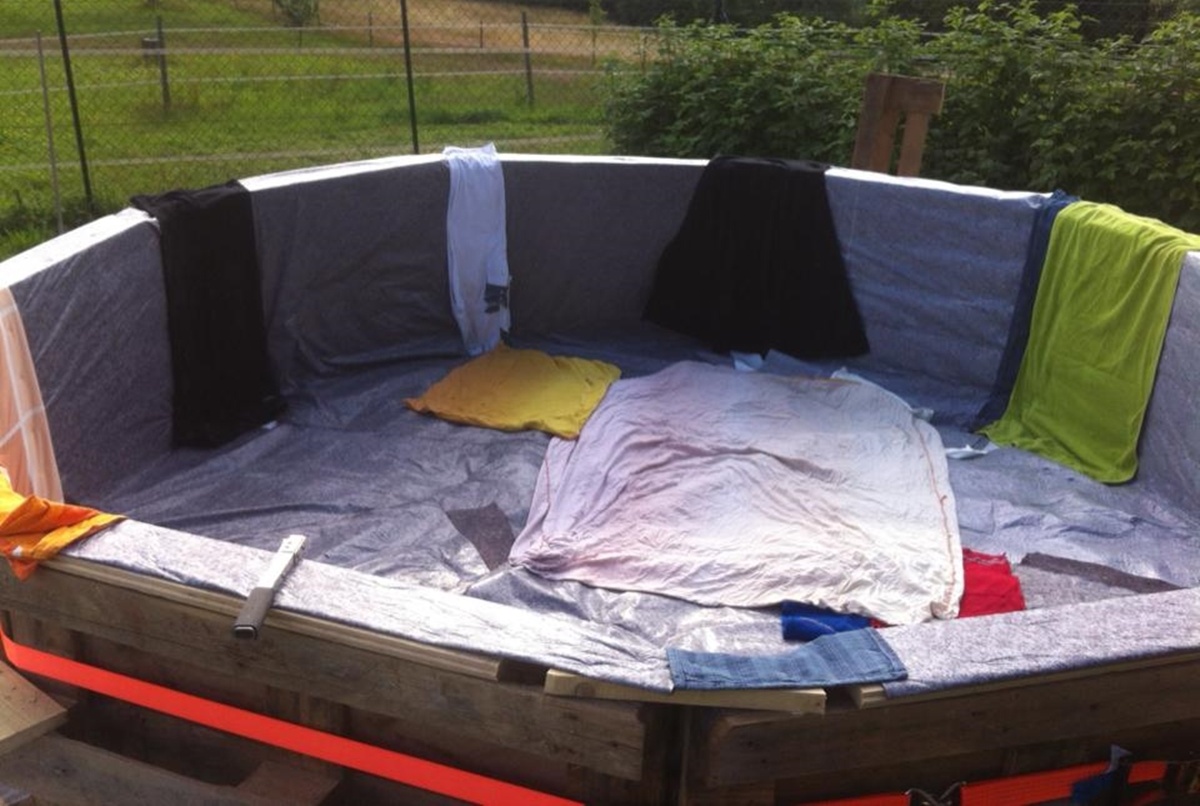
- Sheathe the structure from the inside with siding, board it, cover it with sand, and cover the inside with a waterproofing film.
Prepare the inside of the pool
- Then put felt or old blankets and towels on the bottom and sides for softness, fix them with tape or a construction stapler.
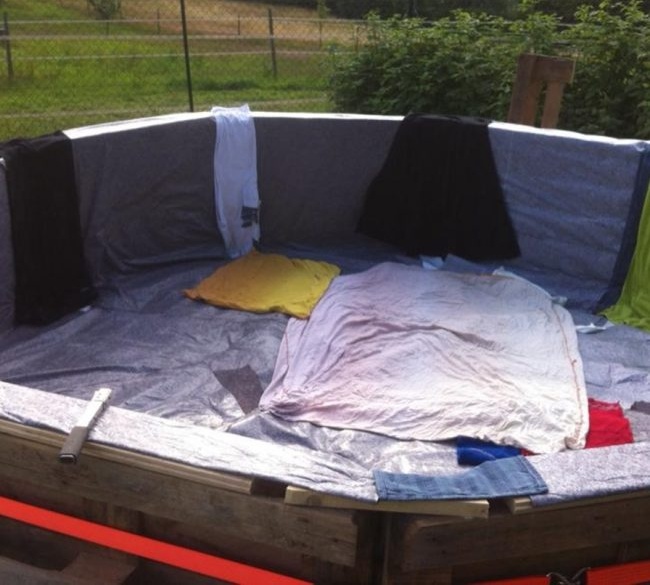
Lay out old blankets and towels for softness.
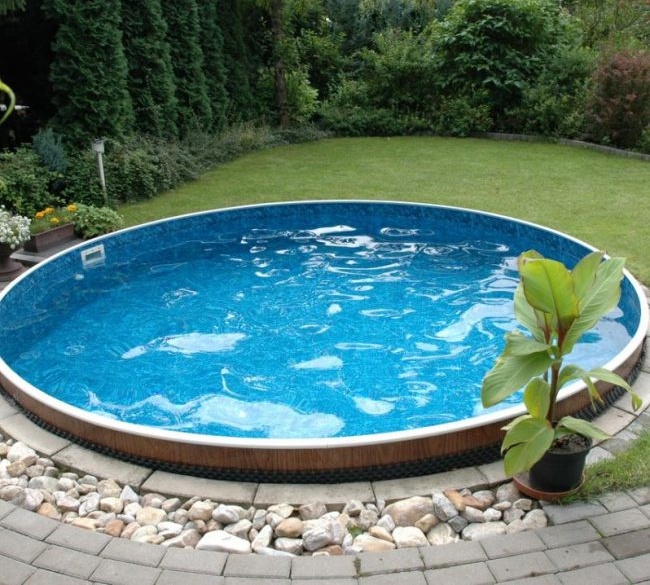
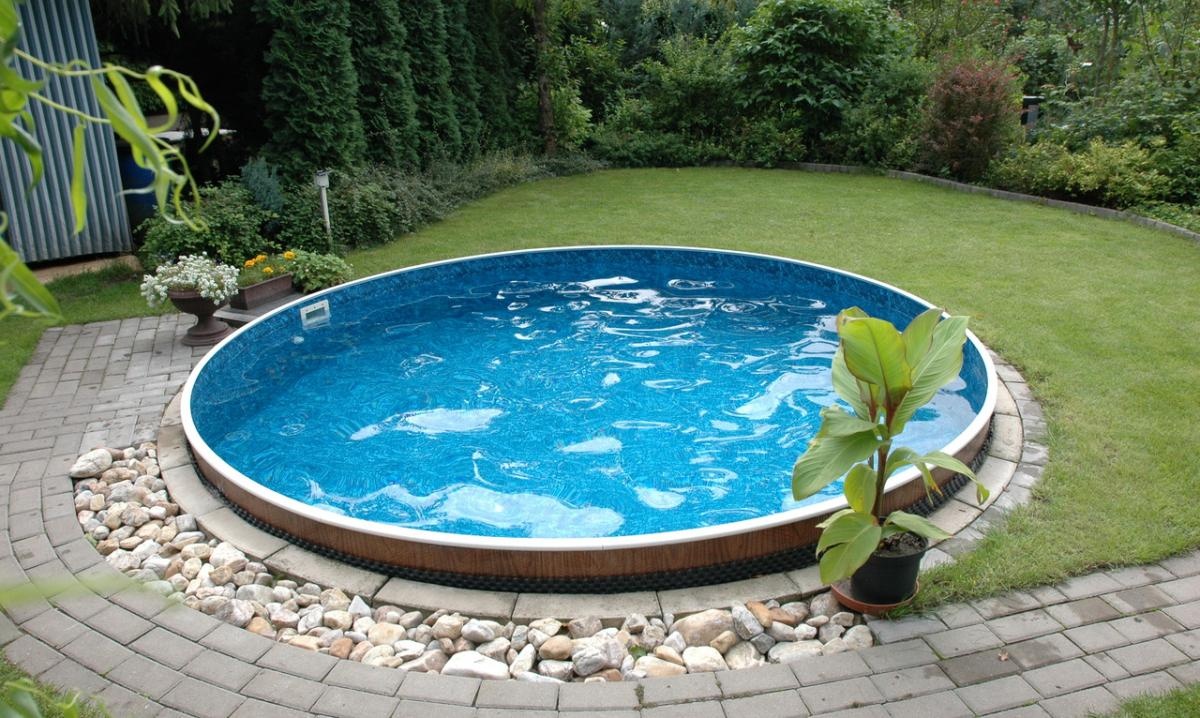
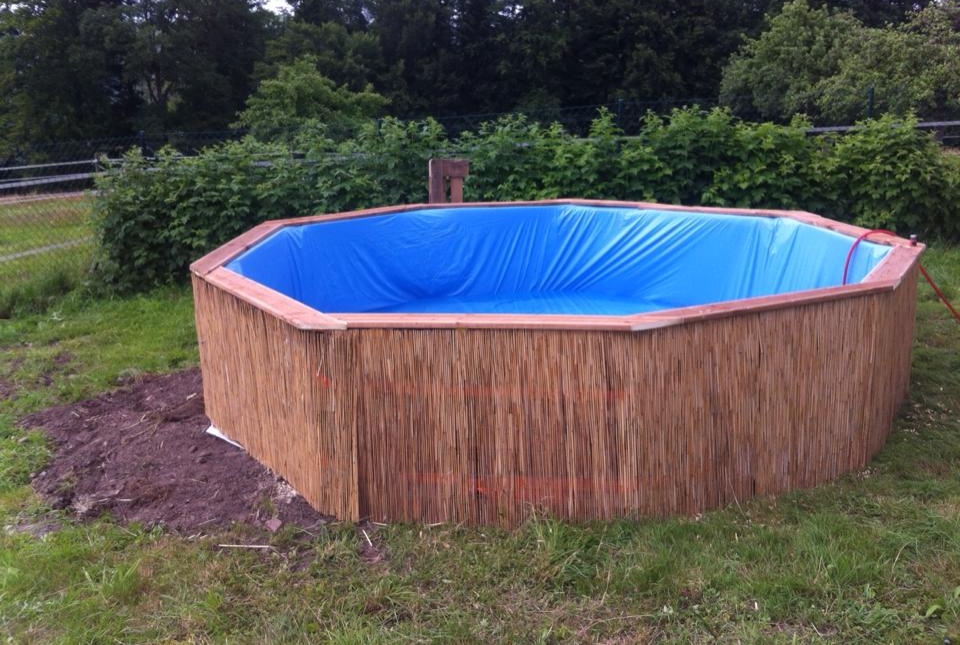
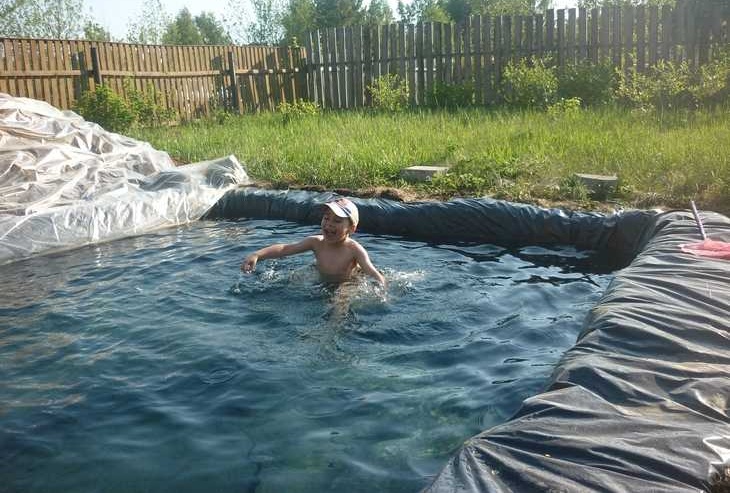
- Cover the top of the side and the bottom of the pool with a top layer of film and spread it. The blue material will look great. Nail the sides from the boards on top, fixing and removing all protruding edges and edges. Now you can draw water and check the cup for leaks.
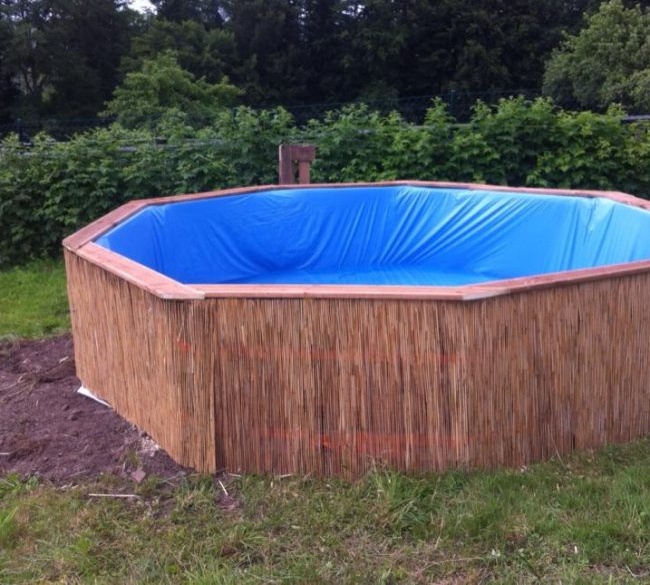
Lay the film in the pool, and outside trim it with finishing material
Tire Pool
First you need to find a larger tire, for example, the BelAZ tire has a diameter of more than 300 cm and a width of more than 95 cm and prepare the necessary tools and building materials:
- hacksaw or sharp knife;
- level;
- bag of cement M-300;
- water
- sand;
- crushed stone;
- liquid soap;
- paint and any decorative elements;
- container for mixing solution, drill with mixer nozzle;
- shovel.
Work Stages:
- Turn the tire over and lay it flat on its side. There is a special marking on the surface, which will help to cut out the middle part exactly along the contour. Work should be a hacksaw or knife with a thick metal blade. To facilitate the process, it is recommended to lubricate the rubber with soap.

One of the available ways to make a pool
- For the stability of the tire, it is advisable to dig a pit 1/3 more than the diameter of the tire, then level the bottom, fill it with a layer of rubble and fine sand, moisten.
- In a container, mix a solution of cement and sand in a ratio of 1: 3. The amount of water can be different, to improve the properties of the solution, you can add a plasticizer - the usual cheap liquid soap. Pour the finished solution onto a sand pad. The thickness of concrete should be at least 15 cm.
- In a fresh non-frozen solution, you need to install the tire and press it into concrete, check the level, adjust the position strictly horizontally. Around the tire, it is advisable to pour another 2-3 buckets of concrete.
- The structure will completely dry and gain design strength in three weeks. You can decorate the bowl outside with pieces of tile, stone. Inside, the pool is covered with waterproof paint, and outside it can be made bright and fill the area around it with sand or laid out with paving tiles.
Near the pool you can arrange a recreation area
The properties of rubber will allow you to enjoy such a product for more than one year, without fear of leaks and destruction.
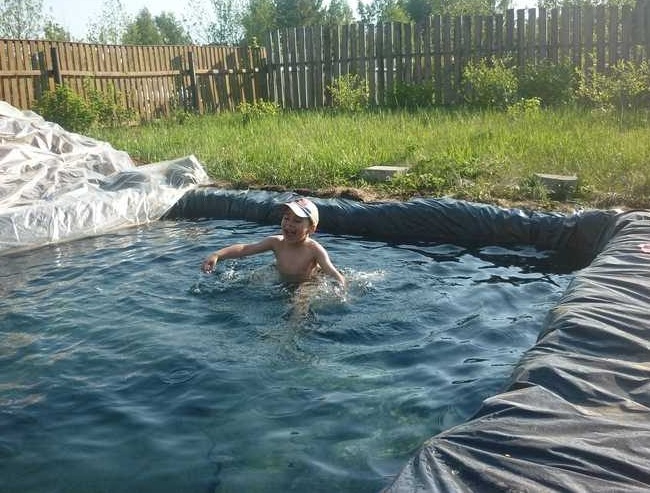
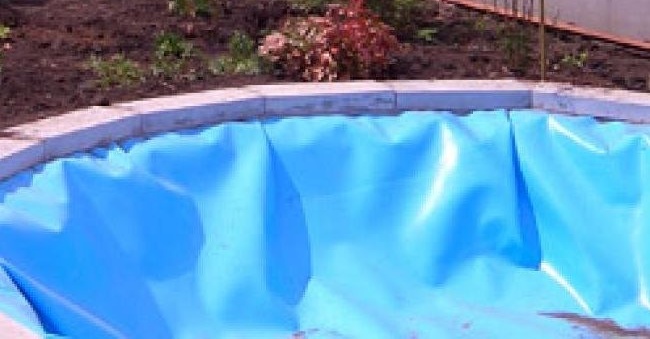
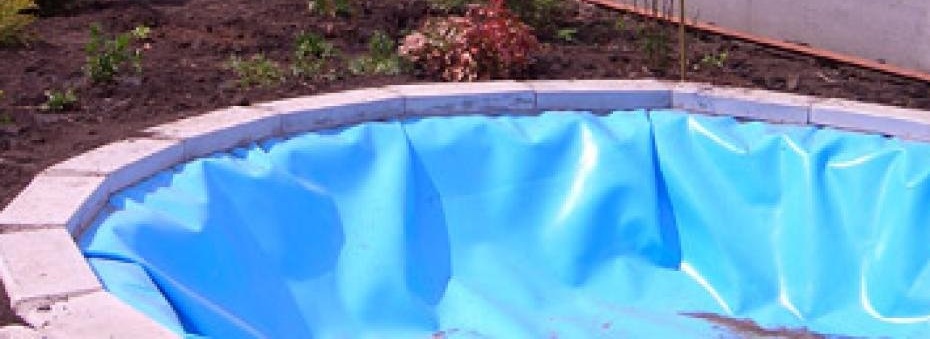
Film pool
This method is the fastest - it allows you to create a budget version of the bathhouse in two hours, which can be arranged right in the garden. It should be noted that such an express bowl will serve until the first puncture of the film.
Step-by-step instructions for manufacturing:
- Dig a pit 15 cm deeper than the desired pool depth; length and width depend on the size of the existing film. A large surface can be soldered from several pieces. Remove sharp stones, roots, clods of earth.
The pool volume will depend on the size of the film.
- Level and tamp the bottom and walls of the pit, pour sand with a layer of 10 cm. You can sprinkle along the edges of the sides for convenience, put unnecessary soft material.
- Line the foundation pit with a waterproof film, fasten the edges around the sides with bricks, pour water.
Lay bricks along the sides
If necessary, such a reservoir is quickly removed until the next hot season.
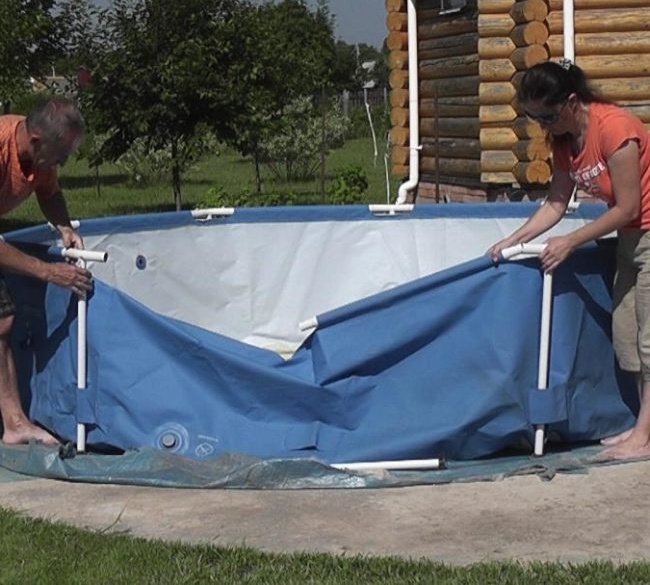
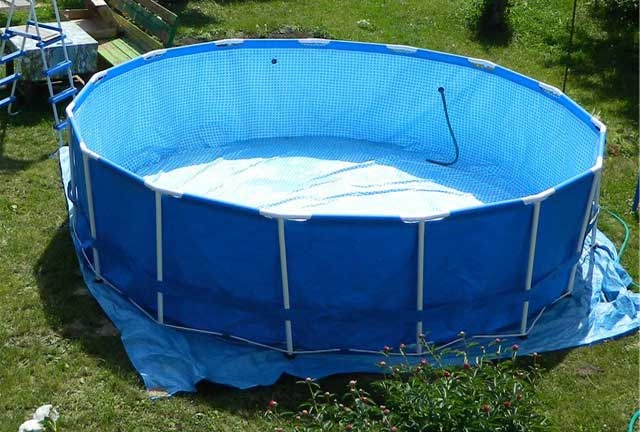
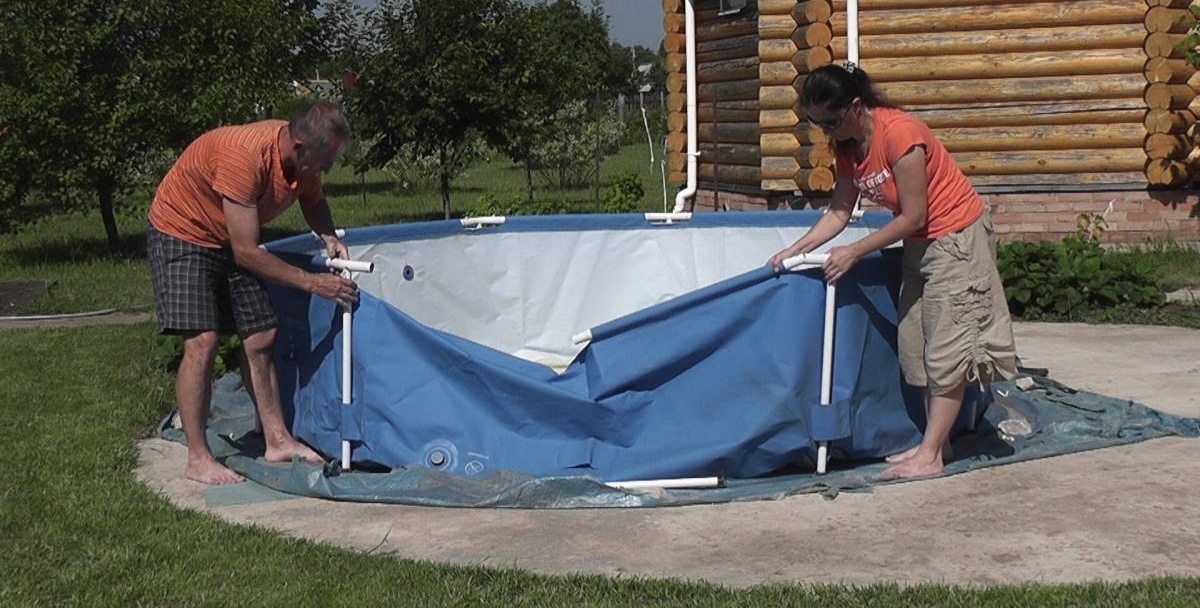
Plastic pipe pool
Ready-made prefabricated models of pools are on sale, the frame of which is made of PVC pipes, and the bowl is made of thick soft material or also of plastic. This design can be made on its own from the remaining from the repair or purchased pipes. They are inexpensive and are sold in any hardware store.
For work you will need:
- PVC fabric, which does not allow water to pass through and is used for the manufacture of tents and inflatable boats, it is very durable and is sold in various densities, an excellent solution for a home-made pool;
- shovel;
- sand;
- crushed stone;
- roulette;
- level;
- marker;
- iron for soldering pipes or a building hair dryer with a special nozzle for welding the film;
- insulation;
- geotextiles.
Assembly takes place in several stages:
- Prepare the base - remove the top layer of soil with plants, remove sharp stones, tamp and level the surface horizontally without slopes. Lay the geotextile and pour a sand cushion.
- Make markings with pegs at the locations of the stiffening ribs of the frame. Cut plastic pipes into segments equal to the height of the sides of the pool. They will be located vertically around the circumference and will be the basis of the frame. Another set of pipes will act as horizontal elements of the grating of the sides on which the PVC fabric is stretched. Lay out pipes and fittings on site.
- Weld frame using ironing. The shape can be rectangular or round, the dimensions should not be made very large so that the plastic base can withstand the load and weight of the water.
From the pipes make the frame and cover it with foil
- Next, pull the PVC cloth, wrap it around the top edge and brew. As a result, the soft bowl will be fixed to the frame. You can create a large canvas from pieces using a building hair dryer.
Pool is also easy to disassemble
The bathhouse is usually small or medium in size; it can be taken apart in the fall and hidden in the pantry until next summer.
Care Rules
For a home-made pool to last for several years, it needs proper care.
- Frame structures should be regularly inspected for integrity and timely minor repairs of load-bearing elements should be carried out. Avoid contact of the film with sharp thorns of plants or with piercing objects and toys.
- Over time, the water becomes dirtier, debris and dirt appear in it, slippery unpleasant bloom on the walls - green algae. To protect water, you need to cover the surface with a blanket or film to protect it from falling debris. Collect garbage from the surface using a fine sieve on a long handle.
- You can use special disinfectants for pools, which will make the water clean for a long time. Sustained-release tablets are sold, which float in special dispensers and chlorinate water, not exceeding a safe concentration. Means are released to stop the growth of algae, they are used during the period of active flowering of water.
- Change the water regularly, wash the film of the bowl with detergents based on chlorine or active oxygen.
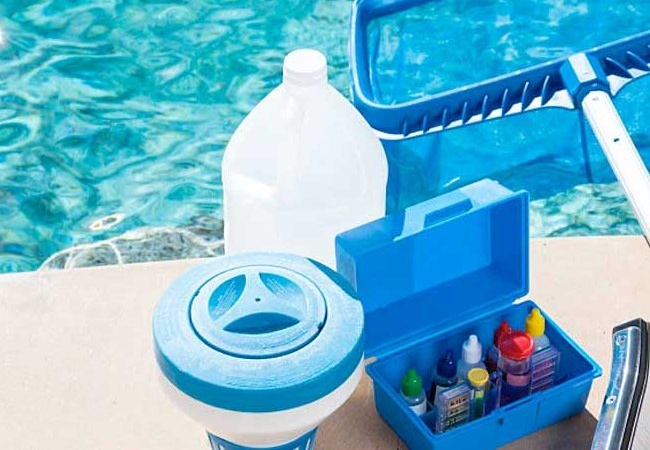
Proper maintenance will ensure a long pool life.
Own pool on the site is not a luxury item, it is affordable for an ordinary summer resident and can be done independently without significant financial costs. Thanks to the use of simple designs and improvised inexpensive materials, as well as simple rules for the care and purification of water, the pool will become a decoration of the cottage and will serve for a comfortable rest for more than one season.