What to do if an air leak occurs in the Varem accumulator
Good day. In the seventh year of service of the 100-liter vertical accumulator Varem, there was a need for his weekly pumping. Upon careful inspection, an air leak was detected from under the flange of the air valve, which is used to remove air accumulating in the upper part of the membrane. Tell me what you can do. Thank.
Expert Answer
The malfunction described by you is typical for accumulators of “one-day” brands and is extremely rare in companies such as UNIGB (namely, it is the owner of the Varem trademark). Perhaps this is due to the fact that the famous Italian manufacturer began assembling expansion tanks - it’s probably worth reminding of our mentality and production culture. The air leak in your case is most likely due to the most banal reason - the nut has been loosened, which fastens the accumulator pumping valve to the tank. In this case, the rubber seal, which is installed on the nipple from the inside of the container, is slightly pressed against the metal. All that is required to restore the tightness is to tighten the nut with an open-end wrench or ring spanner.
The second likely cause is the wear of the sealing element due to its poor quality. To repair the accumulator, the unit will have to be disassembled. To do this, water is drained from the system, and the tank itself is dismantled. Using the “13” key, unscrew the bolts securing the flange and remove this part from the tank. Next, they dismantle the rubber membrane (popularly called it a pear). It may be necessary to unscrew the nipple nut before this - quite often a protruding “strap” on the bottom of the rubber bulb is used as a sealant. After removing the membrane and valve from the tank, inspect them for damage.
For repairs, it is best to use a new nipple, which can be purchased at a plumbing store. You can see how it looks in the photo below.
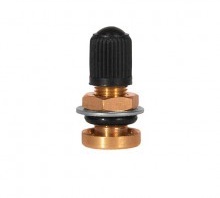
When installing a new part, do not overdo it. Tighten it with a little effort - you can always tighten it, but to replace the crushed and cut rubber ring, you will have to dismantle the accumulator again. After the part is installed in place, pump air to operating pressure. To check the tightness of the connection, lower the top of the tank into a container of water or apply soap solution to the junction. The absence of air bubbles will indicate that you have done everything correctly and you can begin to install the storage tank in place.