10 ways to reliably seal the joint between the bathroom and the wall
There is always a gap between the bathroom and the wall, so even if outwardly it is almost imperceptible, it is necessary to close the joint along the upper edge. This will prevent water leakage and the appearance of mold in the bathroom, which is very difficult to get during cleaning. From the article you will learn how and how to seal the joint between the bathroom and the wall.
Cement mortar
If the gap is less than 0.5 cm, then it can be covered with a cement mortar. This method is a bit outdated and is rarely used by experienced builders, mostly just to fill the seam. From above, at the junction, for example, a plastic baseboard is always additionally attached.
The main disadvantage of coating with cement is that the dried-up solution quickly cracks due to vibration from the bath during its use.
Application: dilute the cement mortar and rub into the seam with a spatula a few centimeters in depth, and then allow to dry for a day.
Grout
The grout mixture is suitable for closing the gap between the wall and the bathroom, but only if it is no more than 0.4-0.6 cm wide.
The grout is airtight, which prevents water from leaking over the bathtub, and it also contains antifungal agents that can resist mold. The grout can be matched to the color of the tile to make it look aesthetically pleasing.
Application: rub the grout into the joint in the same way as the cement mortar.
Waterproof foam
Mounting foam is also suitable for sealing the joint, moreover, it is a one-component polyurethane foam, since due to its composition it is characterized by high moisture resistance.
Application:
- Stick masking tape on the edge of the bathtub and the wall next to it so that only the joint remains unaffected.
- Foam the gap between the wall and the bathroom.
- After the foam has hardened, the excess must be cut off, and then the masking tape removed.
- Close the foam seam with a corner, ceramic border or plastic tape.
It is impossible to leave the mounting foam in the open form for a long time, since it quickly becomes dirty, blackens and begins to crumble.
Special border tape
A fairly simple but reliable option for sealing the joint is its gluing with a special border tape. It adheres well to surfaces, while it has good flexibility. The maximum joint width should not exceed 3 cm.
The procedure for gluing tape:
- Wash the tiles near the junction and the edge of the tub.
- Degrease surfaces with solvent or alcohol.
- Remove the protective layer from the tape and attach it to the seam, pressing with your fingers. It is advisable to heat the tape with a hairdryer before gluing so that the glue becomes more sticky.
The only minus of the tape is its fragility, so you have to change it at least once a year.
Plastic corner
Decorative plastic corner is durable and has a wide range from which you can choose the right one.
Mounting Method:
- Clean surfaces with detergent and degrease.
- Fill the joint with tile grout or foam.
- Attach the plastic corner to a special sealant or glue, leave for a day to dry.
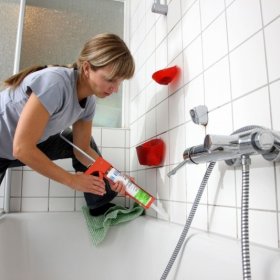
Silicone sealant
If the joint is up to 5 mm wide, it can be repaired with sanitary silicone sealant. It is enough to squeeze a strip of sealant and slowly pass it over with a finger wrapped in a plastic bag, slightly pressing it into the seam.
If the joint is wider than 5 mm, then:
- Before applying sealant, a sealing cord made of foamed polyethylene must be laid in the seam.
- Apply silicone sealant with a thin layer, smudge.
- Leave to dry for at least a day.
The sealant must be torn off and applied again every year.
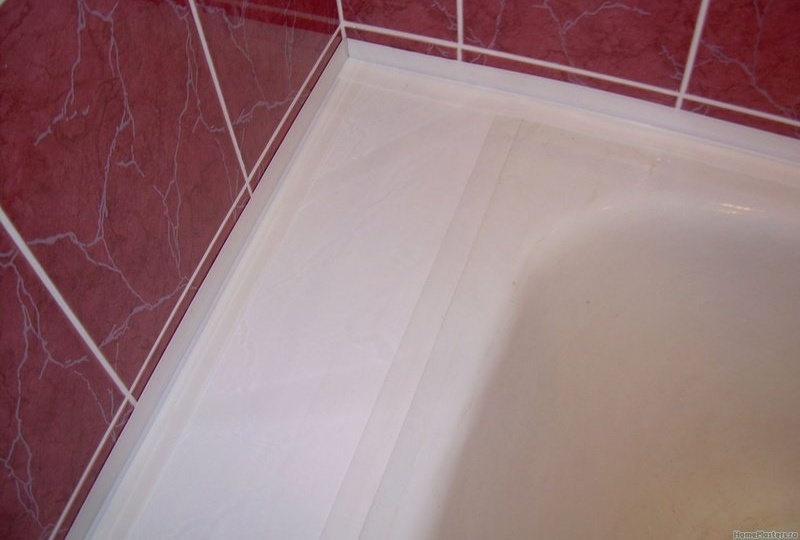
Baseboard for bathroom
The joint of the bathtub and the wall can be decorated with a plinth, but before installation it will be necessary to seal the gap.
The procedure is as follows:
- Wipe the edge of the bath and part of the tile along the seam with solvent.
- Fill the joint with grout or foam.
- Cut the desired piece of the baseboard, prepare the corners and stubs.
- Apply sealant to the back of the skirting board and stick it to the right place, pressing it with your fingers. Fasten corners and plugs.
- Remove sealant that has leaked out from under the baseboard.
Ceramic border
Such a border is much stronger and more beautiful than the usual plastic, but it will also cost more.
Setting the border:
- Degrease the surface.
- Make a marking with a pencil on the skirting board and trim the excess with a grinder, if necessary.
- Fill the joint with grout.
- Apply silicone to the back of the curb and glue it, as well as fix the corners. For a cast-iron bath, you can take liquid nails instead of a simple sealant.
You need to start gluing the border from the most prominent edge for the greatest aesthetics.
Tile corner
Plastic corners are attached not only to the tile, but also under it, covering a gap of 2.5-3 cm.
To stick a corner under the tile, you need:
- Take measurements, cut off a specific piece.
- Apply tile adhesive to the wall, and silicone sealant on the side of the bathtub and press the corner.
- Insert the tile into the corner groove and press it against the wall.
This method of sealing the joint is quite laborious, but in the end you get a strong, neat design that eliminates leakage of water under the bath.
Installing tiles close to the side of the bathroom
Another way that allows you to reliably seal the joint - laying tiles close to the side.
To do this, you need:
- To build up a false wall made of moisture-resistant GCR so that it protrudes above the side of the bathtub, while adjoining it.
- Lay the tiles on the wall, reaching the very edge of the bath.
- Between the edge and the bottom of the last row of tiles, apply tile adhesive.
Additionally, you can decorate the corner between the bathroom and the wall with a beautiful plastic corner.
Dampness, the appearance of foci of fungus and a musty smell is the main problem of the bathroom, therefore, it is necessary to eliminate the maximum possible places of moisture accumulation in it. Having reliably sealed the joint, it will be possible to prevent water from leaking under the bath, and hence the appearance of dark foci of the fungus.