Construction of a chimney in a metal or brick bath
The time has passed when the stoves in the baths were not equipped with chimneys and people washed "in black." The stoves were modernized, a chimney appeared, carbon monoxide no longer enters the room, and soot does not settle on the walls. For those who managed to build a stove with their own hands, the construction of the chimney does not seem a difficult task. If you follow all the rules and recommendations, not to miss a single detail, then almost anyone can handle the construction of the chimney. How to do this and what we will consider below.
Content
Varieties of chimneys
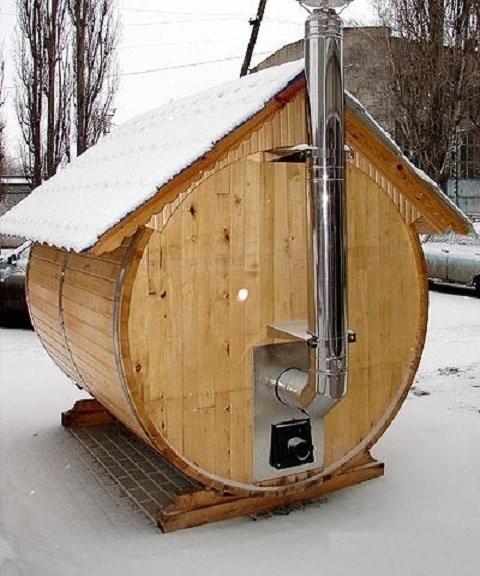
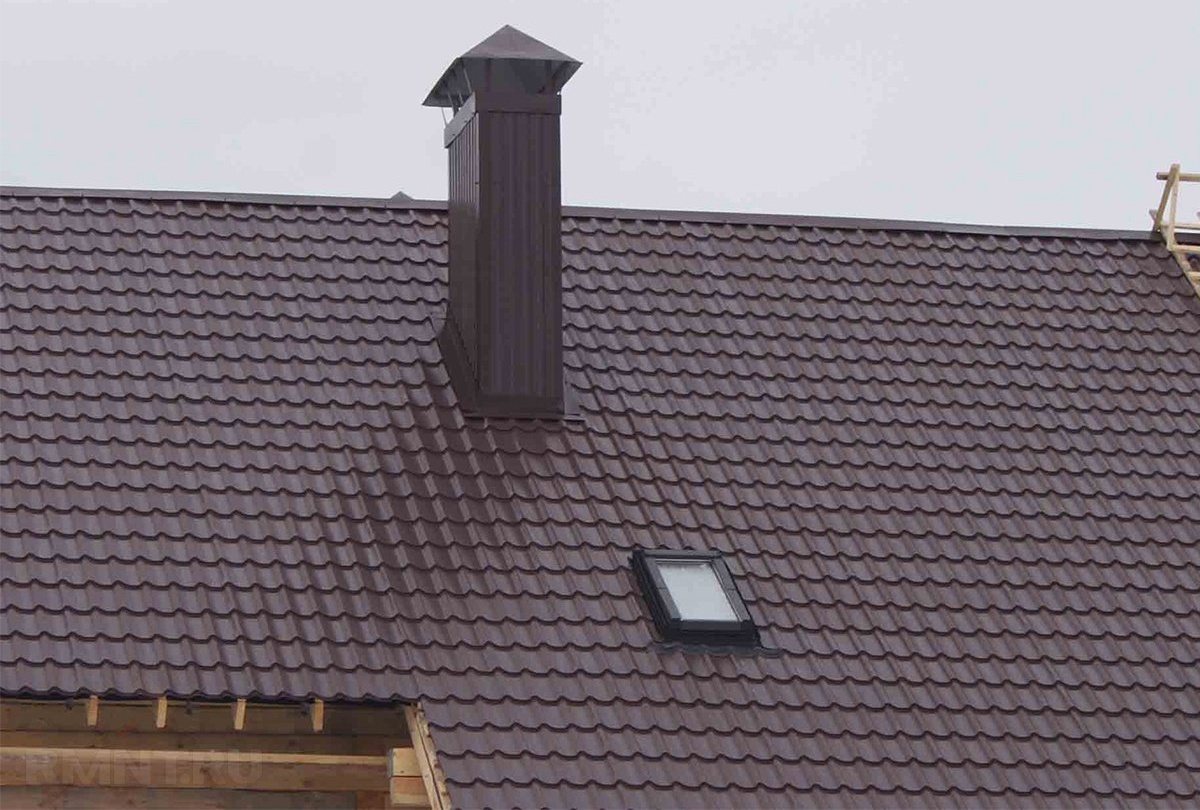
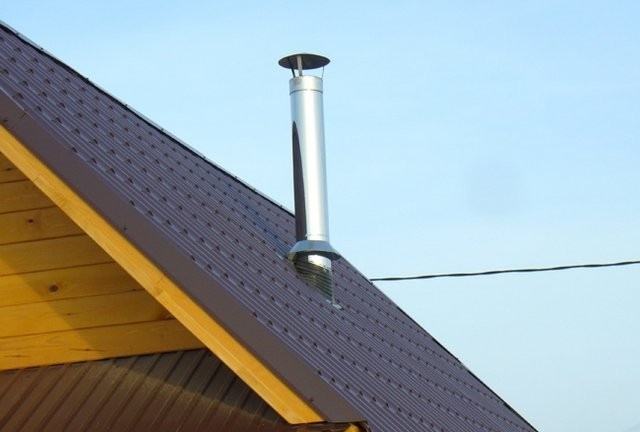
Metal outdoor chimney in a barrel bath
There are several criteria by which varieties of chimneys are distinguished:
- First of all, this is the material from which it is made. Previously, often used burnt bricks for the construction of the chimney. But recently, more and more preference is given to metal structures.
- Chimneys can be internal or external. The first pass through the entire room up, cross the ceiling, roof and go out into the street. The second are displayed through the wall.
Scheme of a metal chimney
Consider all the options and determine their advantages and disadvantages.
By type of material
Made of bricks
Brick chimney
Due to the lack of worthy alternatives, earlier this part of the stove was made only of burnt bricks. Despite the fact that this element visually seems simple, the technology of its construction is very complex. Whatever it was, but it's still brickwork, which can not be put just like that. This must be done using special schemes, observing all the parameters.
This chimney manufacturing option applies to those that have been tested by time. Such designs are strong and durable. In addition, the obvious advantage of this type is that the brick is an excellent heat insulator and heat accumulator. And another brick - fireproof building material. And for a bath it is very important!
There is a significant drawback to this type of chimney. Besides the fact that it is the most labor-consuming to manufacture, the inner surface of the bricks is not smooth, but with roughness and angles. Because of them, soot accumulates on the walls, gradually the passage may become clogged and the draft of the furnace will become worse. If you do not clean it in time, then smoke may go into the bathhouse. Worse if the soot lights up when you start to heat the stove. Sparks will fly from it and the consequences can be sad and dangerous.
From metal
Metal chimney
The process of installing chimneys made of metal is much simpler than the previous one.
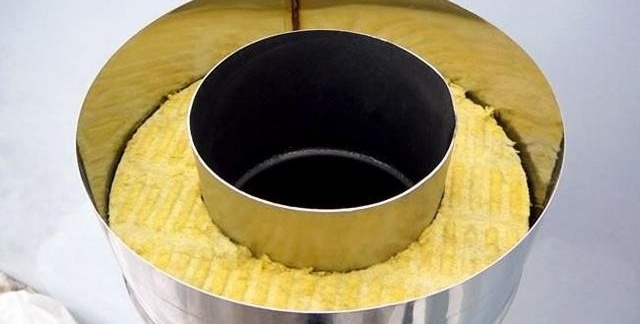
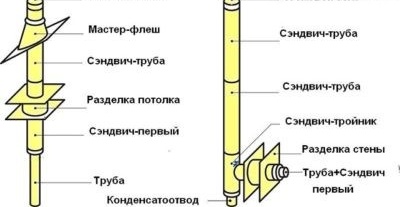
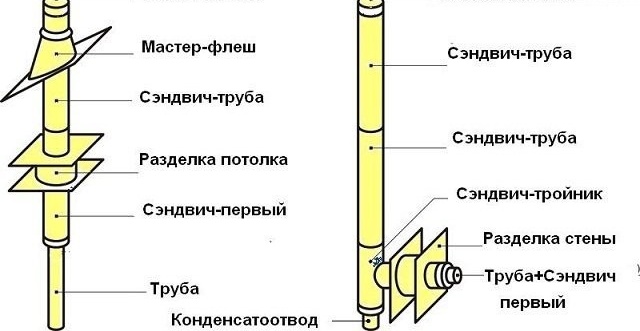
Sandwich pipe
A modern sandwich construction is made with the addition of thermal insulation material. Thus, it has become more practical than simple metal pipes. Of course, she cannot store heat like a chimney made of bricks. Even temperature changes can lead to the formation of condensation on the pipe walls. The last problem is solved by a thick layer of insulation. But in such a chimney, the inner wall is made of metal. It is almost perfectly smooth, and there are no edges in it. Thus, smoke from the chimney comes out almost without obstacles.
Alternatives
Sometimes the chimney is made of ceramic. But to combine the advantages of the above options, you can build a combined chimney: insert a metal pipe into the brickwork.
Sometimes a steel jacket is put on a ceramic pipe.
The choice of material depends on the preferences, financial capabilities and skills of the owner.
For a chimney, the use of asbestos-cement or aluminum pipes is not recommended.
Chimney placement inside and outside the building
You may also be interested in the material, which describes the procedure for the repair of an oven for a house or bath:https://aquatech.tomathouse.com/en/otoplenie/kak-pochistit-pech.html.
By placement
External
The American architect came up with the idea of bringing a chimney to the outer wall of the building. Due to the fact that such a chimney is easier to install, it quickly gained popularity. Such a pipe does not need to be lifted from the stove to the ceiling. It needs to be brought out through the wall. Such a chimney installation is safer, it is not necessary to isolate the attic floor. Through the cracks that appear between the roof and the pipe, rain and melt water will not leak.
However, a serious drawback of this installation of the chimney is that it cools much faster, therefore, condensation appears in metal structures.
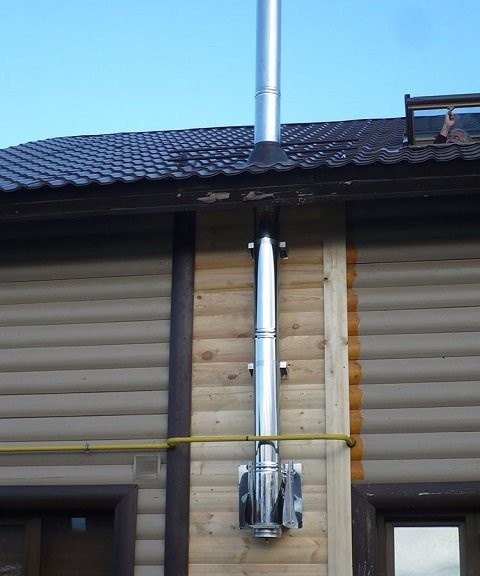
External chimney made of metal
To prevent this, it must be properly insulated. In addition, heat does not enter the room from the external chimney, therefore, fuel consumption for heating increases significantly.
Sometimes, for the construction of an external pipe, a metal pipe is also used, which is installed according to the usual principle. Outside it is bricked. This is a combined version of the chimney.
External brick chimney
Domestic
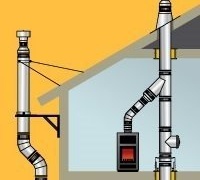
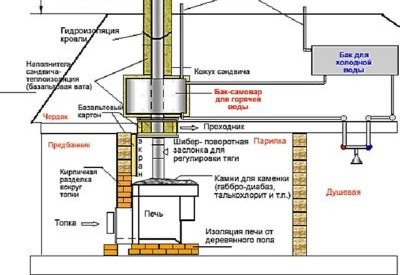
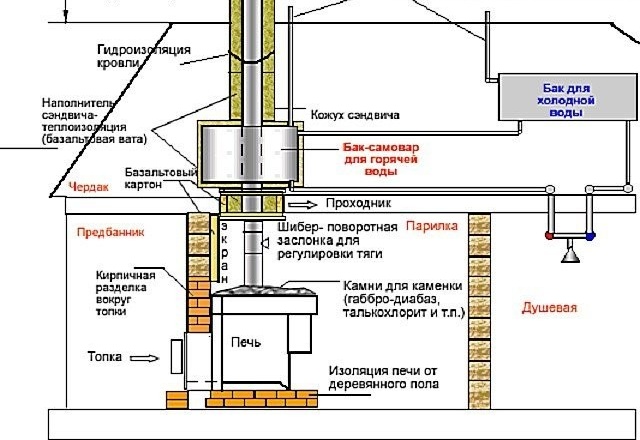
A chimney of metal goes from the top of the sauna stove through the entire room to the ceiling.

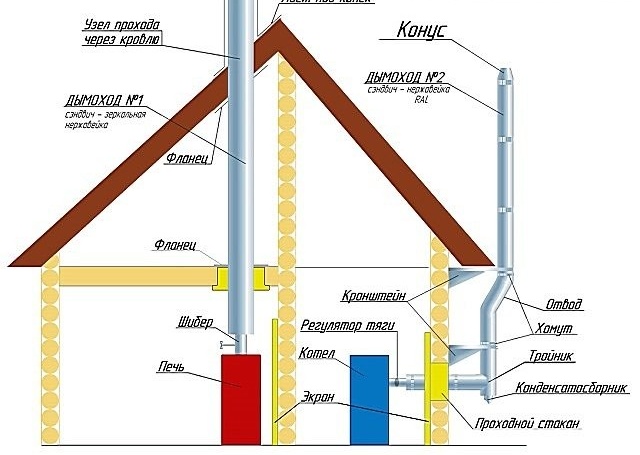
Diagram of the internal chimney with all nodes
It crosses the attic space and the roof and reaches the level of the roof ridge. A clear advantage of this type of pipe is that the heat does not go outside, but comes from the pipe and remains in the room. The stove keeps heat longer, and fuel is used more economically. Another undoubted advantage of this type of chimney is durability. Of course, this is the case if during its construction all the rules and regulations were observed, and during operation the joints were constantly monitored.
The disadvantage is that you need to make holes in the ceiling and roof to bring the pipe out.
From our next article, you will learn the features of masonry brick ovens. How to correctly calculate the required amount of materials and prepare them, what stages still need to be considered before proceeding with installation:https://aquatech.tomathouse.com/en/otoplenie/kirpichnye-pechi-svoimi-rukami-sekrety-remesla.html.
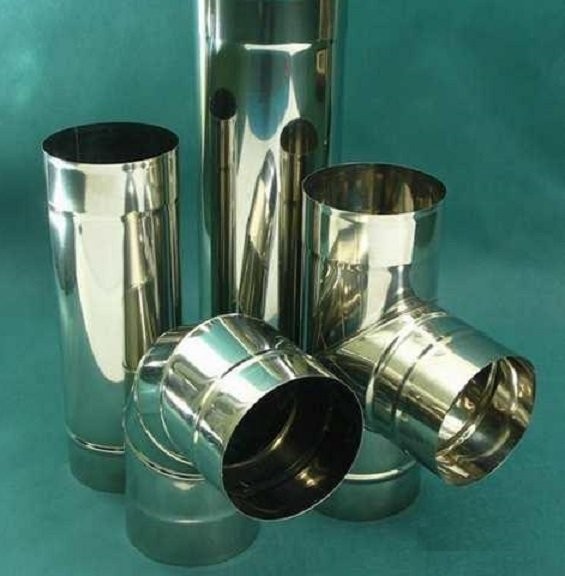
List of materials for metal construction

Elements of a metal chimney
- To understand what materials you need to purchase, first of all you need to make a detailed drawing, where all the corners and turns of the pipe will be indicated. In such a scheme, specify the exact angles so that the knees are correctly selected for you. Pipe sizes are also very important. It needs to be enough for the entire height of the building.
- Get a pair of sheets of metal of the same diameter as the pipe. They will need to be fixed on the ceiling of the bath room and on the floor of the attic.
- It is necessary to take care of heat-resistant materials that will be laid on the floors and protect the design of the bath from high temperatures of the chimney pipe.
- On the roof, the pipe must be waterproofed. To do this, you can use adhesive sealant or a special rubber sealant.
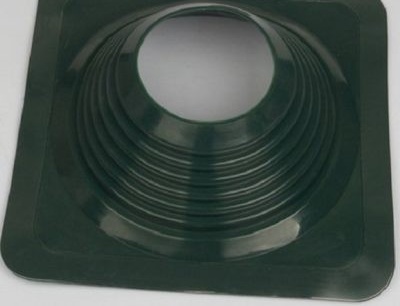
Rubber sealant for waterproofing
- When you purchase chimneys, pay attention to the internal section in them. Depending on the power of the furnace, you need to choose the right one for you. For a bath, works with a diameter of 15–20 centimeters are usually used. By installing a pipe with a larger diameter than you need, the stove will lose heat too quickly. And if the pipe is with too small a cross section, then the draft will be insufficient.
- The chimney must be at least 500 centimeters high. The traction quality directly depends on this.
- To make the pipe last as long as possible, choose the metal from which it is made, with a thickness of 1 mm or more.
- If you plan to install a heating tank for water, consider this as well. On the diagram, indicate its location and calculate what you need to purchase to install it.
Layout of the elements of the furnace with a heating tank

Metal chimney installation
Once the bath stove is finally installed, you can proceed with the construction of the chimney pipe. The internal and external pipe installation are different. Consider both options.
Inside the bath
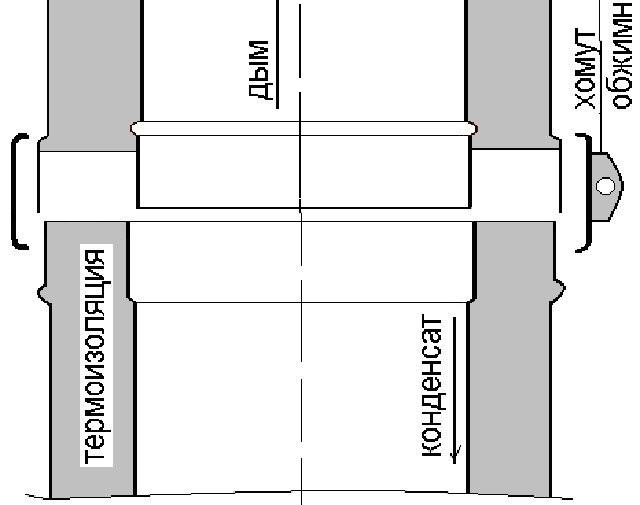
- Most often, internal chimneys go almost perfectly vertically. The individual elements of the pipe are mounted on top of each other (installation "smoke").
- Sandwich designs are set slightly different.

Sandwich Pipe Coupling
The elements of the pipe, which are located indoors, are mounted “by condensate”, that is, the entrance of the upper pipe takes place through the lower bell. Those parts of the chimney that go outside are installed by smoke.
- At the design stage, make sure that there are no joints of the elements of the chimney at the places of overlap.
-
In places where the pipes will pass too close to combustible materials, such as wood, it is necessary to put insulation.
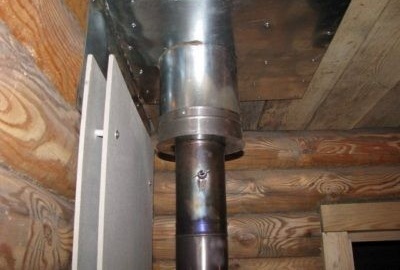
The passage of the chimney through the ceiling with insulation
Two layers of asbestos boards can be used for this.
- Installation of a water heating tank, as a rule, takes place near the fuel part of the stove. If you place the tank directly above the furnace or in the attic, then the heated water can be simultaneously distributed in two rooms.
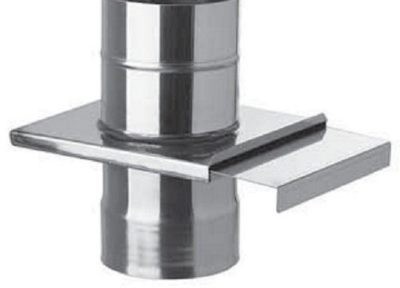
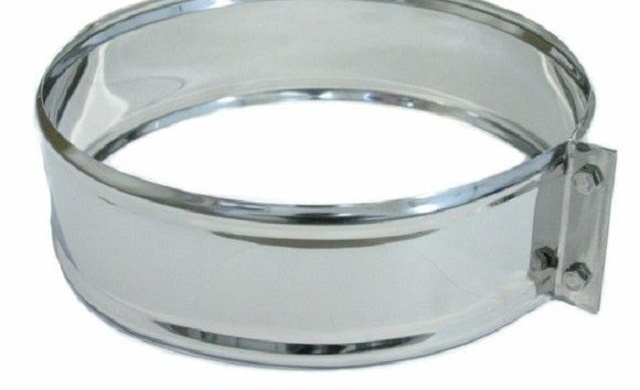
- Lubricate places where pipes will be connected to each other using heat-resistant sealant. After they are installed on top of each other, additionally fix them with a wide clamp.

Pipe Clamp
- If you notice large gaps in the joints of the pipes, then cover them with an asbestos cord, wrapping it around the pipe. But experts advise you to select parts in the ideal entry without gaps.
- The first section of the chimney pipe, which is attached to the nozzle of the furnace, should not consist of several layers. It is presented in the form of a conventional single-walled metal pipe with special connections. This pipe is equipped with a gate valve (gate), with the help of which the necessary level of thrust is created and controlled.
Pipe with gate valve
-
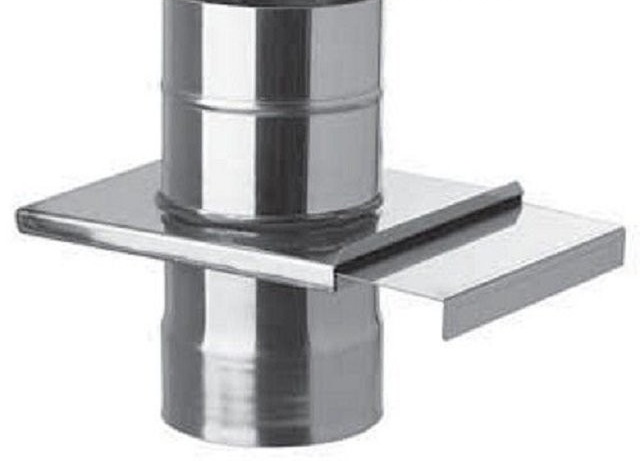
For convenience, to guide the pipe through the ceiling, experts recommend using a special box

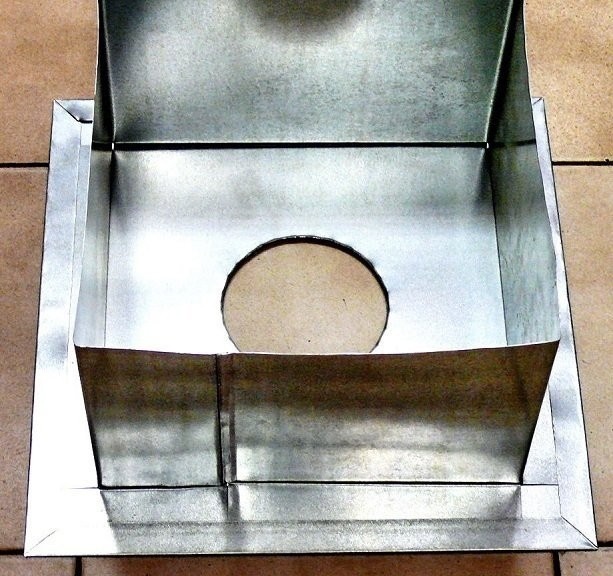
Box for pipe passage through the ceiling
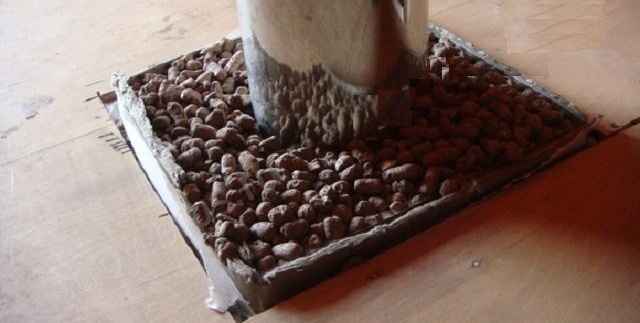
The height of its walls should be 300-400 millimeters thicker than the ceiling. From the chimney to the walls of the duct there should be a distance of 18–20 centimeters. To install it in the ceiling, cut a hole in the shape of a square to the size of the box. Fix the lower part to the ceiling. The bottom of the box has an opening through which a chimney is passed. Fill the box with medium-grained expanded clay or mineral wool to the top as tightly as possible.In the attic, close the box with a metal lid equipped with the same hole for the pipe as the bottom.
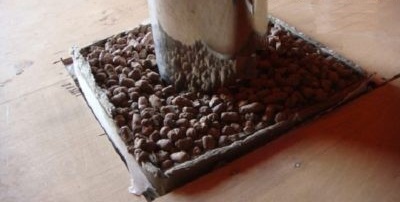
Expanded clay filled box
-
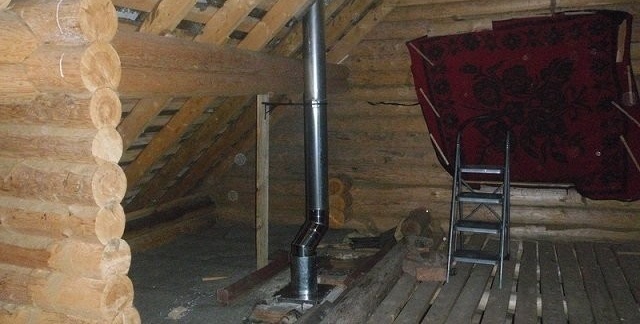
Pass the pipe through the entire attic. If it rests against the bars of the crate, then using the bends, go around them.
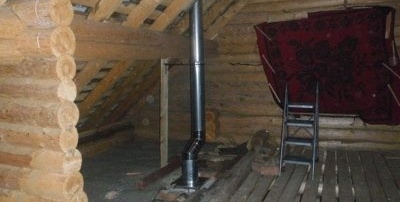
Pipe passage through the attic
- The place where the chimney passes through the roof must also be insulated with an asbestos sheet, in which a hole is made for the pipe. Additionally, place asbestos slabs or mineral wool in this place for insulation.

Pipe passage through the roof
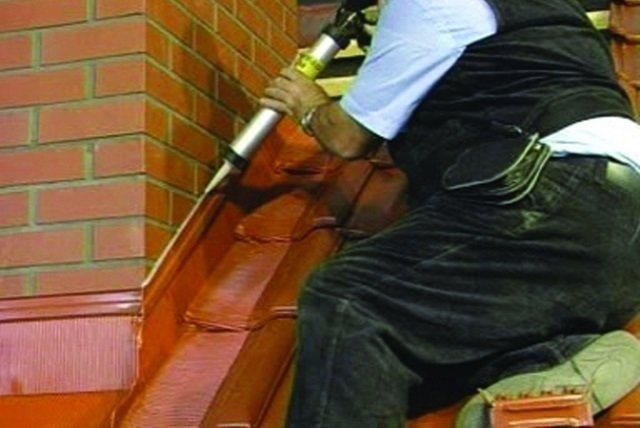
- So that moisture does not leak into the gaps between the chimney and the roof, you must take care of this. A specialized elastic material is put on the chimney, which must be glued to the roof surface with a special moisture-proof sealant. Then it must be additionally fixed with roofing screws.
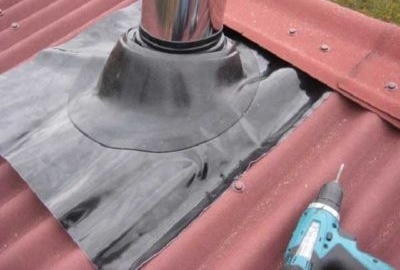
Exit pipes through the roof with waterproofing


On top of the chimney, it is necessary to install an umbrella that protects against the penetration of moisture and debris into the pipe.
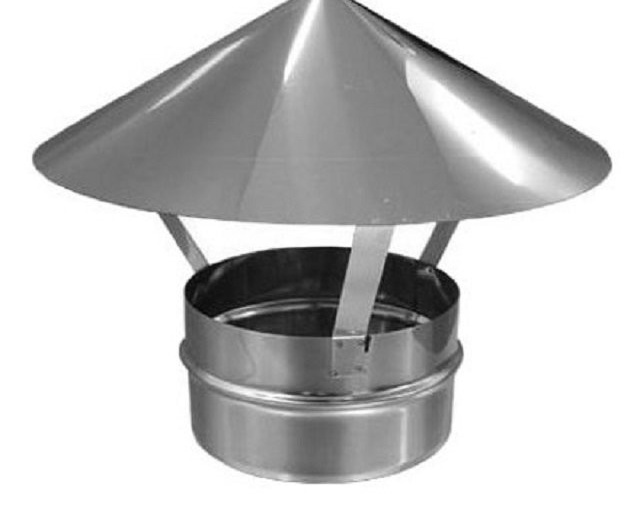
Umbrella protecting the chimney from moisture entering the pipe
You may also be interested in an article with instructions for building a Kuznetsov furnace with your own hands:https://aquatech.tomathouse.com/en/otoplenie/pech-kuznecova-poshagovaya-instrukciya-po-izgotovleniyu.html.
Outside the bath
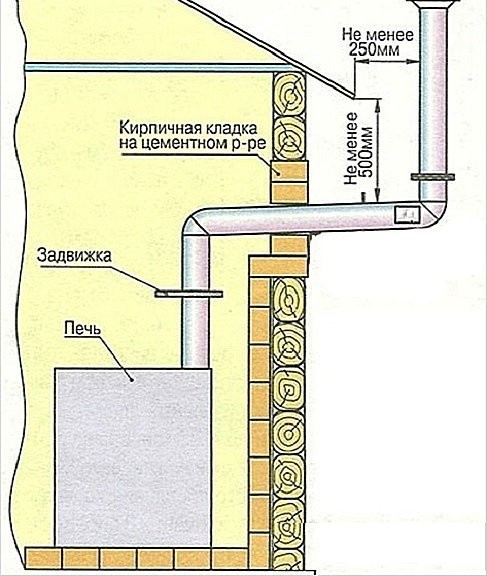
- As already written earlier, this option for installing the chimney occurs by bringing it out through the wall of the bath. To use this option of the chimney pipe as safe as possible, it is necessary to make part of the wall with brickwork in the place where the pipe will go out.
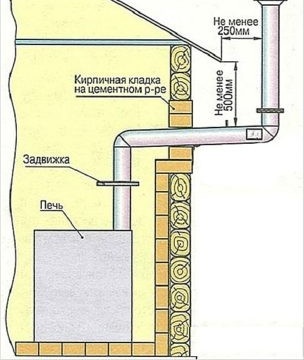
Scheme for removing a metal chimney through the wall
-
The corners of the pipe are made using elbows or bends. They are made with angles of 90about or 45about. Other bending angles are less common.

Knee and Tee
- As in the case of the internal chimney, the external pipe exits through the wall of the bath using a metal box. Only the space of the box is filled not with expanded clay and mineral wool, but with stone wool. Small gaps around the chimney are sealed with heat-resistant sealant.
- A tee is installed on the outer wall. From it, the chimney goes up, along the wall and down (to the place where the condensate will collect).
- On the wall of the bath, install mounting brackets with which the pipe will be fixed in an upright position.
- The pipes should rise above the ridge of the roof by at least 50 centimeters. This will provide better traction.
- Put a protective umbrella on the pipe.
List of materials for a brick chimney
This version of the pipe is built using heat-resistant bricks, which are interconnected by a masonry compound (dry building mix for the construction of stoves and fireplaces). Sometimes a well-chosen clay solution is used. In addition, the pipe will need to be treated with antifungal compounds. The amount of material is calculated based on the order.
You will also need a level, square, spatula, etc.
How to make a brick structure
Brick chimneys can be indigenous and mounted. The first option is located next to the stove and is ideal for stoves.
If the stove is initially made up of bricks, then the extension of the chimney occurs to the general design. If you have a metal stove, then a brick chimney is connected to it using a metal pipe.
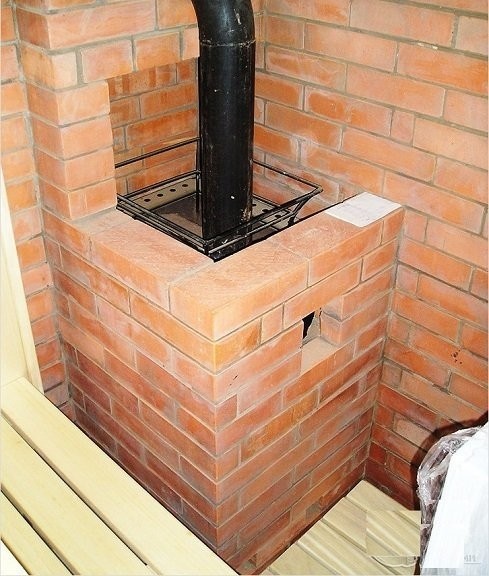
Connection of the chimney to the bath stove with a metal pipe
Nuances
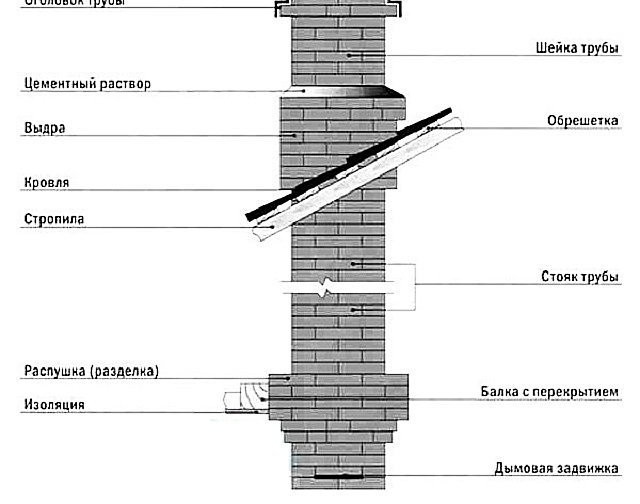
- Near the ceiling in the chimney, a smoke damper is installed, which is responsible for the draft in the stove. It also depends on how much fuel will burn and how long the stove will keep heat.
-
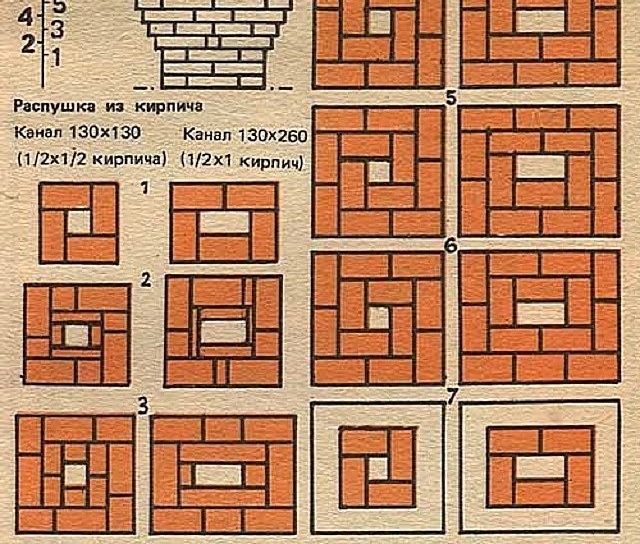
To lead the pipe through the ceiling of the attic, it is necessary to carry out a fluffing in the chimney.

Brick chimney scheme
Swing (cutting) is a thickening of the walls of the chimney part of the furnace while maintaining the internal section.Thus, the floor is insulated from high temperatures.
- A riser is being built over the fringe. It crosses the entire attic and has a straight and even shape.
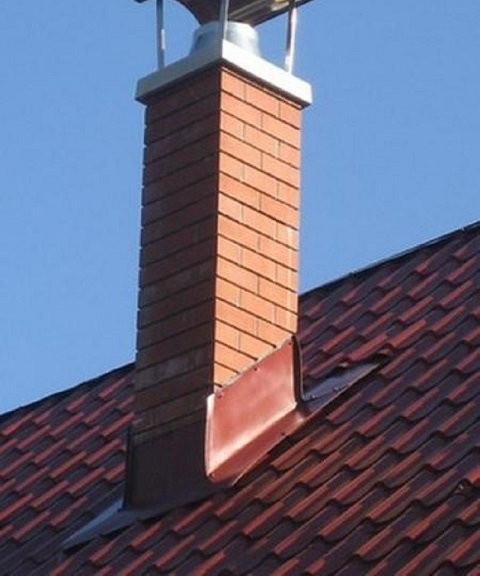
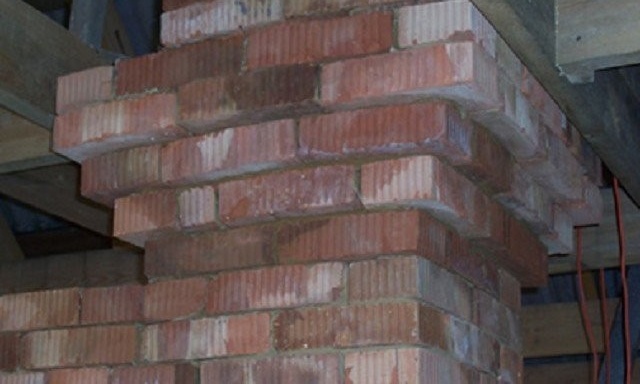
- In the place where the chimney intersects with the roof, an “otter” is constructed, which has the same functions as a fluff. But in addition to the function of protecting roofing materials from temperatures, the otter closes the gaps that form between the roof and the chimney.
- The next element of the pipe is the neck. After expansion, it returns to its original form.
- After the neck there is a head. Its bricks protrude outward and provide additional protection against moisture penetration.
- To prevent precipitation, dirt and dust from falling into the pipe, a metal cap is put on it.
Step-by-step construction
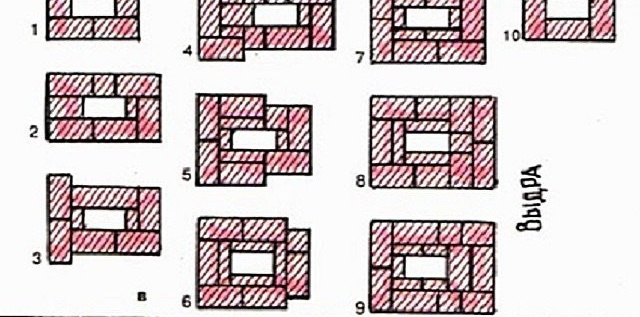
From the fundamental part, the chimney is placed using a single ordering scheme.

Chimney well
The construction should be smooth, without protrusions and windows. An exception is the ledge, where a metal pipe from the stove is embedded. The chimney is a square pillar with a well-shaped cross-section inside. The size of this section, depending on the power of the sauna stove, is 13x13 centimeters (0.5 bricks), 13x26 centimeters (1 brick) or 26x26 centimeters (2 bricks).
- The foundation is the foundation of the chimney. Its thickness is the same as that of bath stoves. They are one.
- The chimney rises to the place where the valve is installed. Then the chimney is put in order.

Chimney and flue arrangement
- Row number 1 completes the neck of the chimney.
- From the 2nd row, the construction of the canopy begins. In this case, the bricks must be shifted by 1/3 out. At this stage, solid bricks and parts are used. Parts of the required sizes are made using a pickaxe.
- The internal section of the chimney is constant throughout the entire masonry. The shift of the fluff occurs only outward. If you violate this rule, then you can greatly reduce the draft of the furnace.
- The flap moves from 3 to 5 rows.
- The 6th row is laid in the same way as the 5th, without a shift.
- Rows number 7 and 8 are the same as row number 1.

Ready-made steps
-
As soon as the cutting is laid out, the construction of the otter begins.
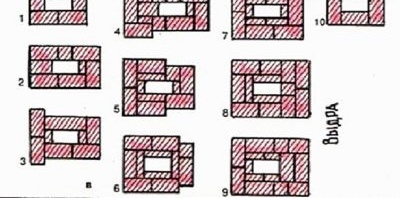
Otter Order
Building its task is not an easy one. Each row on 1/3 must be above the previous one. Its lower one is glad of the same shape and size as the upper row of cuts. From the second row of the otter, the laying of steps begins, expanding the chimney outward to 1/3 a brick. The ordering diagram clearly shows how many rows you need to make for the construction of the otter as.
- After the otter, the neck of the chimney is laid out in accordance with the scheme.
- Then comes the tip. It consists of 2 rows, with the lower one slightly protruding outward.
- The last stage is the installation of the cap-cap.
Waterproofing
Of course, fluff and "otter" protect the ceiling from exposure to high temperatures. But the waterproofing on the roof has not been canceled. Brick chimney must be waterproofed before the roofing material is laid on the roof. Usually they use roofing material and mastic for this. First, put the mastic on the bottom of the chimney, heat it with a burner and glue the roofing material to it, firmly pressing it.
Then you can lay the roofing material, which should fit snugly to the pipe. After that, there is a decorative finish (apron) on top of the roof. All slots must be carefully filled with sealant. Otherwise, moisture may leak through them.
Sealing gaps
Chimney cleaning
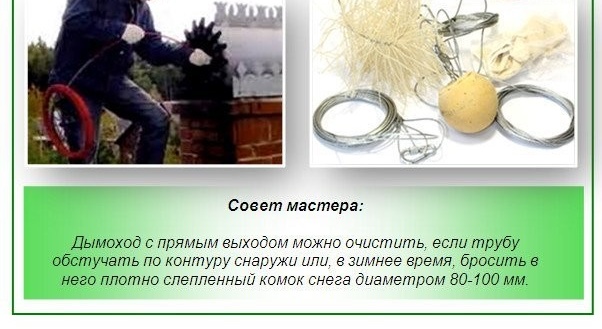
It’s best to do this after it rains. Cleaning the chimney is an important process that cannot be avoided and ignored. For this, experts advise resorting to a time-tested mechanical method using a brush, special weights, and sometimes a sledgehammer and crowbar.
It is recommended to take out all things from the bath, and cover, for example, newspapers with the floor, walls and ceiling. This work is very dirty!
It is most convenient to use a brush to clean the pipe. It is inserted into the pipe and gently pushed up until the resistance of the soot accumulated on the walls becomes less. The main thing is not to twist the brush, otherwise it can be broken. If this happens, then it will be possible to get it only in parts.
If small growths are found in the chimney, melt the stove with aspen wood.
Chimney cleaning
When burning, they create excellent traction and carry ash out of the chimney. Aspen firewood is characterized by dry and intense heat. If earlier the stove was heated with coniferous wood, then, most likely, tar substances remained on the walls, evaporating from the needles during the fire. Aspen perfectly eliminates them. Instead of aspen, it is permissible to use potato peelings that cope with the same problems no worse. The only problem is to collect them in the required quantity.
In addition to the mechanical method of cleaning pipes, there are more modern ones. They are rapidly gaining popularity. Cleaning takes place with the help of chemicals, which include special substances that, during combustion, remove soot from the chimney or make it loose, due to which, it falls off itself.
Video: building a chimney in a bathhouse
The construction of the chimney must be approached with all responsibility. Not only the functionality of the stove, but also your health will depend on the quality of the work performed. After all, if the design is improperly executed, carbon monoxide can enter the room. Therefore, carefully study the material presented above, thoroughly prepare and, being confident in your abilities, proceed to construction. Good luck