DIY corner fireplace: step by step instructions

A fireplace in a country house serves not only as a stylish decorative element, but also as a source of real home comfort. Together with the open flame of its hearth, an incredibly warm and comfortable atmosphere reigns in the room, which allows you to relax and rest after a busy day. A popular option is a corner fireplace. It can be built even in a small room, and a simple, uncomplicated design can be repeated by any novice master.
Content
Features and advantages of corner fireplaces
Placing a fireplace in the corner of the room dates back to the time when it played a more applied role than a decorative one. Since it was necessary to heat several rooms with a heating device, the location at the intersection of the walls was the most advantageous both from the point of view of heat engineering and from a purely practical point of view. The corner fireplace could be installed in a small room, where a full-fledged heating unit simply could not fit.
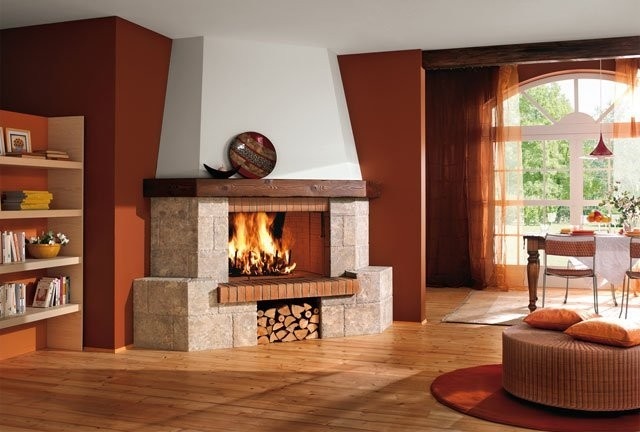
The corner fireplace creates an atmosphere of comfort, warmth and well-being in the house
In addition, homeowners were attracted by the price of building a heating device, which was significantly lower than when installing a classic fireplace. This is due to the fact that the angular structure requires the construction of only one facade, while wall-mounted models also need side walls. Of course, in the first case, much less material will be needed, and the construction time is reduced by almost half. Although in our time the fireplace has lost its exclusive purpose, the tendency to optimize space and costs during its construction has continued.
All corner fireplaces can be divided into two groups:
- symmetrical designs;
- asymmetric type fireplaces.

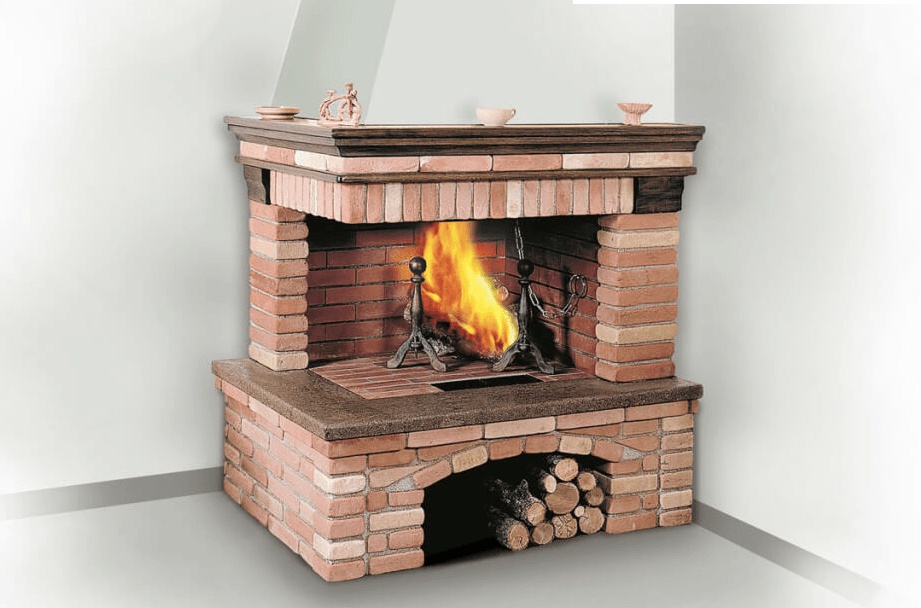
Symmetric fireplace with a semicircular portal
In the case of a symmetrical installation, the bisector of the angle passes exactly in the center of the portal of the heater and visually divides its furnace into two equal parts. In this case, the front panel can be laid out both in a straight line and in the form of an arc or a broken line.
The combustion chamber of an asymmetric fireplace is shifted to the side and is often opposite one of the walls. The heater itself resembles a wall-mounted stove with an open or closed firebox, and its portal is supplemented by a side wall. Often it is replaced with a metal or stone column, getting a unique design.
Corner fireplaces have practically no drawbacks, while their features predetermine a number of structural and operational advantages.
- Universality. Heating devices of this type can heat rooms with an area of more than 100 square meters. m, therefore, suitable for small country houses and large country cottages.
- Space saving. Installing a wood heat generator in the corner of the room will significantly save space. Symmetric models with a concave type portal allow optimizing space.
- High heat output. The heat from the fireplace is spread not only by convection, but also due to radiation. This allows you to raise the air temperature in the room from 0 ° C to + 20 ° C in just 1-2 hours.
- Installing a heating device in the corner allows you to immediately heat three rooms in the house.
- The possibility of constructing a furnace of any configuration.
As you can see, there are many advantages to this design. As for the negative aspects, the angular models in this regard are no different from the wall. An open fuel chamber does not allow a full smoke flow, since the draft is only enough to remove combustion products through a direct channel. Due to the fact that most of the heat goes out together with smoke, the efficiency of corner fireplaces rarely reaches 20%. There can be no talk of heat accumulation either - when the wood burns out, the walls of the stove quickly cool down.
Asymmetric corner fireplace looks stylish and elegant
Design Features
The main elements of the corner fireplace are the fuel chamber and the chimney. From the correct size ratio of these elements depends on how efficient and productive the heater will be. The base of the structure is called a fireplace table, which is located at floor level and rests directly on the foundation. In front of the fireplace, a pre-furnace platform is arranged. It is laid out with refractory bricks and covered with ceramic tiles or metal sheets. According to fire safety standards, the platform should protrude beyond the portal by at least 30 centimeters on each side.
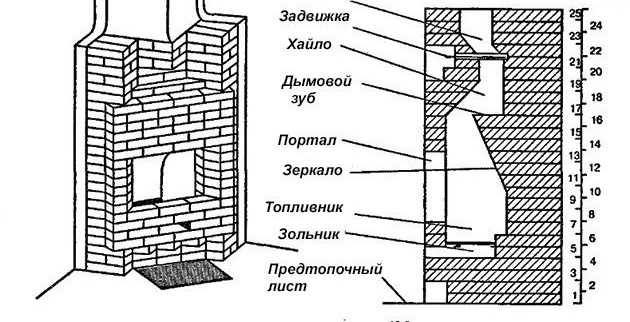
The device of the corner fireplace - drawing
Above the fireplace table is located under - a place on which firewood is laid. The canonical design does not imply the installation of a grate, but it is often mounted to increase the performance of the heating device. In addition, in furnaces with a closed firebox, the lower blow allows you to adjust the flame intensity. Thanks to this, it is possible to stretch the burning time of one fuel bookmark, which means to increase the efficiency of the structure.
Under, like the fire chamber, they spread with refractory materials - the temperature in this zone often exceeds 1000 ° C. Often, in order to enhance the heat-emitting ability, the back wall is faced with a stainless steel sheet or a cast-iron plate. To further enhance the heat transfer of the fireplace, the back of the furnace is performed with an inclination forward. This allows you to direct thermal energy towards the floor.
A smoke collector (hailo) is arranged above the firebox - a camera in the form of a truncated pyramid with a small threshold in front. This barrier prevents the mixing of cold air with the combustion products and serves as an additional barrier to prevent smoke from entering the room.
On the back wall of the smoke box there is a smoke (chimney) tooth - a protrusion necessary for the formation of the so-called gas threshold. Thanks to it, it is possible to reduce the flow rate of burning gases and make them stay longer in the combustion zone. The chimney tooth traps soot in the chimney, preventing it from falling into the combustion chamber. For this reason, a door for cleaning the chimney is often installed near a brick ledge.
In the place of transition from Hail to the chimney, a valve is installed that regulates the draft. It also blocks the way for warm air from the room after the firewood has completely burned out.
The design of the pipe to remove combustion products is no different from the chimneys of other wood-burning stoves. To ensure good traction, the pipe is raised above the ridge of the roof, but not less than 5 meters from the hearth (grate).
Calculation of the main sizes
As noted earlier, the correct operation of the fireplace primarily depends on the size of its firebox and the cross section of the chimney. If the parameters do not match, the thermal efficiency of the heater will drop significantly, or the stove will throw smoke into the room. When designing a fireplace, you should adhere to the rules:
- The cross section of the furnace window should not exceed 2% of the total area of the room. The height of the working chamber is chosen so that it does not exceed a depth of more than 2 times.
- To determine the square of the hearth of the furnace, the mouth area is multiplied by a factor of 0.7.
- Fire chamber dimensions: the width should be 20–40% more than the height.
- To calculate the depth of the working chamber, its height is multiplied by a factor of 0.5–0.7.
- If the design of the fireplace involves the presence of a lower blower, then the area of its channel in the light should be at least 200 square meters. cm.
As for the parameters of the chimney, its cross section cannot be less than 10% of the area of the furnace window. When building a chimney, experts recommend observing the conical shape of the opening. In any case, the size of the smoke channel should be at least 140x270 mm for a brick structure and Ø150 mm for a round riser.
The network has many programs for calculating the main parameters of corner fireplaces. In addition, you can use ready-made tables, which indicate the design parameters of their components, depending on the area of the heated room. One of them is given below.
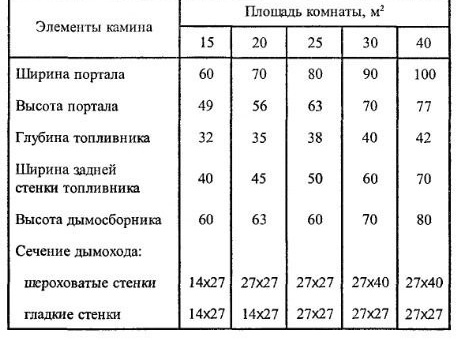
Table of the main dimensions of corner fireplaces depending on the area of the heated room
You can use the schemes and orders of existing heating appliances.
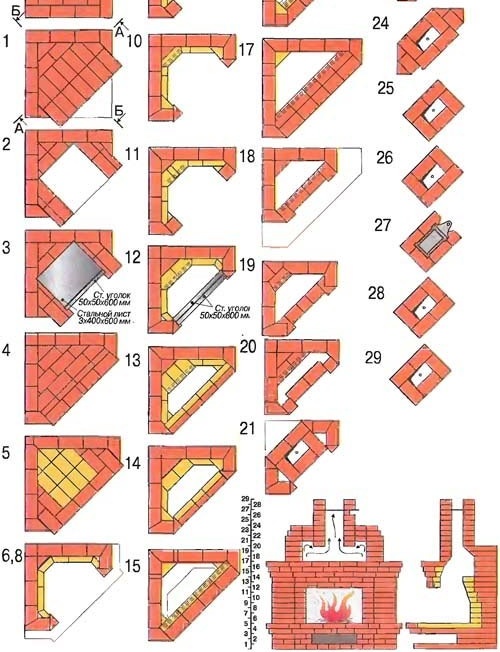
Simple corner fireplace arrangements
The exact amount of material needed depends on the design of the fireplace and its size. To calculate the number of bricks, it is advisable to use the ordering scheme. Moreover, each half or three-four indicated on the diagram is considered to be a whole brick, and the value obtained as a result of calculations is multiplied by a factor of 1.2. This will allow you to make a small margin in case of marriage or damage during transportation and unloading. As for the mortar, then to make joints with a thickness of 5 mm, you will need 1 bucket of the ready masonry mixture for every 50 bricks.
Necessary tools and materials
You will need a minimum set of tools, which, most likely, will be found in every home master. Here is a complete list of everything you need:
- tamper for compaction of soil;
- bayonet shovel;
- rule for leveling the foundation;
- a mooring cord, which will make the masonry perfectly straight;
- hammer;
- building corner, plumb line and level;
- buckets for mortar and water;
- jointing for masonry;
- a mason hammer, or, as it is also called, a small pickaxe;
- trowel (trowel);
- roulette;
- mallet with a rubber striker;
- angle grinder;
- cutting wheels for work on stone and metal;
- pliers.
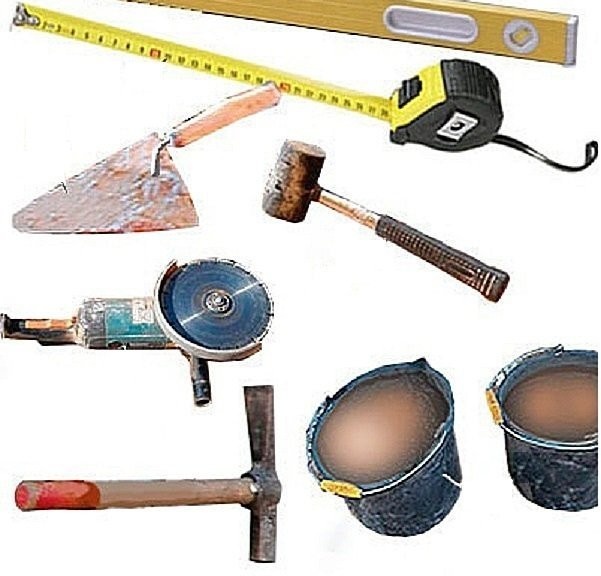
For laying a fireplace, you will need tools that every owner will find
In the process of erecting a fireplace, you will need to equip a reliable foundation. To do this, prepare:
- roofing material or any other rolled material for waterproofing;
- a construction grid with cells 100 mm in size for reinforcing the foundation slab (other materials found on the farm can be used as an arm belt - pieces of steel bar and reinforcement, pieces of pipes, corners, etc.);
- sand;
- crushed stone (fraction 20-30 mm) or coarse-grained granite screenings;
- lumber for the arrangement of formwork (it is best to use wide edged boards, but various trimmings, as well as used wood materials, will do);
- cement grade M-400 or higher;
- nails for formwork assembly;
- steel wire, if the reinforcement belt will be knitted from reinforcement or bar.
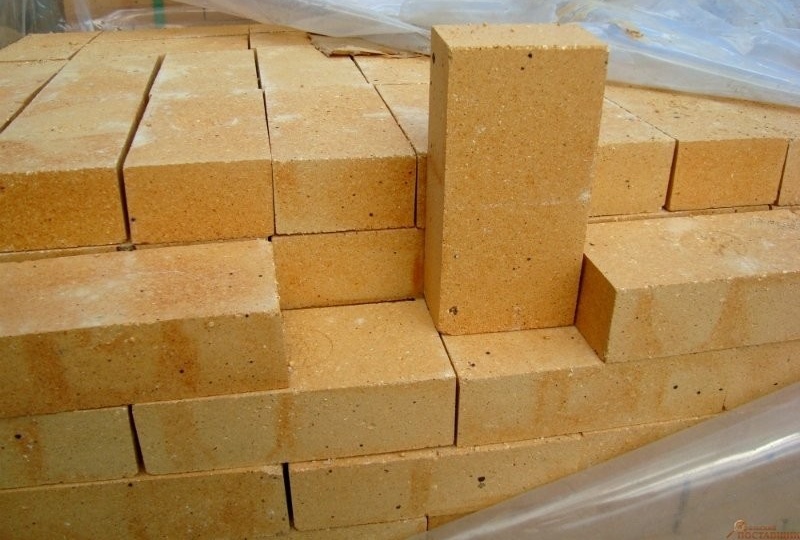
High-temperature zones of the furnace and chimney are laid out with fireclay bricks
Material List:
- refractory brick - you can use any, but for convenience, it is better to take chamotte grade SHA-8 with standard sizes;
- red burnt brick of grade M-150 and higher;
- facing brick (it is used for masonry of external surfaces, unless another method of finishing is assumed);
- cement;
- clay;
- sand;
- steel corner with the dimensions of the shelves 50x50 mm or 60x60 mm (needed as supports for overlapping the hearth and arch of the furnace);
- boards, rail and plywood for the manufacture of the template, if the overlap of the fuel chamber will be in the form of an arch;
- special type metal valve - with a long handle;
- fireplace cassette, if it is intended to install a factory-made furnace;
- heat-resistant thermal insulation from asbestos or basalt;
- Decoration Materials.
The solution can be prepared not from individual components, but from the finished mixture for laying furnaces. Heat-resistant compositions for the construction of stoves and fireplaces in a wide range are present on the shelves of construction stores.
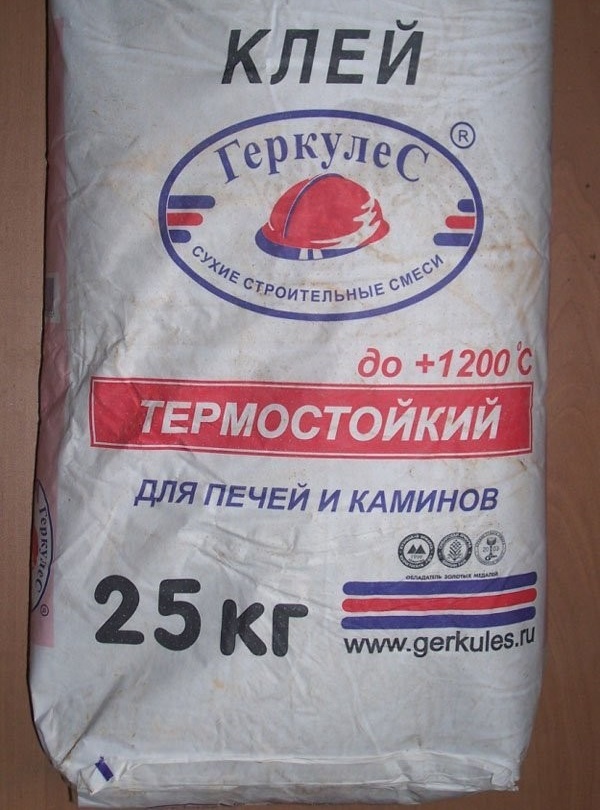
Masonry mortar can be prepared from purchased mixtures
Have to take care of the chimney. In the case of manufacturing a chimney from brick, it is necessary to think in advance about the safety of its operation. Since the feature of the heater is an almost direct gas channel, it is not uncommon for burning particles of ash and soot to fly out of the chimney during intense combustion. The design will comply with fire safety standards if the chimney is equipped with a spark arrester. To protect the vertical duct from atmospheric phenomena and increase traction, a deflector is needed. In addition, it will protect the structure from the wind, preventing the formation of turbulent flows at the upper end of the pipe.
Preparation for construction
Seat selection
The angular design outlines a very narrow circle of possible options for placing a heating device - at the junction of the internal or external walls of the room. Nevertheless, the correct choice of the installation site seriously affects both the ease of installation and the thermal efficiency of the unit during operation.
Most often, a fireplace is installed in the largest room — the living room or hall, since it requires a lot of air to function properly. The minimum space requirement is 20 square meters.
Experienced stove stoves recommend installing a fireplace stove on the interior walls of the room. Otherwise, the heat output of the heating device will inevitably fall, as well as problems with the functioning of the chimney.
The fireplace should not be placed opposite doors and windows, since when they open, a draft is formed between the firebox and the open window (door) opening. In addition, it is necessary to observe the condition for the proximity of the roofing ridge - this will greatly facilitate the process of constructing a chimney. In addition, a short chimney outside the building looks more harmonious against the roof.
Be sure to pay attention to the areas of the room that will be in contact with individual parts of the wood heat generator. At the place of installation of the chimney, there should not be beams and rafters, and support logs are not allowed under the wooden floor.
A fireplace with a closed firebox ensures constant traction, regardless of installation location. The operation of the heating unit with a cast-iron cassette is almost never accompanied by the emission of smoke into the room.
How to build a foundation
An ideal option is to equip the base of the fireplace stove even at the stage of building a house. In this case, the slab can be filled with the same solution that is used for the construction of the strip foundation of the building. The only condition is that between structures it is necessary to provide a gap of 5 to 10 mm wide. The fact is that the massive walls of the building will eventually precipitate. In this case, individual parts of the fireplace will be displaced, and this is fraught with the appearance of cracks and tears in the walls of its chambers. To prevent this from happening, the foundation of the heater is never connected to the base of the house.
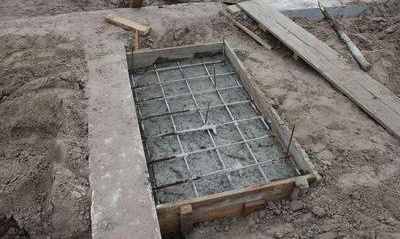
A separate foundation for a fireplace is equipped even if it will be built during the construction of the building
If the fireplace needs to be built during the repair or reconstruction, you will have to remove part of the floor. If a wooden flooring is installed in the house, then it is cut out at the place of installation of the fireplace table, leaving a margin of 10-15 cm in each direction. For this purpose, you can use either a conventional hacksaw or mechanical tools - a jigsaw or a hand-held circular saw. In the resulting opening, a foundation pit is dug with a depth of 0.5–0.6 m. Further work is conveniently performed according to the scheme below.
- The bottom of the pit is covered with a layer of sand with a thickness of not more than 15 cm. After this, the bulk material is compacted by tamping followed by spilling with water.
In sandy or sandy loam soil, the pit walls may crumble, preventing construction work. To prevent this from happening, the side surfaces are covered with a plastic film.
- On the sand it is necessary to pour crushed stone with a thickness of 10-15 cm. In some cases, you can use granite chips or broken brick.
- Strong wooden blocks are clogged in the corners, to which formwork boards are nailed. Performing this work, it is necessary to monitor the cut of the upper boards. They need to be aligned as accurately as possible in terms of level, since this affects the geometric accuracy of the structure.
If the formwork is knocked down from narrow boards, then between them inevitably there will be gaps through which cement will flow. To avoid such a nuisance is very simple - just cover the walls of the wooden frame with plastic wrap or other waterproofing material.
- At a height of 5-10 cm from the bottom, a reinforcement belt is installed. For this, several metal pins are driven into which the construction mesh is fixed with a knitting wire. Another option is to install a reinforcing structure on the halves of bricks.
- Mixing crushed stone, sand and cement M-400 in a ratio of 4: 3: 1, prepare concrete. If granite screening is used, then its ratio to cement should be 3: 1. Sand is not used.
- Concrete is poured into the mold and subjected to compaction by vibration, ramming or bayonet. After that, the surface is leveled.
- Preliminary solidification of the solution will end in 5-6 hours. After this time, the structure is covered with roofing material and incubated for several weeks until the concrete sets completely.
Sometimes it is impossible to level the surface of the foundation due to the use of crushed stone of a large fraction. In this case, the filling of the base is carried out in two stages. First, a 4/5 mold is filled with concrete and compacted. The remaining 1/5 part is poured with an ordinary cement-sand mortar. After that, bringing the surface of the foundation slab into proper form is not difficult.
Preparation of masonry mortar
Despite the fact that retail chains offer a wide variety of heat-resistant mixtures, experienced stove-makers prefer the old, time-tested, clay solution. For him, it is better to use clay with high fat content, which is soaked 1-2 days before the start of work. The resulting substance is filtered through a sieve, while kneading undissolved lumps.Subsequently, a homogeneous consistency will make it possible to lay a brick on a seam of any thickness, up to the recommended 3 mm.
Sand before mixing with clay pulp is sieved through a sieve. Experts recommend the use of coarse river sand, but you can get by with ordinary sand that is mined in quarries.
It is not by chance that we mentioned that it is best to take oily clay. The fact is that after drying it cracks less. If you manage to get the blue clay, then you should know: there is no better material for laying stoves. At least that's exactly what stove-makers with vast experience say.
Before proceeding with the masonry, it is necessary to determine the correct composition of the clay solution
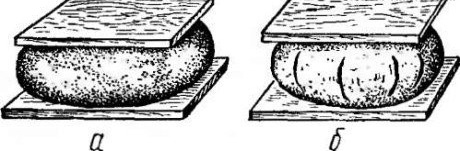
Sand is added to the clay solution just before the start of the masonry. Its amount depends on the fat content of the material, therefore, to determine the correct proportion, the following method is used: a sphere of size slightly larger than a ping-pong ball is rolled from a solution, and then it is placed between two even planks. Gently squeezing them together, they watch at what point the lump will begin to crack:
- if the sphere falls apart almost immediately, then this indicates an increased content of sand in the solution;
- if the ball is compressed to half the diameter, and cracks have not appeared, then sand in the clay mixture is not enough.
The ideal combination is the ratio that leads to cracks when compressing the lump by 1/3 of the diameter. Masonry should be carried out only with such a solution, otherwise there can be no talk of any strength and tightness of the seams.
Masonry fireplace installation: step by step instructions
Experienced masters have their own secrets and best practices. We will share some of them with you:
- It is necessary to take out all the furniture and furnishings from the room. Remember that laying a fireplace and putting it into operation is very dusty and dirty.
- It is possible to start construction only after 28 days - this is the period recommended by cement manufacturers for the complete setting of concrete.
- Before work, the bricks need to be soaked for several hours in water. Otherwise, they will excessively dehydrate the masonry mixture, which will reduce the strength of the joints and the entire structure as a whole.
- Even experienced stoves pre-erect the structure in a dry way, that is, without the use of a solution. This allows you to thoroughly understand the circuit of the heater and avoid errors in the order. As for beginning masters, they are advised to lay out each row dry even after the work goes into the phase of thorough construction (using sand and clay mixture).
In turn, we also want to give one small recommendation. Before you start laying the first brick, print the order diagrams on separate sheets of paper. In the course of work, the ranks passed can be crossed out - this will allow you to keep track of your account and save time on unnecessary checks.
The thickness of the joints when laying the fireplace should be no more than 3-5 mm
Only having figured out all the nuances, you can pick up a trowel and proceed to the construction of a fireplace. The phased execution of work will allow you to properly organize the workflow and avoid mistakes, therefore, we recommend using the instruction, which discusses the features of the masonry of individual parts of the unit.
- The front rows are laid out not just smoothly. They should be ideal, since the geometric accuracy of the entire structure depends on this. You may even need to draw the contours of the mantelpiece on the foundation waterproofing. Masonry is performed in full accordance with the ordering scheme.
- The side walls, which begin to spread in the second row, form a sub-window space necessary for drying and storing logs. Closer to the outer edge of the brick, it is necessary to lay a metal corner 600 mm long.In the future, it will serve as a support for the bricks of the furnace hearth.
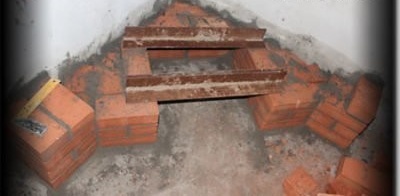
Metal corners will serve as a reliable support for the bricks of the upper row
- The laying of the third row is similar to the previous one with the only difference being that a metal sheet 3-5 mm thick is laid on a steel corner. By the way, it is possible to block the under-window chamber in another way - with the help of four pairwise welded corners 60 mm wide. Features of this method can be considered in the illustrations.
- The fourth nearby is a bricked chamber for the firewood.
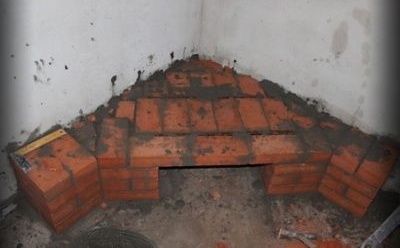
Overlapping a niche for firewood
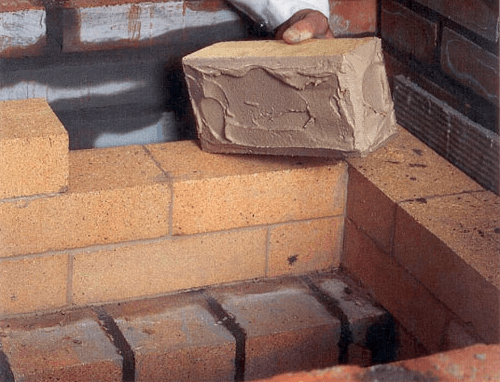
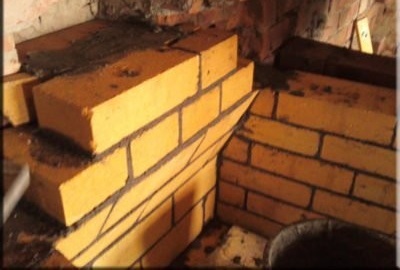
- In the fifth row, fireclay bricks come into play. They lay the bottom of the furnace.

The bottom of the furnace is exposed to high temperatures, so it is laid out with fireclay brick
- Before starting laying 6-8 rows, a circle for working on stone is set on the grinder and the fireclay brick is dissolved into two thin halves. They will be needed for lining the combustion chamber.
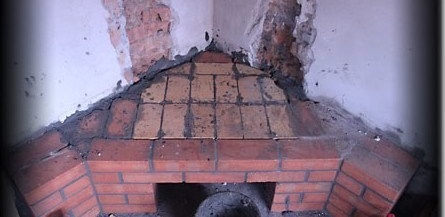
- From the seventh to the ninth row, simultaneously with the build-up of the side walls, lay the inclined back surface of the furnace. This prepares the base for the formation of the chimney tooth.
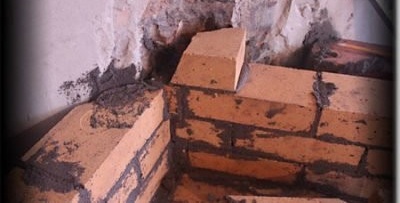
Brickwork may be required during masonry
- The tenth and eleventh row is carried out in accordance with the rules, continuing to increase the array of the heater.
- In order to start blocking the firebox, two steel corners with a length of 600 mm are laid along the outer edge of the twelfth row. At the same time, they are oriented by horizontal shelves inward.
- In the thirteenth and fourteenth row, the front overlap of the furnace window is performed. To do this, fireclay and red bricks are installed on the edge, pairwise connecting to each other. Of course, chamotte should be from the high-temperature zone.
- On the fifteenth row they finish laying out the back wall and the smoke tooth. At this point, the transition between the furnace and the chimney begins.
Chimney tooth
- In order to form a mantelpiece, sixteenth and seventeenth row bricks are pushed out.
- Starting from the eighteenth row, the interior of the fireplace is narrowed, equipping a smoke box. The flue cross section is reduced to the twentieth row.
- From the 21st to the 24th row, a smoke channel is laid out. This part of the fireplace cannot be called a full-fledged chimney, because in addition to the chimney, it also has elements of the side walls of the heater.
- Starting from the 25th row, they increase the transitional section of the chimney, called the neck. In this part of the pipe, a furnace valve is installed. In the design presented, this element is mounted after laying the 27th row.


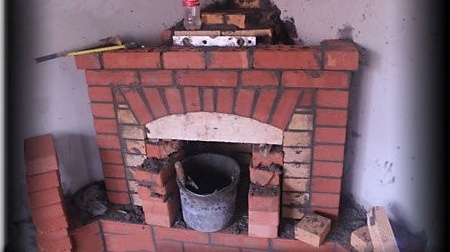
To make the arched ceiling of the furnace, you will need a template of plywood and wooden battens
The portal of the presented fireplace has a rectangular furnace window. If desired, it can be performed in the form of an arch. To do this, a template made of battens and plywood is installed on the brick supports. Bricks pre-cut in the same form are placed “on the poke”.
Chimney installation
Those who believe that the chimney is just a direct channel for the exit of flue gases should take a closer look at the scheme and rules of the chimney, which experts recommend for equipping wood-burning stoves. Inside, it really is a hollow pipe of rectangular cross section. As for the outside, its configuration fulfills an important functional purpose.
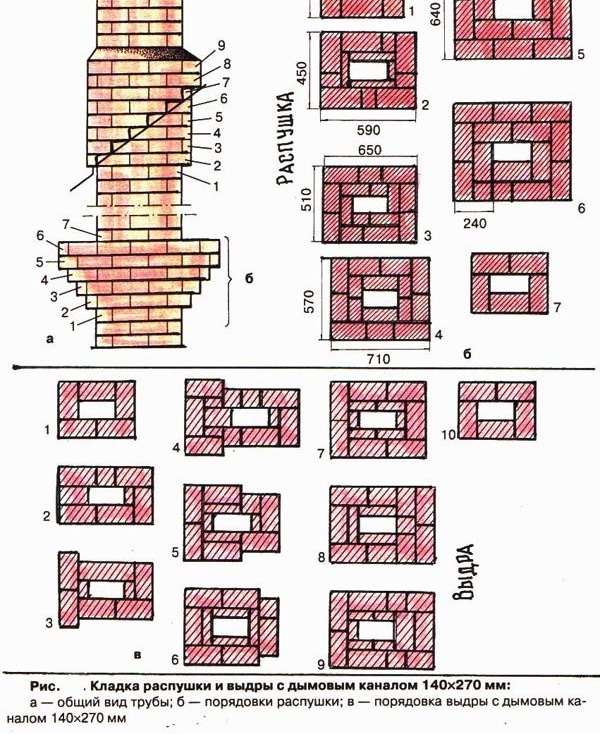
Chimney design and arrangements
The thickening at the intersection with the ceiling is called a fluff. Thanks to several additional rows of bricks, it is possible to reduce the temperature of the flue gases so that there is no need to install a heat-insulating layer. If you install a straight, thin-body riser, then the ceiling will have to be protected with several layers of asbestos or basalt slabs.
At the level of the roof, the chimney is expanded, receiving the so-called otter.In addition to the aesthetic purpose, such broadening plays another, no less important role. During rain, it is the otter that does not allow precipitation to drain on the outer surface of the riser, protecting the brick from destruction. As for the protection of the smoke channel, for this purpose the top of the pipe is crowned with a metal cap.
Otherwise, the construction of chimney flues must be guided by the same requirements as for other wood stoves. The traction force, and, therefore, the operability of the fireplace, depends on the proper placement of the structure on the roof. You can familiarize yourself with the installation rules of the chimney by carefully studying the diagram below.
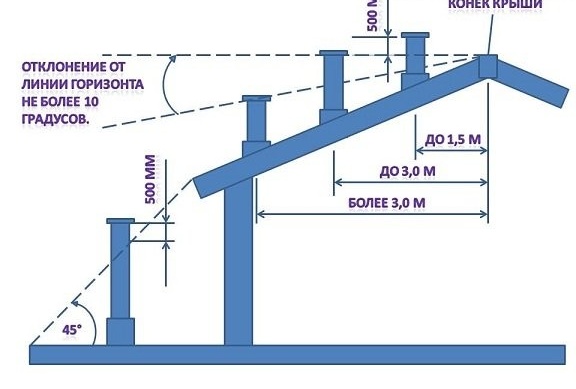
The installation diagram of the chimney relative to the ridge and the roof of the building
Fireplace decoration methods
If high-quality facing bricks were used when laying the external walls, then all that is required to improve the aesthetics of the structure is to complete the jointing. To do this, they are wiped, and the outer surface is ennobled with a special tool - embroidery. It is also necessary to polish the bumps of the bricks and cover the walls with a special composition. The simplicity of this method has a big minus - over time, the surface of the fireplace darkens and loses its attractiveness.
A very simple way to improve the appearance of the fireplace is plastering. Ready-made decorative compositions are best suited for this, which are presented in a wide assortment on the shelves of retail chains. Plastering work can be started only after the walls of the fireplace have dried up and will shrink. If necessary, the portal can be painted with water-based paint, but you can proceed with this only after the finishing layer has completely dried.
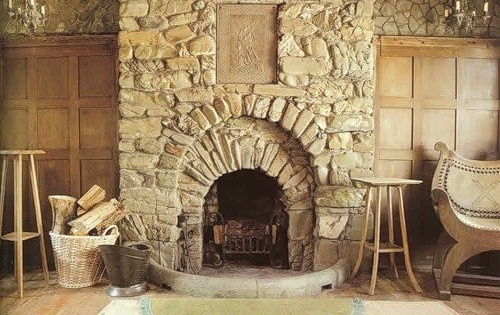
Fireplace trimmed with natural stone, as if transferred from the era of knights and beautiful ladies
Currently, there are many options for facing the fireplace with materials of natural or artificial origin. Tiles will help to make the stove bright and irresistible. They will completely transform the portal of the heater, making it in a special way warm and homely. Finishing with marble slabs or stone, on the contrary, will create the effect of an expensive and presentable structure. As for facing the fireplace with ceramic tiles, you should choose only heat-resistant varieties - majolica, clinker, porcelain stoneware or terracotta. Of course, when laying facing materials, only special, heat-resistant adhesive compositions should be used.
7 secrets of proper operation
- The kindling of the fireplace begins by opening the chimney gate and checking the draft. At the slightest suspicion of a return draft, clean the grate, the air inlet and the chimney.
- If the fireplace has not been used for a long time, then the kindling begins with the removal of cold air from the chimney. To push the air plug and create a positive pulling force in the chimney, it is enough to light a pile of straw or dry paper under the gas channel. Proceed to the fireplace insert only after making sure that the draft appears.
- When choosing firewood, preference is given to aspen, birch, oak, beech, hornbeam. Aspen firewood not only forms a minimal amount of soot, but also helps cleanse channels of soot. Stoves recommend every tenth firebox to carry out aspen.
- For kindling, it is convenient to use chips of coniferous wood, pine or spruce cones, as well as shavings.
- Do not load the furnace more than 1/3 of the volume. This will create an optimal balance between the productivity and efficiency of the wood heat generator.
- Particular attention should be paid to the influx of fresh air into the room. If the house has modern windows and doors, it is necessary to provide a ventilation system.
- With daily furnaces, soot is removed immediately after the end of the heating season.If the fire is kindled only on weekends and holidays, then the service is carried out no more than once every three to four years.
Video: do-it-yourself corner brick fireplace
A corner fireplace can completely transform the interior of your house or cottage. To create a heating device under the power of any home master, you just need to carefully understand the rules and perform the work with due diligence and accuracy. Believe me, all financial, temporary and physical investments will be justified on the very first evening spent at your own hearth, under the soothing flashes of flame and the crackling of burning logs.