Effective heat: do-it-yourself fireplace stove
Everyone wants to make their home as comfortable and cozy as possible. Today there are many different methods for solving practicality and comfort problems, but the most effective and unchanged over the centuries is the construction of one of the many furnace structures. Today we will talk about how to build a fireplace stove with your own hands.
Content
Design features
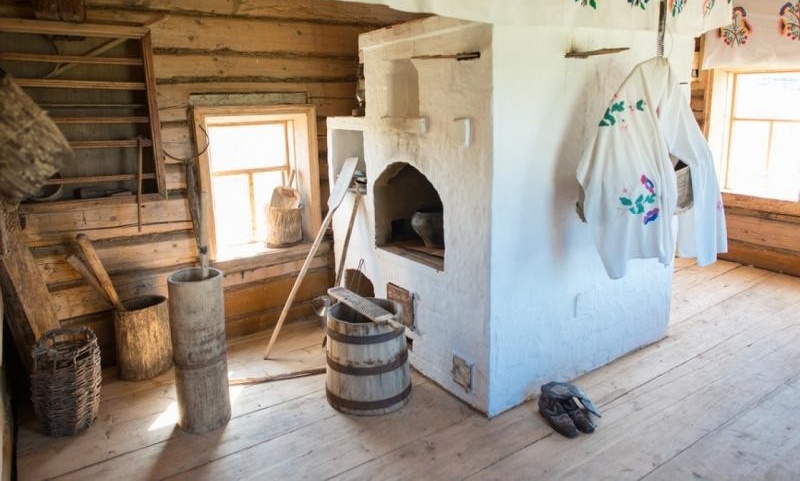
For the first time hearing about fireplace stoves, owners of country houses often shrug their shoulders: why spend effort on building a heating device of this design if you can build one of the well-proven stoves such as Dutch, Swedish, hoods (bell stove), etc. The whole thing that they don’t know the features of the operation of fireplace stoves, and in fact, when developing them, they combined all the best from two completely different heating devices.
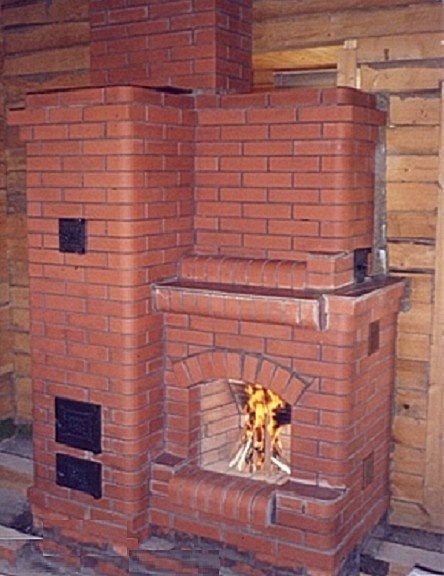
The combination of the stove with the fireplace allows not only high-quality heating of the room, but also to make its interior unforgettable
The main advantage can be considered that for heating the room, you can use two modes of operation of the dual heat generator.
Fireplace mode
In this case, the smoke from the source through a special smoke collector will be directed to the flue located on the rear wall of the heater and then directly to the chimney. The construction of a practically direct channel avoids reducing traction, so the intensity of burning wood will be maximum.
Using the heating unit as a fireplace is very convenient for irregular fire chambers, for example, in a country house or in country houses, which are visited only on weekends in the winter. In this case, the room temperature will become comfortable literally within one hour.
The advantages of the stove
The combustion products do not “fly out into the pipe”, as is the case with a fireplace, but are redirected to additional channels located on the sides of the heater, where all the heat is transferred to the walls of the structure. The duration of combustion of the same amount of fuel during furnace combustion is significantly increased, since the operation of the unit most often occurs at the border of smoldering. This is achieved by adjusting the air flow through the blower. Due to the increase in the furnace massif, it has improved heat-accumulating properties and allows even after complete burning of the fuel to give up accumulated heat for a long time.
If an irregular mode of operation is assumed, then most often the heat generator is operated according to the following scheme:
- When kindling, a vertical channel is opened, which translates the unit into fireplace mode.
- After the temperature in the room rises to a comfortable level, close the valve of the vertical channel and close the blower door to maximize the duration of combustion.
As you can see, the fireplace stove is a successful symbiosis of several heating appliances. However, his advantages do not end there.
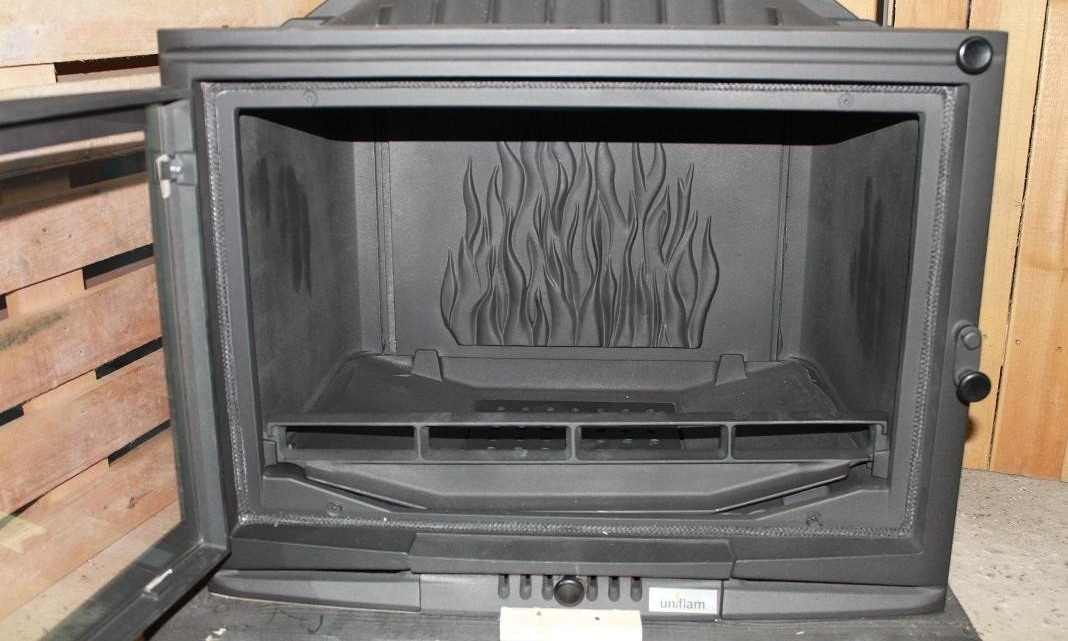
Using a fireplace cassette increases the hygiene of the structure and facilitates the construction of a heating device
Heating devices can be performed with both open and closed fireplace inserts. In the latter case, a door made of heat-resistant glass or a special cast-iron cassette (insert) is used. Limiting the amount of incoming air allows you to increase the operating time of the fireplace and increase its efficiency.
Varieties of fireplace stoves
The design discussed above is the simplest implementation of the idea of a fireplace stove. In fact, there are much more efficient and functional structures in which a separate fireplace and stove are combined, a hob, an oven or heat-exchange niches are installed, etc.
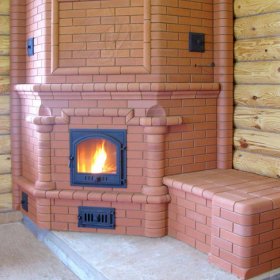
Fireplace stove with stove bench

Fireplace with stove bench
A massive building with a heated sunbed or hob is not suitable for every home. For example, for a summer residence, it will be too big, since it will occupy a significant area of the room. If you install such a unit in a country house, then you can achieve amazing comfort: a similar design is requested for installation in the living room combined with the kitchen.
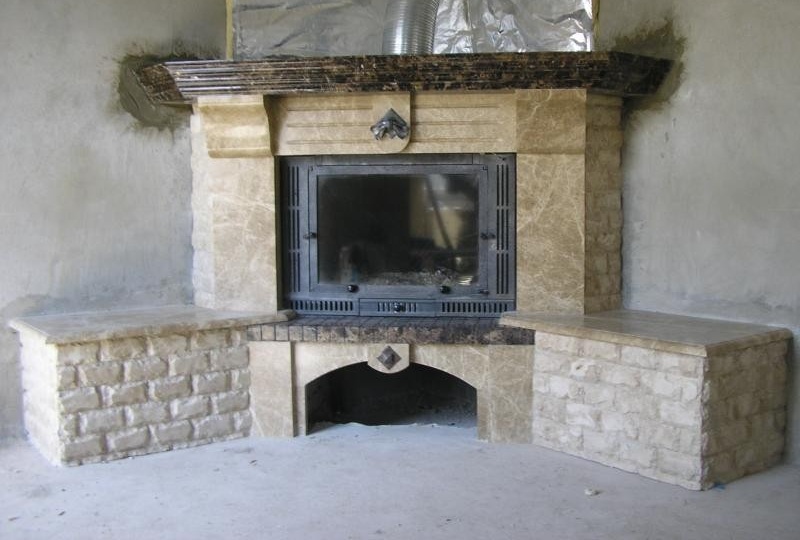
Wall-mounted fireplace
Wall-mounted fireplace stove saves space in a small room
This design can be built in a small house for heating two adjacent rooms. As in the design discussed above, heating units can be heated individually. In this case, the fireplace can be used for quick and comfortable heating of a large room, while heating the back wall during operation of the stove will work to heat the bedroom. The disadvantage of this design can be considered the lack of a cooktop, which, however, is offset by the compactness of the structure.
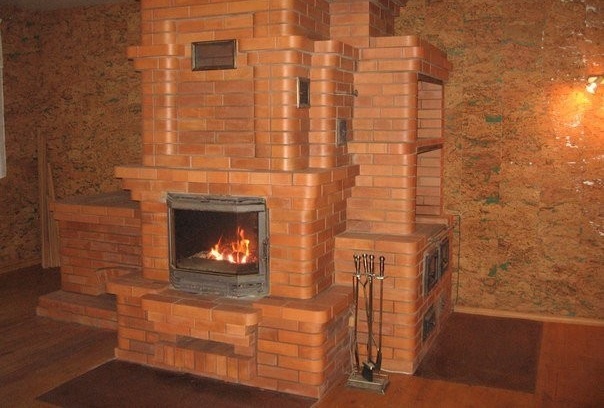
Square fireplace stove with stove and oven

Multifunctional fireplace with stove and oven
A multi-function heater installed in a large room is able to divide it into several zones. From the fireplace you can create a cozy home atmosphere for relaxing and gatherings with friends, while the area adjacent to the stove can be used for cooking and other household needs. Fortunately, for this, the fireplace stove has a large hob and a spacious oven. The shelf above the fireplace can also be used to the maximum - it is convenient to dry fruits, mushrooms or medicinal plants on it.
Advantages and disadvantages of combined heating appliances
The advantages of fireplace stoves include:
- the ability to quickly heat the room;
- good heat storage ability;
- high performance;
- heat transfer at the level of the best heating units;
- universality;
- the possibility of using for heating several rooms;
- increased emissivity;
- the presence of additional functional elements for cooking, drying clothes or relaxing.
As for the shortcomings, they include low efficiency and uneconomical design, working in the fireplace mode, the need to clean additional smoke channels, the need for good ventilation and high-quality air flow. A clear minus can be considered and the complexity of the design, as well as the impressive dimensions of the structure.
The device and principle of operation
The fireplace stove is installed on a foundation slab, equipped on a drainage cushion of sand and gravel. The construction has two combustion chambers. The one that forms the working area of the fireplace has an increased height, and can be equipped with a glass door. Often it has a curved shape - in this way it is possible to increase the area of the reflecting surface.
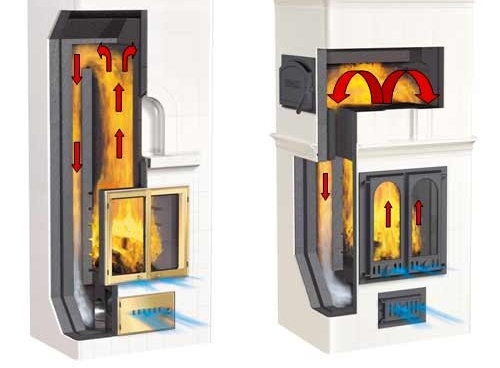
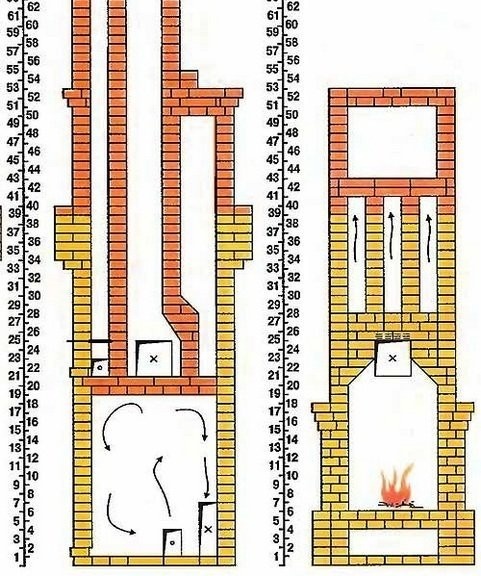
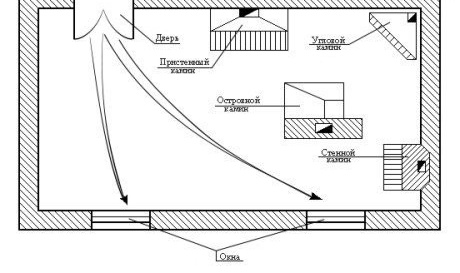
Scheme of the movement of gases inside a combined type heating device
Under the firebox is performed both in the form of a rectangle and a trapezoid. In the latter case, it narrows to the back wall, which is inclined, with a small threshold - a chimney tooth or gas threshold. Its purpose is to hold carbon deposits, which are deposited on the walls of the chimney. There is a smoke collector above the firebox, which goes into a direct gas channel.
The firebox has a reduced size and lower air blow. Depending on the configuration of the heating device, the arbor of the firebox is equipped with a hob or is covered with brickwork. The combustion products from the furnace rise into the vertical channels, arranged in accordance with the schemes of Dutch or Swedish stoves.
The internal structure of the fireplace
If you plan to use the fireplace and stove at the same time, then a common chimney with two separate chimney channels is equipped.
To prevent the ingress of combustion products into the room, the smoke channels of both devices are equipped with gate valves, which are shut off as necessary. In addition, the chimney is equipped with an additional damper that prevents heat leakage after the fuel has completely burned out.
Calculation of the main parameters, drawings and orders
First of all, you need to choose the installation location of the unit, and then draw up a preliminary sketch of the shape and design. Having decided on the configuration and dimensions, you can proceed to the calculations of the main elements of the heating device. Since only experienced specialists can fully calculate the structure, we recommend that you take the design and dimensions of one of the Swedish or Dutch stoves as a basis and integrate a fireplace of your own design into the finished structure. Of course, choosing a heater, it is necessary to correlate its power with its own heat needs.
As for the calculation of the fireplace part, it is conducted based on the dimensions of the room. To determine the size of the furnace, you can use the finished table. An ideal ratio of width to height is considered 3: 2, but the depth of the firebox is taken equal to 1/2 or 2/3 of its height.

Table for calculating the size of the fireplace insert
It must be understood that the performance of the heater depends on how well the draft is organized, so calculating the chimney cross section is no less important than determining the parameters of the furnace. Experienced stove makers take its size equal to 1/10 of the area of the furnace window. The resulting value is rounded up so that when building a chimney, use a whole brick. If you install a round chimney, then its cross section should be at least 150 mm.
The fireplace stove we offer for manufacturing has a hob and can be used both for dividing the room into two zones and for heating an adjacent room. In the latter case, the rear wall of the structure is built into the wall.
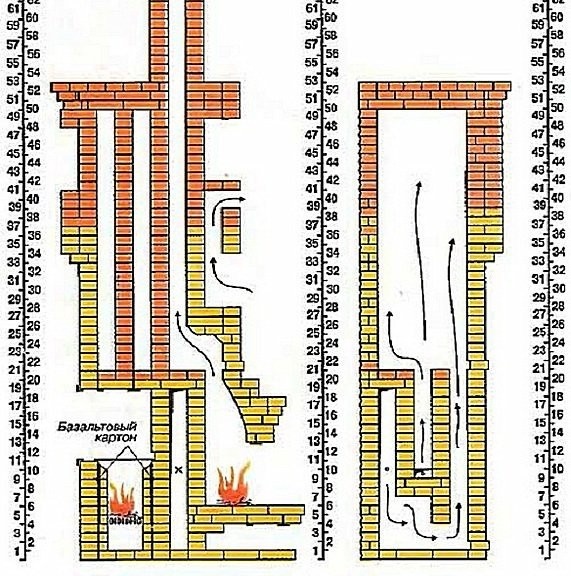
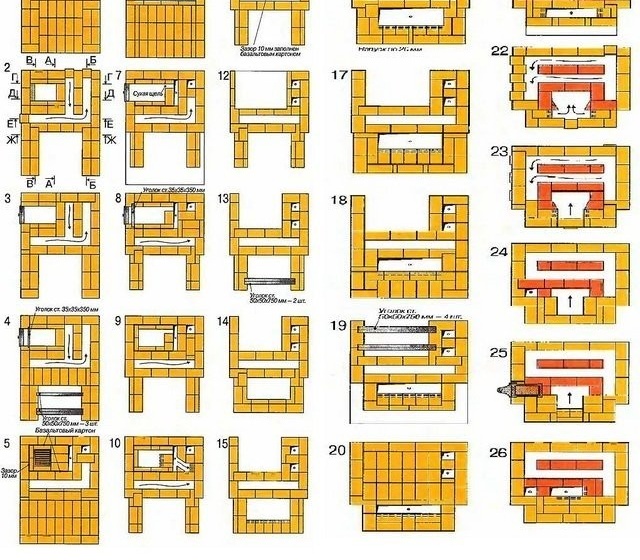
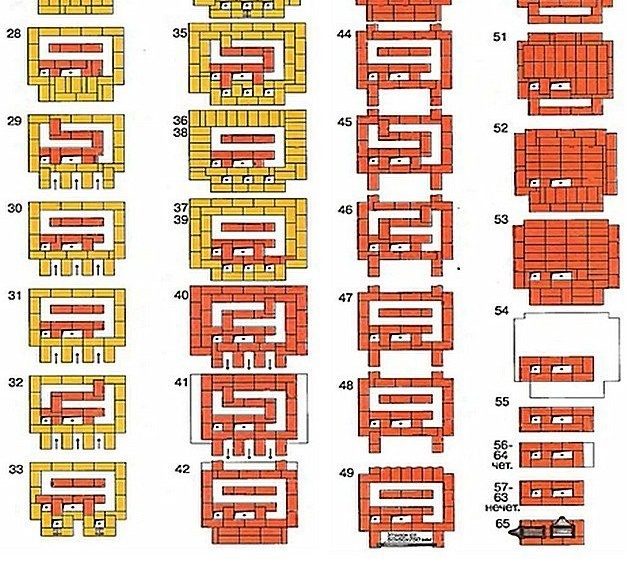
Schemes and orders of the heater are given below. With their help, you can not only repeat the existing design, but also develop your own.In addition, the visual picture of the structure of the inner chambers will help to understand the direction of gas flows and determine the surface with the most intense heating.
Schemes and orders of a multifunctional fireplace with hob (photo gallery)
-
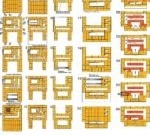
- Arrangements for the bottom of the fireplace
-
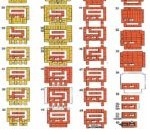
- Top orderings
-
- The movement of gases through the channels of the fireplace
-
- The scheme of the furnace indicating the direction of the chimney

Preparatory work
Before embarking on the construction, it is recommended to purchase the necessary materials and prepare the tool. After that, you can proceed to the preliminary stage - the choice of place and arrangement of the foundation. The furnace itself is erected only after the base has completely dried.
Tools and materials
In order to build a stove combined with a fireplace with your own hands, you will need a minimal set of tools. Most likely, you already have all of the following.
- Building level.
- Tape measure and metal ruler.
- Trowel (trowel).
- Pickaxe hammer.
- Grinder with cutting wheels for stone and metal.
- Rubber mallet hammer.
- Tanks for water and solution.
- Plumb line.
- Stitching.
- The rule.
- Building corner.
- Bayonet shovel.
- A hammer.
- Cord mooring.
- Rammer.
To build the foundation you will need:
- Waterproofing (you can use roofing material or plastic film).
- Sand (it is better to use a large river).
- Crushed stone of the middle fraction.
- Mesh for reinforcement (can be replaced by reinforcement segments, metal rods or pieces of corners, pipes, etc.).
- Edged boards for the construction of formwork.
- Nails and steel wire.
- Cement.
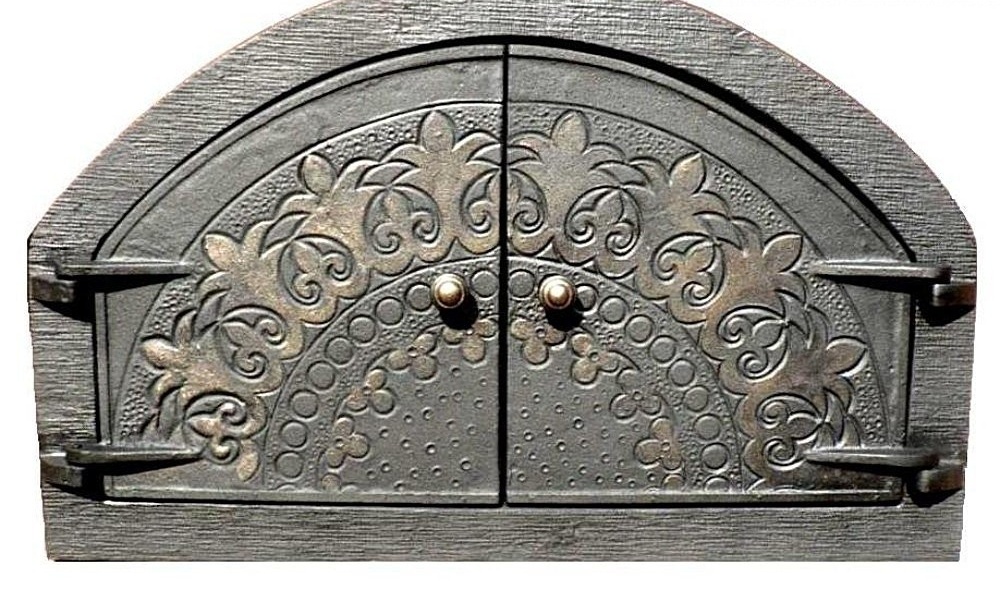
High-quality iron casting will set the tone for the design of the entire structure, so why not choose the best of what is on the market?
You will need other materials necessary for the construction of walls and the arrangement of various sections of the fireplace:
- red solid brick brand M-150;
- fireclay refractory brick brand SHA-8;
- clay and sand or a special composition for laying furnaces;
- metal corners with a shelf size of at least 5 cm;
- plywood and boards for the manufacture of the template (in case the overlapping of the fireplace insert is in the form of an arch);
- metal gate valves;
- blower door;
- sheet asbestos or basalt cardboard;
- furnace door;
- doors for cleaning channels;
- grate;
- cast iron stove with hobs;
- steel wire for mounting furnace cast iron;
- finishing materials (if it is not planned to lay out, but another type of decoration of external surfaces).
In addition, if the design of the heater provides for the installation of a fireplace cassette, it is necessary to purchase it at the design stage. This will accurately determine the amount of bricks and know if there is a need for refractory materials.
How to choose a construction site
Determining the installation location of the fireplace stove, one should be guided by the same rules as for the installation of conventional heating appliances. When constructing a structure near wooden walls, a gap of at least 40 cm must be maintained between them and the furnace. In addition, the installation of a heat-resistant screen from a metal sheet, asbestos plate, drywall and other non-combustible materials is mandatory.
When choosing a place for installing a fireplace stove, you need to consider all options
The gap between the walls of the room and the furnace is needed not only to ensure the safety of the structure, but also to conduct periodic inspection and repair of the side surfaces of the heater.
If the installation of the heating unit is planned on the periphery of the room, then one of the internal walls is chosen, since proximity to the outer perimeter will contribute to the rapid cooling of the furnace and reduce its thermal efficiency.
Foundation preparation
For laying any stationary heater, a solid foundation is required.Since we are dealing with a design that, in fact, consists of two separate units, the foundation should ensure the stability and reliability of the wood heat generator with increased mass.

The foundation of the fireplace stove is subject to increased requirements, because it ensures the reliability of the entire structure
The scheme for constructing a concrete slab, which is used as a support for the fireplace stove, is no different from the algorithm for filling the foundation of other stationary heaters. First, note the contour of the base - it should protrude beyond the perimeter of the heater by at least 100 mm. If the building is installed in a room with a wooden floor, then the part that falls under the stove is cut out. Further work is carried out in the following order:
- Depending on the characteristics of the soil, they dig a pit with a depth of 0.5 to 0.7 m.
- The bottom of the pit is filled with a 10-cm layer of sand, which is well compacted and shed with water.
- Sand is covered with the same layer of rubble, which must also be carefully tamped.
- At a height of 5-7 cm from the gravel, a reinforcing mesh is installed. To do this, you can use metal pins driven into the ground or lay the armo-belt on wooden blocks.
- Along the contour of the foundation, formwork is mounted.
When installing the formwork, it is important to set the upper cut of all boards exactly in level. In the future, this will facilitate the alignment of the plane of the foundation slab and create a good reserve for ensuring the geometric accuracy of the structure.
- From sand, gravel and cement (ratio 3: 1: 4) a solution is made, which is poured into the prepared form.
- Concrete is compacted by bayonet and ramming, and then leveled, following the rule on the parallel elements of the formwork.
After the initial solidification of the solution, the structure is covered with a plastic film and left until completely set. Cement manufacturers recommend curing concrete for 28 days, but in fact, you can start building a heating device in a week. The main thing is not to forget to separate the foundation from the masonry with a layer of waterproofing. There is no more suitable material for this than roofing material with which concrete is covered in two layers.
Solution preparation
If factory building mixtures are used for masonry, they are prepared according to the recommendations indicated on the package. We propose to take advantage of the experience of experienced stove-makers who say that there is no better material for masonry furnaces than clay.
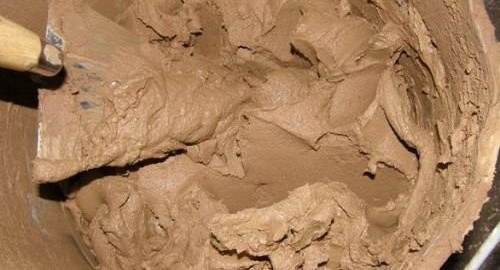
The clay solution should resemble thick sour cream in consistency
The masonry mortar is made of clay and sand, adding water in the amount necessary to obtain a consistency of thick sour cream. In this case, the amount of sand is determined based on the clay content. In percentage terms, it can reach 30–35%. It is best to mix solutions with different compositions in several containers, mold small cakes out of them and let them dry completely. The composition whose sample is least cracked is considered suitable for work.
Clay before preparing the solution must be kneaded and plant residues and other impurities removed from it. After that, the material is soaked in water for a day. Do not immediately mix a large amount of working solution - it is prepared as necessary. The fact is that when settling, the sand will still settle to the bottom, so additional mixing will be required. And this is an unnecessary waste of time and energy.
Masonry of a stove and fireplace
Before proceeding to masonry on the solution, experts recommend folding the unit dry. This will allow you to get acquainted with the features of each row, identify possible difficulties and prepare the necessary structural elements for work.
After the "dry" construction, you can start laying the brick in a "wet" way.Dry brick will draw moisture from the solution, so it must be soaked for several hours. A similar method is also good because with the simultaneous drying of the joints and masonry, their mutual adhesion increases, due to which the mechanical strength of the whole structure is increased.
When laying out some rows, it is required to use not a whole brick, but its half, or even a third. To do this, you can use an angle grinder, or to split the building material with a pickaxe.
Before working, the ordering schemes are best printed on paper. In the process, the rows passed are noted - this additionally contributes to a clear organization of work. We also recommend that you use the instructions below, which is made taking into account the recommendations of experienced stove makers.
Step-by-step instruction
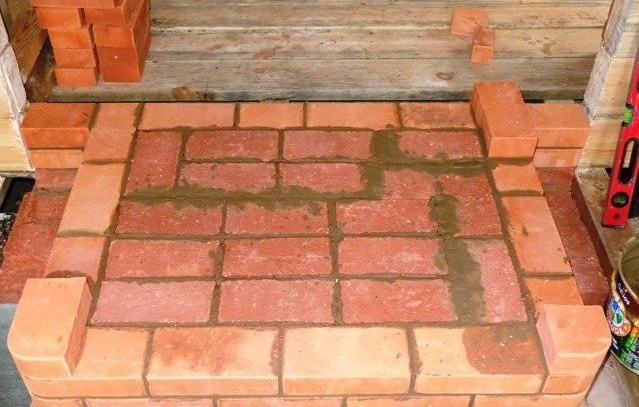
- The first row is laid in continuous, constantly monitoring the level and geometric parameters. To facilitate the task, the edges of the base of the furnace can be drawn in chalk on the roofing material.
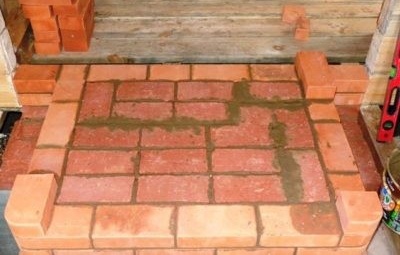
The laying of the first row is carried out with special care
- The second row begins to form gas ducts, a blower chamber and a furnace space.
In order for the joint thickness to be equal to the required 5 mm, a 7–8 mm mortar is applied to the brick.
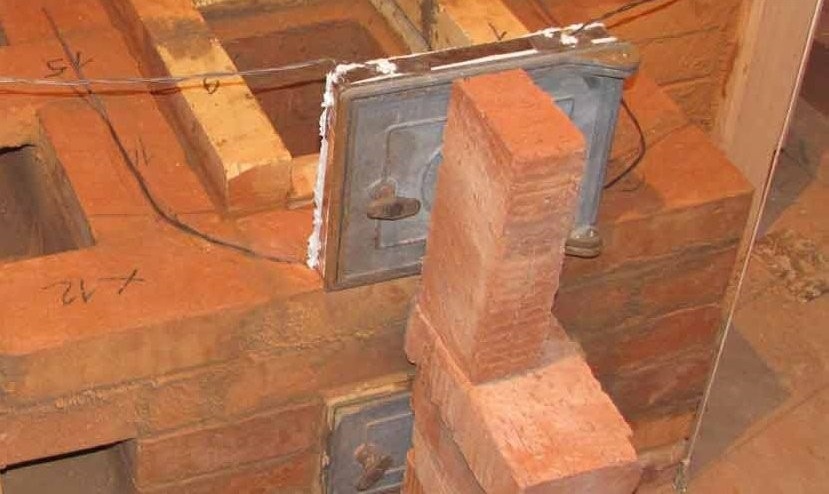
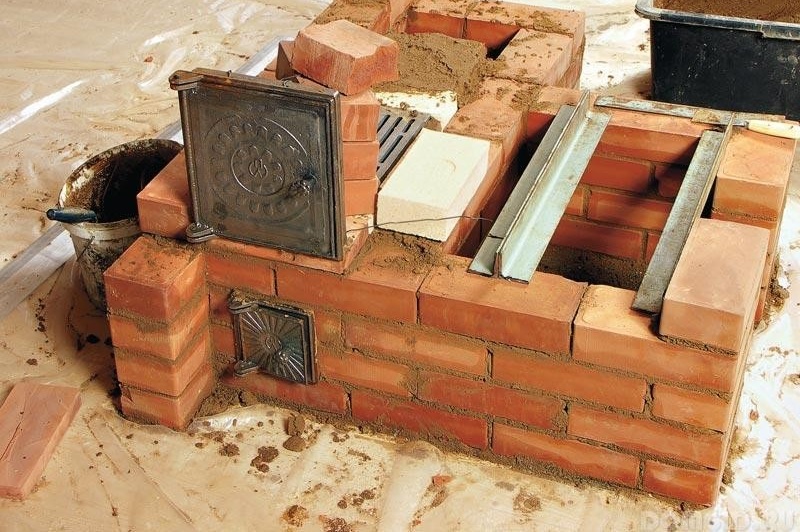
- Before proceeding to the third row, wire is inserted into the special ears of the blower door. After that, the metal part is installed in place and propped up with bricks. The wire is laid in brickwork - this will reliably fix the furnace cast iron.
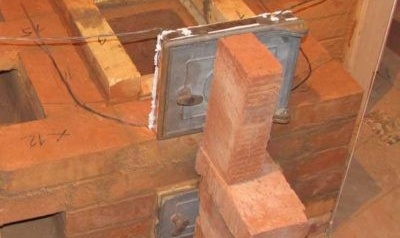
The oven door is fastened with a metal wire, which is laid in masonry seams
During operation of the furnace, the cast-iron parts will heat up, and since metal and brick have different coefficients of thermal expansion, this will lead to the appearance of cracks in the places of their installation. To prevent this from happening, gaskets made of asbestos or basalt gasket are installed between the masonry and the doors.
- The fourth one begins to build a combustion chamber. In parallel, they begin to form the bottom (under) of the fireplace insert. To make the overlap of a wood niche located under the fireplace, use a pair of metal corners, which will act as a support for the bricks of the upper row. The same corner is also used to support the bricks, which block the doorway from above. We remind you that the walls of the furnace and fireplace chambers are laid out with fireclay bricks, which are installed on the rib.
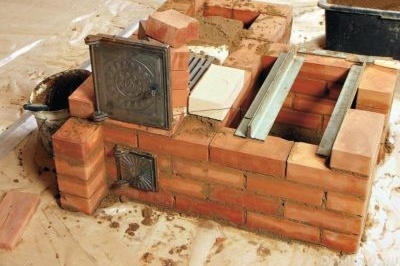
Installation of metal ceilings as supports for upper row bricks
Experienced stove makers recommend reducing the thickness of the masonry seam for fireclay bricks to 2-3 mm.
- In the fifth row, the grate is placed on the side bricks of the ash pan (blower chamber). Bases of basalt cardboard are installed between the red brick of the furnace walls and the refractory material of the furnace.
- Before laying the sixth row, a furnace door is installed.
- In the eighth row above the door, a metal corner is installed and until the tenth row they are laid without additional elements.
- In the eleventh row, a stove with hobs is mounted, continuing to build up the array of the furnace with internal channels.
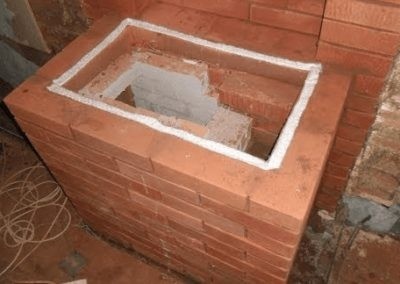
Before laying the slab, the junction is sealed with asbestos or basalt sealant
- Starting the thirteenth row, a steel corner is laid over the fireplace insert. With a brick laid on a metal strip, they begin to overlap and form a mouth with a smoke collector.
In the course of the work, the masonry is laid out, preventing the solution from drying out excessively. Otherwise, this method of decoration will look messy. - In the nineteenth and twentieth rows they block the opening above the cast-iron stove. As the supports of the ceiling, all the same metal corners or pieces of steel reinforcement are used. The internal channels and the body of the heater up to the 24th row are increased according to the ordering scheme.
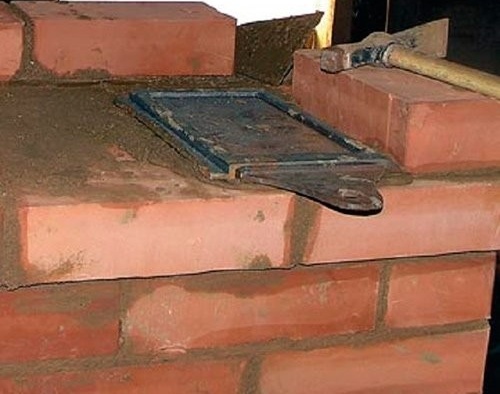
- On the 25th row, a cast-iron valve is mounted. At the same time, it is necessary to ensure its tight fit to nearby bricks, for which an increased amount of mortar is used.

Installation of a furnace valve
- Up to the 50th row, work is carried out according to the scheme, increasing the channels and walls of the fireplace stove.
- From the 51st to the 53rd row, the heater is shut off, leaving only two vertical gas ducts for the exit of combustion products into the chimney.
- From the 54th row, they begin to build a chimney.
- On the 65th row, the valves of the chimney channels are mounted. They will protect the internal channels of the furnace from dirt and moisture during periods of inactivity.

As can be seen from the order, the furnace was originally designed taking into account the use of silicate brick, with which its walls were formed up to the fortieth row. If you like this design, you can repeat the design of the developers. Otherwise, you can work from the very first row with red brick. The same is recommended in the case when the surface of the furnace will be subjected to decorative finishes.
Chimney
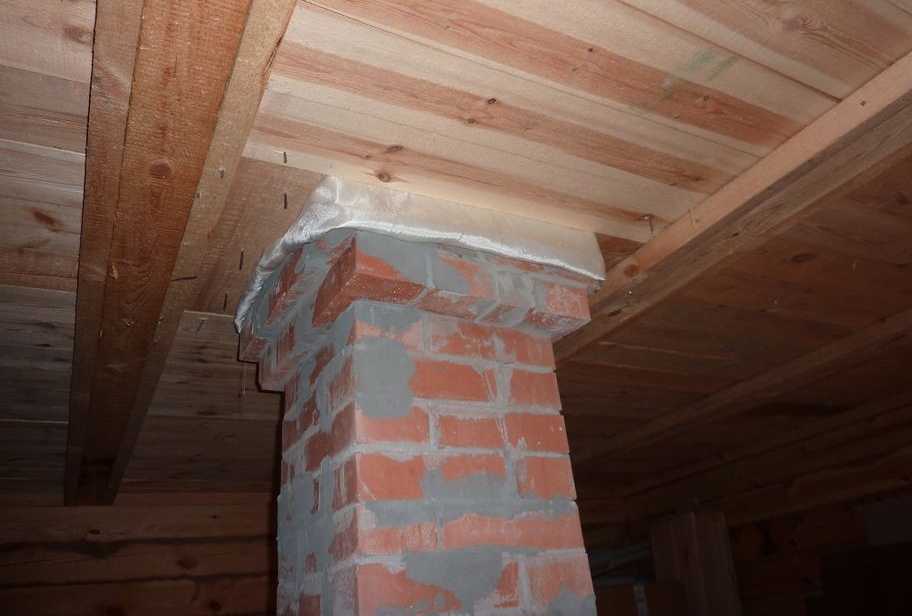
Chimney outlet through ceiling
A hole is cut through the ceiling for the outlet of the chimney. At this point, the pipe has a thickening - the so-called fluff (cutting). Its purpose is to reduce the temperature of the outer surface of the pipe. Some stove-makers do without cutting, and in order to protect the floor material from excessive heating and to prevent its possible fire, they place heat-resistant material around the pipe. For these purposes, you can use as several layers of asbestos slabs, as well as basalt or any other mineral wool. The main thing is that the thickness of the insulation layer is not less than 100 mm - this is the requirement put forward by the current SNiP.
Through the attic, the chimney is laid out according to the scheme of the 65th row, and an otter is arranged at the exit through the roof. This thickening of the chimney prevents precipitation and condensation from dripping off its outer walls. In addition, the roof opening is additionally protected with reliable waterproofing.
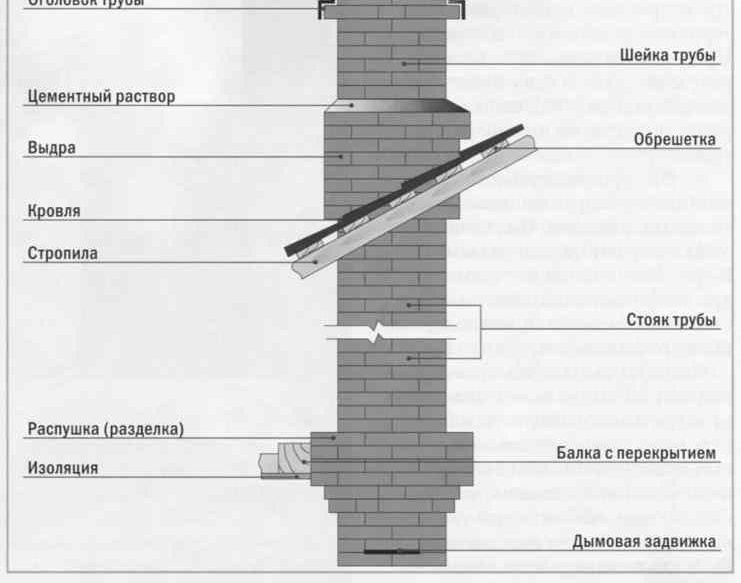
Chimney device
During the construction of the chimney, clay solution is used only indoors and in the attic. Above the roof level, a sand-cement mixture is used for masonry.
To protect the chimney from dirt, dust and precipitation, a metal cap is installed on its head.
Video: how to make a brick fireplace with your own hands
Putting the stove into operation
No matter how you would like to immediately test after laying what the heater is capable of, this cannot be done in any case. First you need to thoroughly dry the walls of the structure. In the hot summer period there is no problem. That is why experts recommend building brick-fired wood-burning stoves in the summer, when natural heat can dry the walls in just a week. To do this, open all the doors and latches, and remove the burners from the stove.
For those who build a fireplace in the offseason, you can recommend a reliable method that will speed up the process of removing moisture. To do this, heaters or powerful electric lamps are placed in the furnaces of the unit. All windows and openings are closed (the fireplace chamber can be curtained with tarpaulin).
The primary heating of the heating device is carried out with a small amount of firewood, preventing an excessive increase in the temperature of the inner chambers. If the fireplace stove has separate chimney channels, it is recommended to burn firewood in two furnaces simultaneously. A uniform distribution of heat in the furnace array will only benefit her. This process is carried out 2-3 times a day for a period of 7-10 days. The fact that the oven is completely dry can be found by the absence of condensation on the internal metal surfaces. Some stove-makers put crumpled newspapers in the lower cleaning channels, according to the moisture of which they judge the readiness of the heater for intensive use.
During drying and testing of the heater, small cracks and tears may appear in the seams of the brickwork. To identify them, all external surfaces are subjected to a thorough inspection. Nevertheless, it is not worth rushing to eliminate defects until the furnace has been operating in maximum power mode for at least two to three months. Of course, this applies only to minor faults. Deep cracks through which smoke or carbon monoxide can enter the room are closed immediately and very carefully. Revision of the external surfaces of the fireplace is carried out regularly. As for the cleaning of the inner chambers and canals of soot, this work is performed every year, after the end of the heating season.
The advantages of fireplaces stoves are obvious, because they allow you to solve many problems associated with both heating and cooking, as well as with the design and decoration of the interior space of country houses. Such a heater will not be redundant even with gas heating, as it will give confidence in the future and provide an incredibly warm and comfortable atmosphere. When choosing a heat generator design, it is necessary to take into account all the features of the room, and during operation, strictly adhere to the dimensions and be extremely assembled. Only the fulfillment of all conditions will allow for many years to enjoy the warmth and comfort of a do-it-yourself fireplace stove.