Russian stove: do-it-yourself magic
At the mention of the Russian stove, associations arise with fairy tales and magic. And also - with incredibly tasty and aromatic dishes and a warm atmosphere. It is striking that the fire of its simple hearth did not die out even in our technological era. Thanks to the revival of individual construction, this wonderful heating unit is still held in high esteem by the owners of country houses. Making it with your own hands, having at hand detailed instructions, will not be so difficult.
Content
Why are Russian stoves so popular
The incredible “vitality” of the Russian stove lies in its functionality - it is used both as a cooking and heating unit, and the latter, contrary to popular belief, is by no means the primary function. In its simplest form, the design is a very deep fireplace, in fact, a dimensional firebox with a pipe.
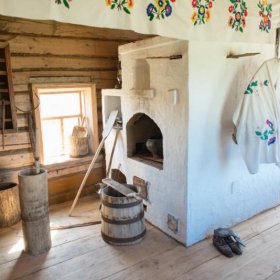
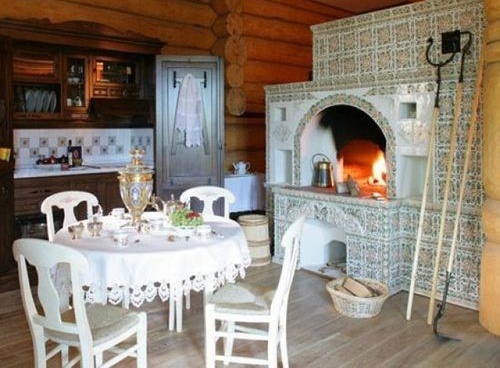
Russian stove of traditional design
Thanks to the thick walls and massive arch, the heat storage capacity of the Russian stove, any other solid fuel unit can envy. The same factor also plays into the benefit of profitability. The structure can remain warm throughout the day, so it does not take a lot of firewood to maintain the temperature within comfortable limits. Here it is impossible not to mention the extremely convenient design with a stove bench or bathes.
The design of the Russian oven is unique in terms of creating culinary masterpieces. The wide temperature gradient of the furnace is very convenient to use during cooking. If necessary, to obtain rapid heating, the cast iron with the contents is moved closer to the hearth. If it is required to reduce the intensity of boiling, then it is moved to the periphery, closer to the sides. By the way, the Russian stove has a unique ability, which no other heating and cooking unit has. The walls and roof of the furnace heated to a high temperature are able to maintain a very high temperature even after the fuel has completely burned out. The infrared rays emitted by the surface allow you to bake or simmer products for a long time, getting an incomparable taste and a delicious rosy crust.The advantage of this method of cooking lies in the fact that it does not come into contact with either fire or a gaseous medium, so there is no question of any carcinogens.
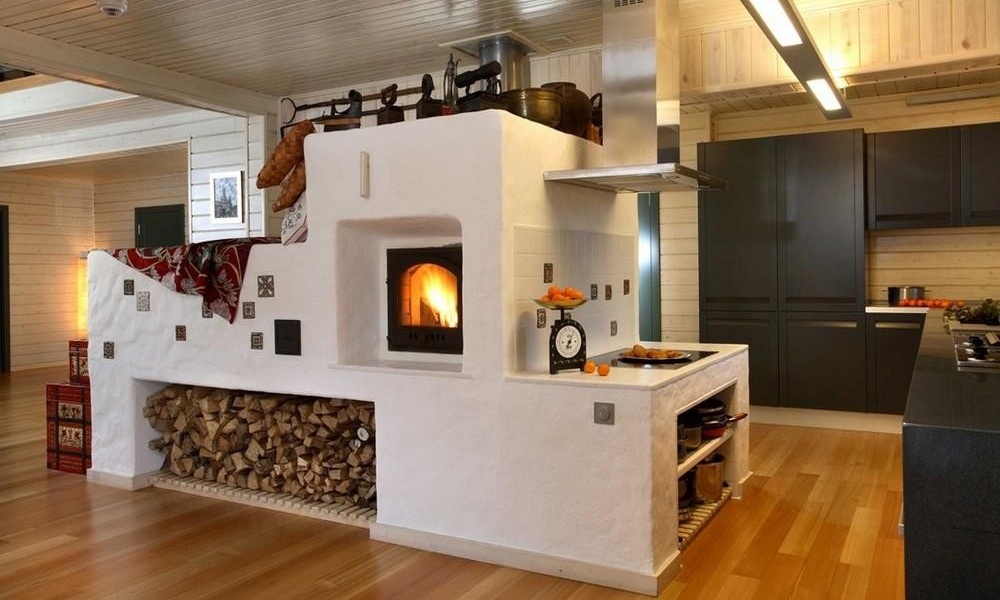
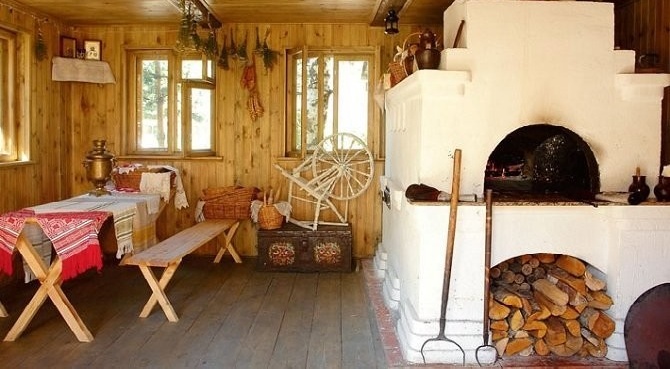
Today, the Russian stove is an extremely functional heater with a stove, water heater and a place to relax
Modern heating appliances can be classified by the presence of one of the following features:
- The presence of plates and flooding. The hob is built directly into the body of the furnace, getting the so-called six, which was performed deaf in the canonical model.
- Placement on the back of the fireplace stove, which opens onto an adjacent room. The practicality of this method is extremely high, since with the existence of two heating devices it is not necessary to build separate chimneys and foundation plates.
- Attached to the stove is rough or trestle bed. They still, as before, increase the comfort and convenience of the heating device, although the dimensions of modern stove benches can not be compared with the sizes of traditional stoves, which were designed for 3-4 people.
The integration of the stove into the massif of the Russian furnace not only expanded its cooking capabilities, but also made it possible to heat the side heating plate and the lower part of the structure. According to this factor, units with side heating are distinguished, which are used to heat the next room, as well as heat generators with lower heating. The presence of flooding in the latter allows you to warm the walls that are below the level of the hearth. By increasing heat transfer, it becomes possible to heat a room with an increased area without the need to expand the dimensions of the device.
Bottom heating significantly increases thermal performance
Advantages and disadvantages (table)
| pros | Minuses |
| High efficiency - from 50 to 70%. | The ability to work only on fuels that do not require increased air flow. Translate it into gas or fuel oil does not work. |
| Safe design. | Bulky construction. Additional load on the floor - it can only be installed on the ground floor. |
| Undemanding to materials - when building a furnace, you can do only with brick, sand and clay. | After cooling, the unit requires prolonged heating. |
| Uniform heat transfer. | Ineffective smoke circulation - in case of miscalculations in construction, the heater may smoke. |
| Durability. | Inconvenience when cleaning the firebox from ash. |
| The possibility of heating an adjacent room. | |
| Convenience and comfort of the couch. | |
| The surface of the bed can emit infrared energy for a long time, which has an excellent therapeutic effect. |
In addition, the Russian stove will require the hostess to be able to handle a grasp, a frying pan, pots and cast-iron, and not every modern woman will like it. If you are ready to put up with minor inconveniences, then this literally fabulous unit will be able to thank the owner not only with warm and tasty food, but also with a healthy sleep, as well as wonderful healing procedures.
See also a step-by-step guide on how to build a Dutch oven yourself:https://aquatech.tomathouse.com/en/otoplenie/pech-gollandka-rukovodstvo-po-izgotovleniyu-dlya-domashnego-mastera.html.
Device and design features
Built according to all the canons, the furnace has many structural elements.
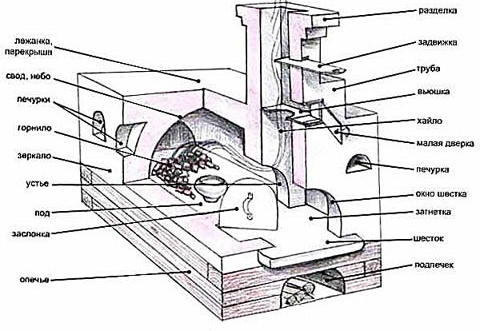
Schematic illustration of the main parts of the Russian stove
- Ward. The recess at the base of the stove is intended for storing and drying firewood. Today, many owners are abandoning the underfloor to simplify and reduce the cost of construction and do it in vain. It is impossible to find a more convenient and practical place for fuel.
- A small stove is a cold niche for storing dishes.
- Six - a flat horizontal surface in front of the crucible. Here you can leave the food pulled out of the hearth so that it is hot for a long time.There are furnace designs in which a hob is equipped in this place.
- Under or bream - the bottom of the furnace (cooking chamber) located under a slight slope to the sixth. The deviation from the horizontal to the exit makes it easy to move heavy cast irons.
- Crucible - the space inside the furnace, which simultaneously performs the functions of a firebox and a cooking chamber. As in the case of Hazel, the ceiling of the furnace has a bias towards the exit. This allows you to hold the hot gases under the arch, so that they have time to warm up the heater array. Between the hearth and the hearth there is a stub, or stub, - a kind of transition zone between the horizontal sections of the furnace with different temperatures.
- The overtube is the same as the hail. In the Russian oven, this is a smoke box located above the sixth. A chimney begins behind it.
- Samovarnik (in another way stuffing box) is a narrow channel leading directly into the chimney, which is intended to connect the samovar pipe. In modern furnaces, the stuffing room is not equipped.
- Vertical flue above the shaft
- View - a hatch with which the chimney is completely blocked. Through the window of the view there is access to the valve 10, which regulates the draft in the furnace.
- Chimney valve
- Lounger.
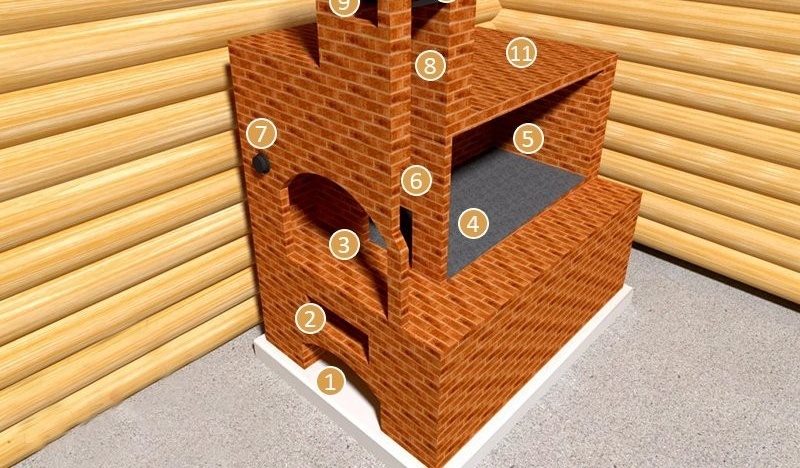
In another illustration, the structure of the internal chambers of the structure is clearly visible. The stove, which can be seen in the bottom figure, is intended for drying fruits, mushrooms and berries. As you can see, the wall thickness between the niche and the crucible is no more than brick, which actually turns the stove into a kind of modern ovens of Swedish wood-burning heat generators.
The structure of the internal space of the Russian stove
A huge influence on the performance of the heating device is provided by the plugs, which is a kind of recuperator: the incoming air flow is heated by flue gases. Mixing does not occur due to different gas densities, and experiments have shown the absence of turbulence even at the interface between two gas flows. To avoid turbulence, the hail and brow surfaces are made as smooth as possible. Otherwise, turbulence will take away part of the oxygen, which will increase the gas-generating ability of the heater.
Oxygen entering the furnace supports intense fuel combustion. In this case, the heated gases rush to the arch of the furnace. Due to its inclination towards the mouth and a small nut, which prevents the free exit of gases to the high, two stable zones of gas circulation are created. It is in them that the whole strength of the Russian stove lies, but only for the formation of vortices, one should strictly adhere to the main dimensions.
In addition, rotating streams for a long time hold unburned particles in the zone of a high-temperature flame, due to which the completeness of fuel combustion increases. The heated arch and walls of the cooking chamber actively radiate energy in the infrared range, evenly heating what is cooked in the crucible. As for the head, it acts not only as a thermal economizer, but also allows you to keep food hot all day. To do this, it is enough to block the chimney, and close the mouth with a wooden shutter.

Due to the characteristics of the chimney, the stove remains warm for a long time
As you can see, the smoke from the Russian stove has a minimal temperature gradient. The constancy of the temperature of the heated gases, as well as their constant circulation in the working area, leads to the fact that the smallest fuel particles burn in the crucible without residue. And here another important advantage of such a simple, but carefully thought-out design is manifested. The fact is that ash in the heating unit is certainly present, but with regards to soot and soot, they practically do not settle on the walls of the furnace - it will only have to be cleaned several times in a lifetime.
On our site there are a large number of instructions for self-installation of furnaces of various designs and complexity, including the Kuznetsov stove:https://aquatech.tomathouse.com/en/otoplenie/pech-kuznecova-poshagovaya-instrukciya-po-izgotovleniyu.html.
Dimensions, drawings and orders
There are many options for Russian stoves. Drawings of some of them we give as an example.
Photo gallery: examples of drawings and arrangements
-
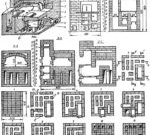
- Russian stove: drawings and orders
-
- Drawing of a Russian furnace with bottom heating
-
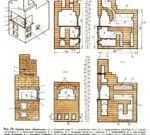
- Drawing of a Russian stove with a hob
-
- Drawing of a Russian stove with a stove bench

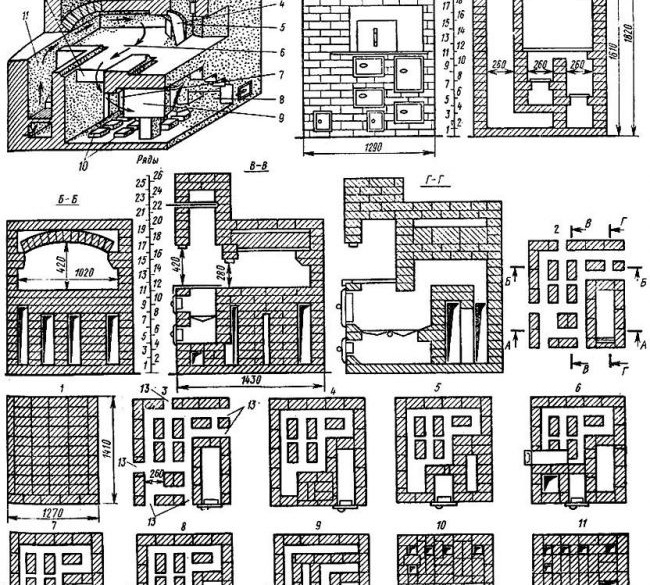
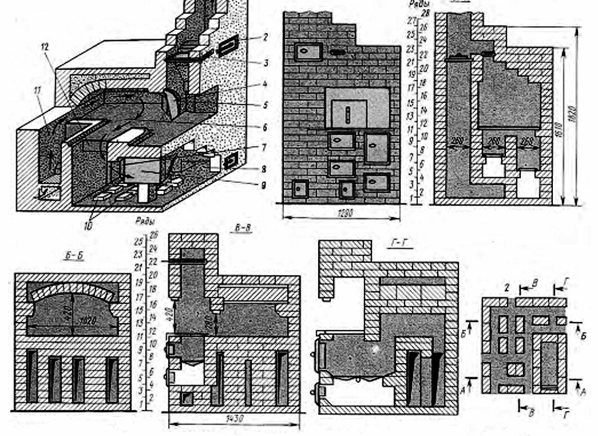
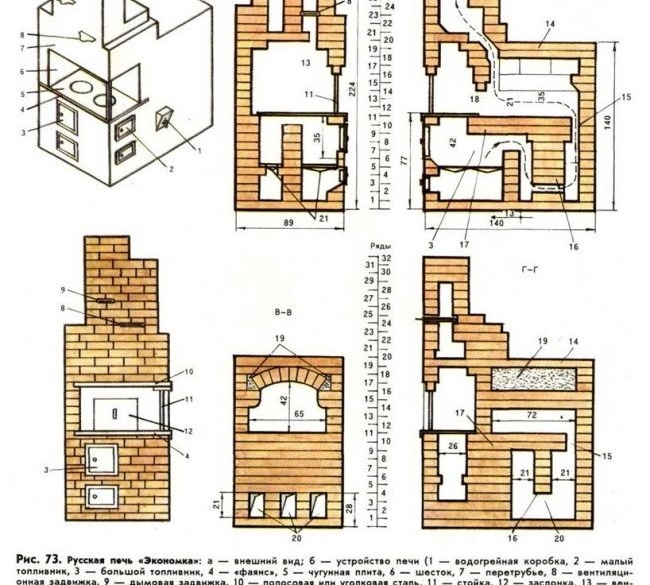
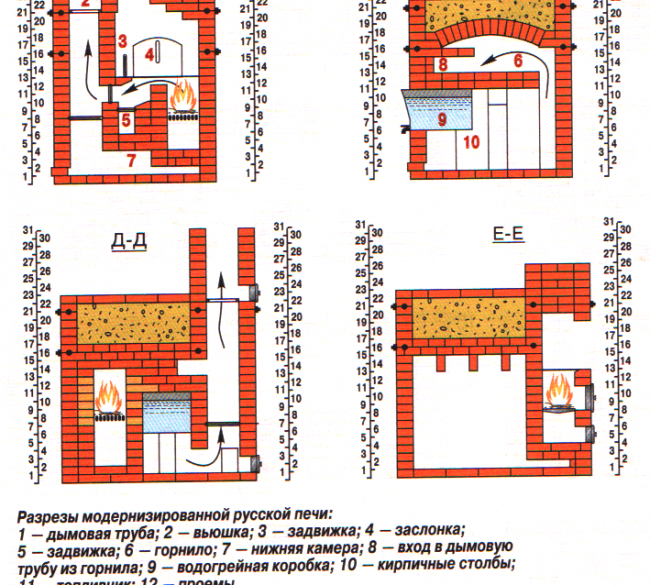
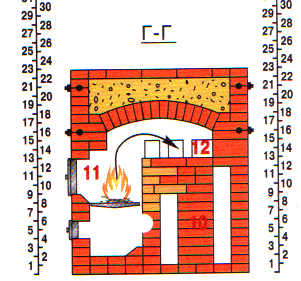
Today we will not dwell on simple designs. Our goal is to build a practical and functional unit with a stove and a heating tank that will satisfy any owner of suburban housing. Below you can see his drawings and orders, and in the future we will provide complete instructions for the manufacture of the furnace, the arrangement of the chimney and the procedure for putting the unit into operation.
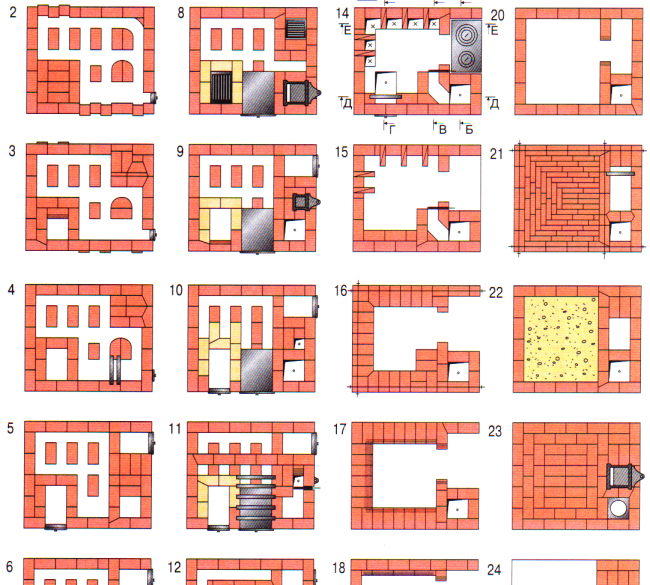
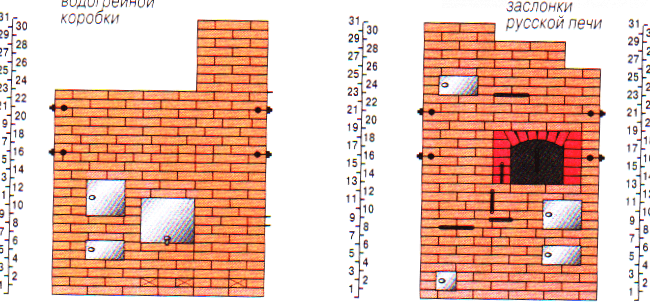
Drawing and orders for the Russian stove (photo gallery)
-
- Improved Russian stove drawing
-
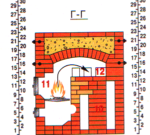
- Drawing and ordering
-
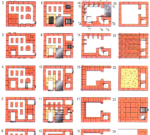
- The order of the Russian stove: 1 - 24 row
-
- Order: 25 - 31 row
-
- Ready oven
Tools and materials
To build a Russian do it yourselfYou don’t have to buy any special tools. Nevertheless, prepare everything you need in advance - this will save time and help to organize the work correctly. Here is what you need first of all:
- A pair of multi-sized stainless steel craftsmen.
- Stitching for seams, if this type of finish is planned.
- Mason's pickaxe hammer.
- Rubber mallet.
- Angle grinder (grinder) with a cutting wheel.
- Electric drill with a set of drills.
- Tool for monitoring the accuracy of masonry (level, plumb, angle and mooring cord).
- Scissors for metal work.
- Tanks for mixing the solution.
- Grid for sifting clay and sand.
- Roulette.
- Pliers.
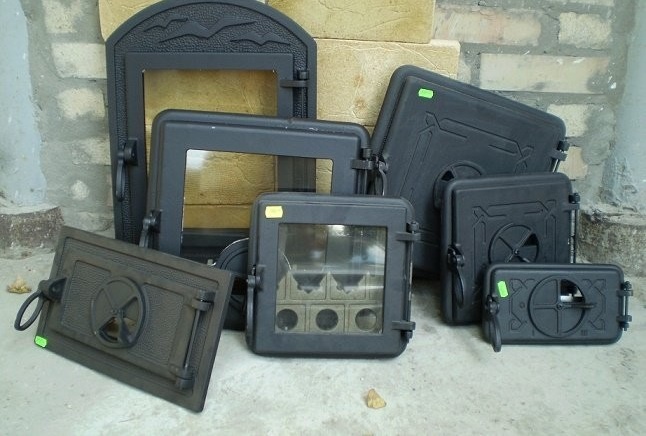
Today on sale you can find oven casting of any type and functionality
Material List:
- Red brick (brand not lower than M-150) - 1900 pcs.
- Sand - 300 kg.
- Clay (as greasy as possible) - 250 kg.
- Basalt cardboard or other non-combustible sealant.
- Ruberoid for waterproofing the foundation.
- Two-burner hob with dimensions of 400x700 mm.
- Furnace doors with dimensions of 250x210 mm and 250x180 mm.
- Grate 200x280 mm - 2 pcs.
- Grate 250x380 mm.
- Smoke damper 180x260 mm.
- Cleaning doors 130x130 mm - 2 pcs. and 130x200 mm - 1 pc.
- Blowing door - 250x150 mm.
- Crucible damper - 380x450 mm.
- Water-heating tank 120x280x500 mm.
- Steel angle with a shelf 60 mm - 1.5 m.
- Metal sheet 5 mm thick.
In addition, it is necessary to take care of the materials for the construction of the foundation - crushed stone, sand, cement and planks for the construction of formwork.
Preparatory Activities
At the stage of preparation for construction, they select a place for the construction of the furnace, mount a reliable foundation and prepare a working solution.
Seat selection
The installation location of the Russian stove primarily depends on the characteristics of the room. In a wooden house, an air gap of at least 40 cm wide must be maintained between the heater and the walls of the building. In addition, areas with an elevated heating temperature should be further protected by non-combustible materials, for example, basalt board boards. It is also important that at the same time access to the lateral surfaces of the heating unit is maintained, which is necessary for their periodic revision. If it is planned to install the oven in the wall between the two rooms, then the opening is protected by masonry, separating it from the wood with a gasket of non-combustible material.
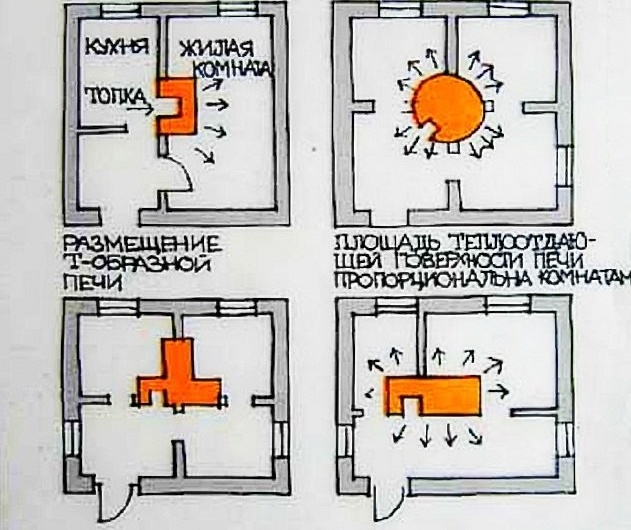
Options for the possible location of the furnace in the house
It is best to place the heating unit in such a way that it can be heated from the kitchen or the porch, and a stove bench or fireplace can be led out into the living room or bedroom.
Foundation construction
Since the Russian stove is a dimensional, massive construction, its foundation should ensure the stability and reliability of the entire structure. To equip the foundation, you need to dig a pit with a depth of 0.5 to 0.7 m. Naturally, in loose and unstable soils, this parameter will need to be increased.
At the bottom of the pit, a pillow is made of drainage materials. To do this, fill the pit with 150-200 mm layer of sand, which is carefully tamped and filled with water for better compaction. From above, sand is covered with rubble, a small boot or broken brick, raising the bottom of the pit another 100–150 mm. The surface is further processed by tamping, and then leveled with a thin sand layer, which is also subjected to spilling.
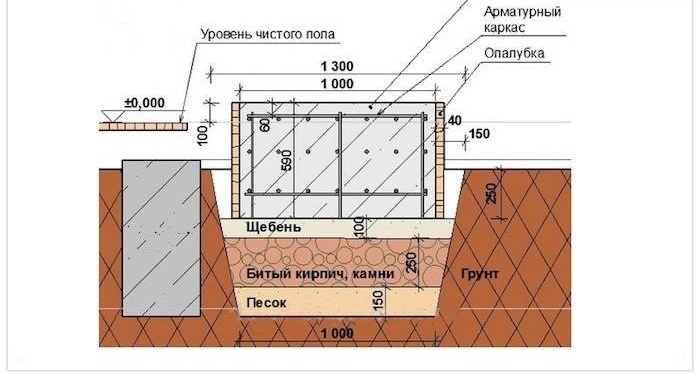
Foundation design for Russian stove
A pillow of sand and gravel is covered with a moisture-proof material, on top of which a formwork made of edged boards is installed. To avoid leakage of cement through the slots of the box, its walls are covered with polyethylene.
Concrete for the foundation should have the following composition: 1 part of cement M-400, 3 parts of sand and 5 parts of crushed stone or other aggregate. The solution is brought to a thick sour cream, and then poured to half the height of the formwork. After this, the concrete is bayoneted and a reinforcing mesh is laid on its surface. Next, the frame is filled to the edge with concrete and the surface is leveled using a long rule.
The concrete base is left to stand for several days until the concrete has thoroughly set, after which it is covered with roofing material.
How to prepare a solution
In order for the work to be fun, the masonry mortar must be soft and flexible. This will make it possible to completely fill the seams and not apply excessive force when laying bricks. In addition, the mixture should not crack when dried, which is actually not so easy to achieve. The fact is that to avoid cracking the surface is possible only in one way - by equalizing the parameters of the thermal expansion of the masonry mortar and brick. Of course, you can buy a special mixture for laying stoves in a hardware store, but a real Russian stove should be made from environmentally friendly materials, right? And for this role, an inexpensive traditional composition of clay and sand is excellent.
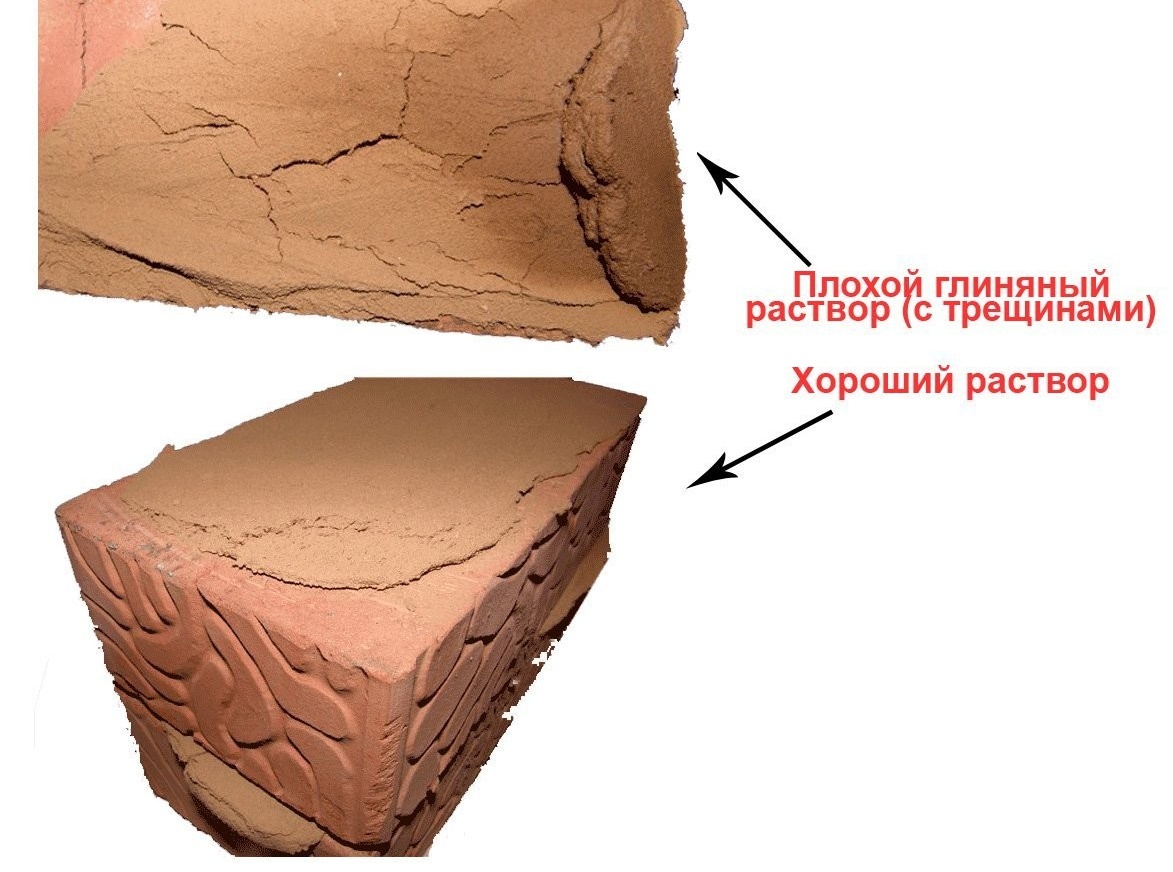
The quality of the clay mortar has a decisive influence on the strength of masonry joints
A certain difficulty arises in the selection of the correct proportions, which is associated with various clay fats. Want to know the secret of a non-cracking solution? It is quite simple - you need to take the most fat clay, adding up to 3 parts of sand to it.
To prepare the solution, the clay is cleaned of foreign components, knots are kneaded and soaked in cold water for 24 hours. After that, it is thoroughly mixed with sand, bringing to a semi-liquid consistency.
To prepare the optimal solution, several miniature batches with different sand contents are made, fixing the proportions on the paper. After that, flat cakes are formed from each sample, which are left for several days until completely dry. The best is the composition that least cracked during the drying process.
Do not prepare too much solution. The fact is that when it is defended, it will be divided into components: the sand will sink to the bottom. Repeated mixing of the clay composition cannot be avoided, and this is all an unnecessary waste of time and effort.
In our next article you will find a step-by-step guide on the construction of a Swedish furnace with calculations and ordering:https://aquatech.tomathouse.com/en/otoplenie/pech-shvedka-svoimi-rukami.html
Laying the Russian stove: step by step instructions
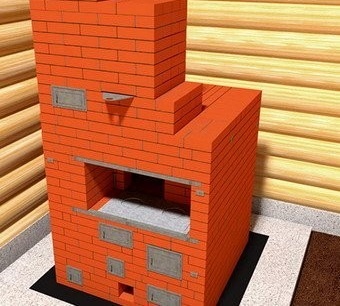
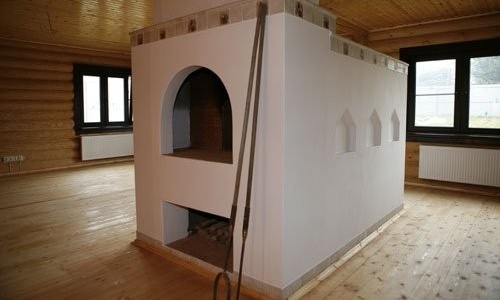
Appearance of the future furnace
First of all, let me give you a few tips that will make the job simpler and the constructed structure safe.
- Use only high-quality brick, in the body of which there are no cracks.
- When filling the joints, there should not be voids and gaps inside, and their thickness should fit within 5–8 cm. Remember that coating the walls with clay for their tightness is not the best option, since thermal conductivity decreases.
- Before laying a brick, it is recommended to soak it - in this case, it will not draw liquid from the solution.
The brick before masonry is soaked for another reason. During drying, it will be dehydrated simultaneously with the solution, which will contribute to better adhesion and hardening of the walls.
To ensure that the structure is neat, the excess clay extruded from the seams must be selected immediately, preventing them from drying out. The walls of the furnace can be laid out in brick or half-brick, while the inner chambers - in half, or even a quarter of its size. Experienced craftsmen most often carry a medium-sized furnace up to 15 cm thick, arguing that it warms up faster and does not require additional fuel for preliminary heating.
Laying is convenient to conduct, focusing on the order. To do this, the scheme is printed on separate sheets of paper in order to follow the selected instructions in the process.
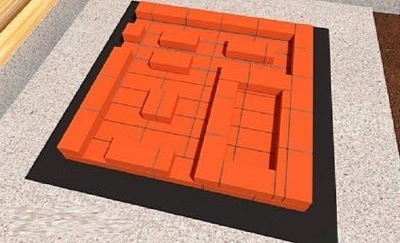
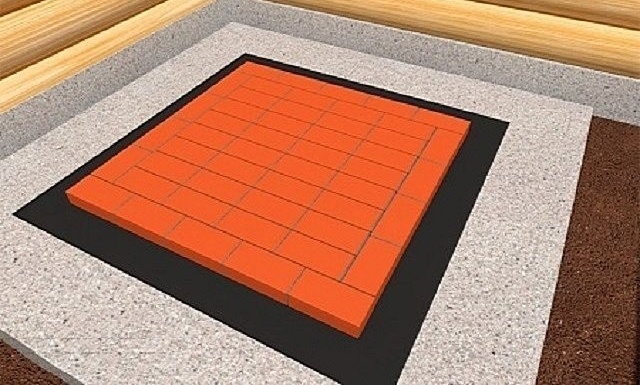
- The first row is laid out with special care, because it sets the geometric correspondence and evenness of the structure. It is better for novice stoves to draw the contours of the furnace with chalk on the base, or first make dry dry laying. When working, they adhere to the following order: first, lay out the external perimeter of the structure, and then fill it according to the ordering scheme.

1st row masonry is continuous
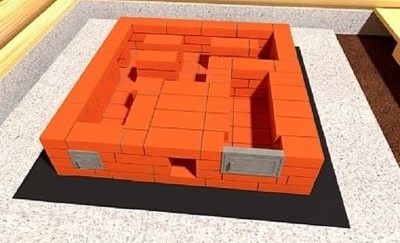
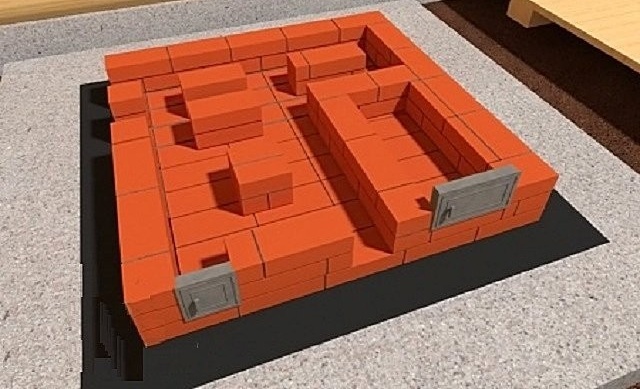
- The second row begins to form walls, cleaning channels and the bottom of the ash pan.
By laying the 2nd row, internal chambers begin to form
- Before starting the third row, install the blower door and the hatch of the cleaning chamber. Pieces of steel wire, which are screwed to the door frames with one end and put into the inter-brick seam with the other, will securely fix them in the masonry.

Getting to the 3rd row, set cast-iron doors
So that the adjoining points of the furnace cast iron do not crack during operation, the metal elements can be wrapped with asbestos cord or the gaps can be sealed with a basalt sealant.
- The fourth row covers the cavities located near the walls, and forms the overlap of the hearth channel.
4th row masonry
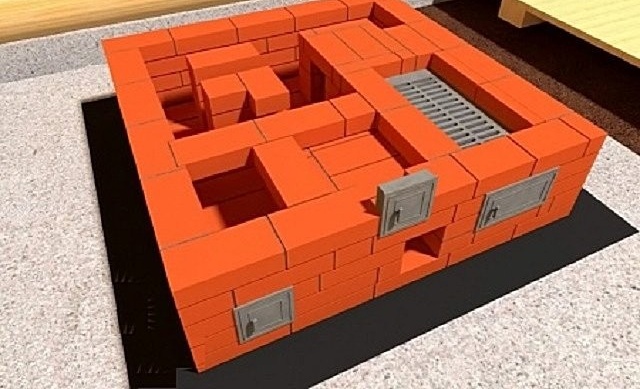
- Starting the fifth row, set the grate and begin to form a firebox. Often for this purpose, chamotte brick, dissolved in two parts, is used. At the same level, the door of the small fuel chamber is mounted, which is located below the hearth channel.
5th row: installation of the grate and the combustion door
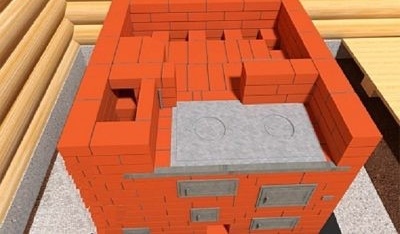
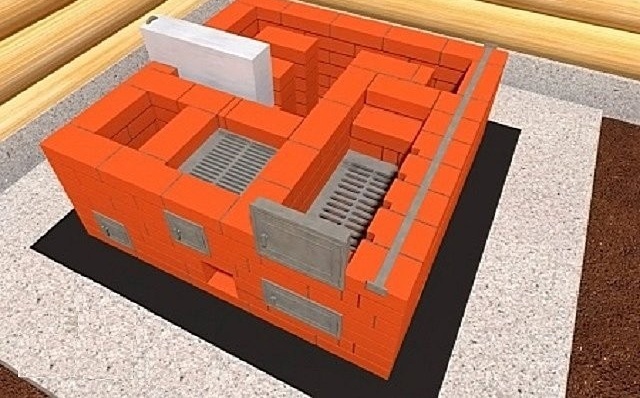
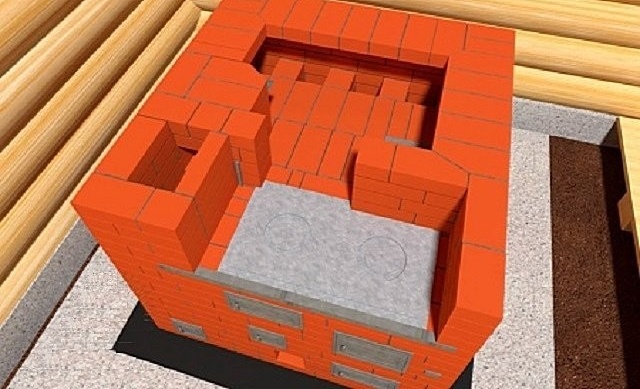
- On the sixth row, lay the firebox and mount the water heater.
Installation of a water tank in the 6th row
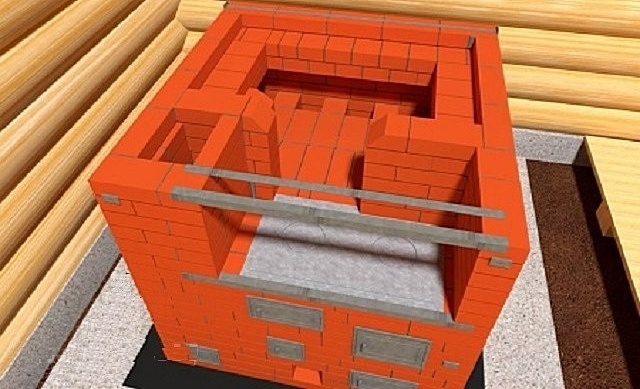
- Seventh row. Installation of grates of a small fuel chamber and a large furnace door. The right wall is pulled together with a metal strip, which is laid in the seam and fixed to the outer edges of the bricks with vertical hooks. Like the side surfaces of the furnace, its rear wall is laid out dry. At the same time, parts of the firebox adjacent to the outer walls are made with gaps to improve heat transfer.
Features of masonry of the 7th row
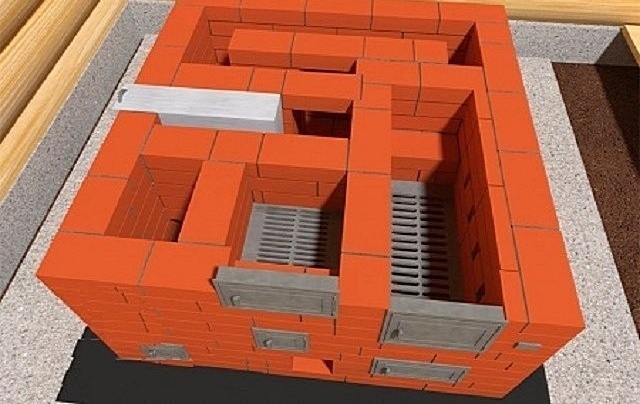
- The eighth and ninth row continue to build up internal channels, as well as securing a small furnace door.

Masonry 8 and 9th row
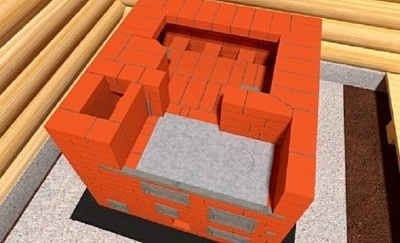
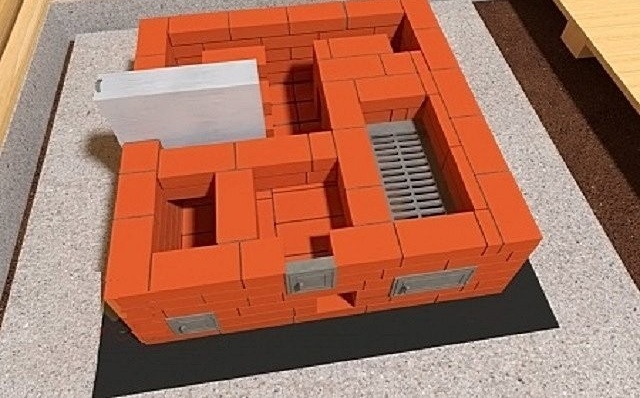
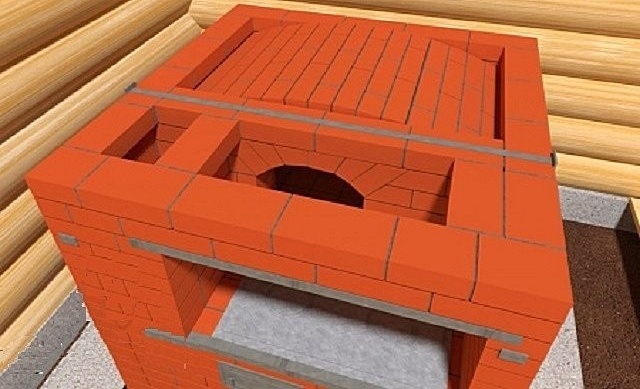
- In the tenth row, the arches of both furnaces are connected, while laying out the bottom of the furnace. In this case, the openings of the channels located at the rear wall should be open. Here, several bricks block the water tank.

10th near form the bottom of the furnace
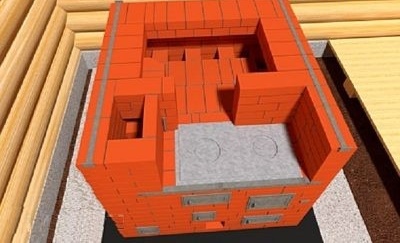
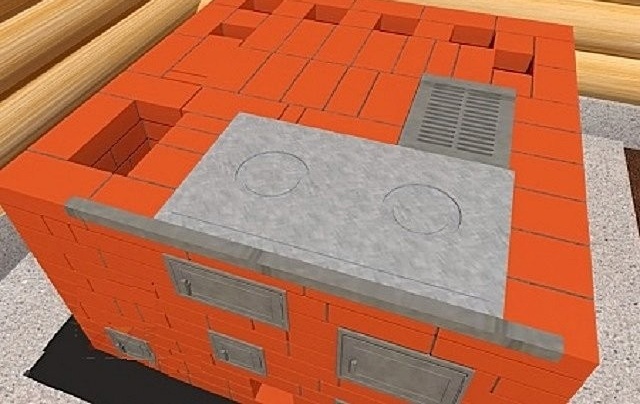
- On the 11th row, the base is prepared under the hob, for which a steel corner is mounted above the furnace doors. In addition, a grate is installed in the back of a large firebox.

11th row: mounting the hob
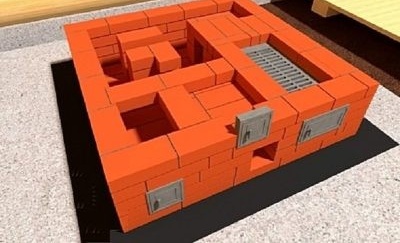
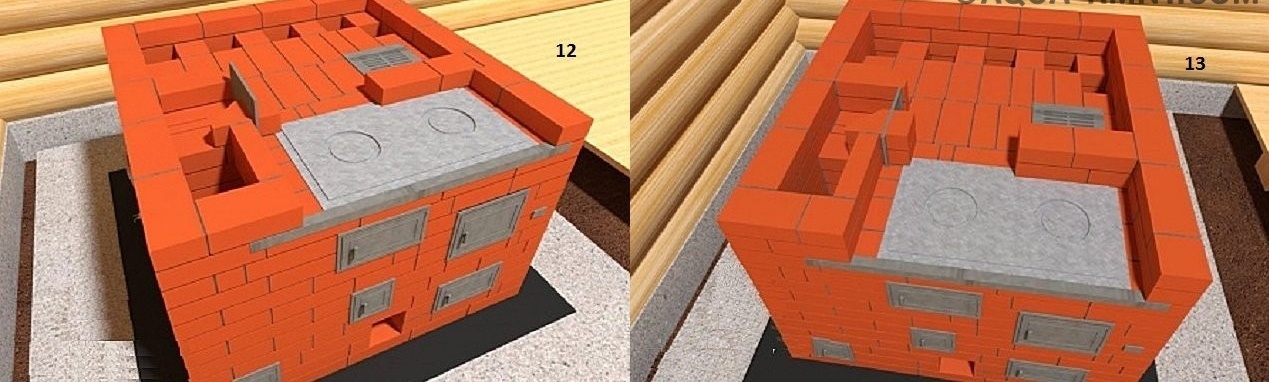
- 12th and 13th row - form the base of the chimney and the walls of the cooking chamber (furnace). Here, a valve is installed, which will block the channel between the main chamber and the chimney.
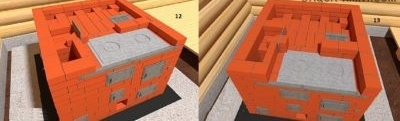
12th and 13th row
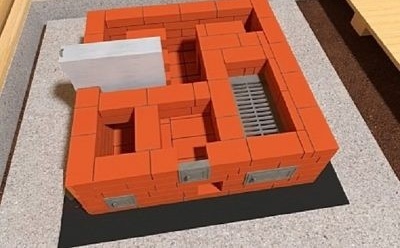
- On the 14th row, they begin to equip the side passage from the furnace to the smoke channel, increase the walls of the cooking chamber and make a hole for the valve.
14th row: we form a channel for the removal of combustion products
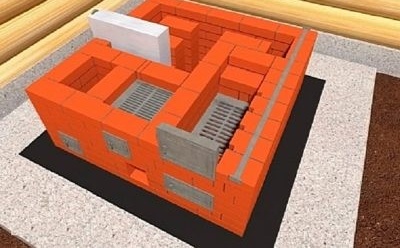
- From the 15th row, they begin to narrow the masonry to overlap the crucible and lead to further distillation of the smoke channel.
In the 15th row they begin to form the base of the arch of the furnace
- On the 16th row, the side walls of the furnace are fastened with metal strips in the same way as it was done with the right side of the unit in the seventh row.
Features of the masonry of the 16th row
- 17 row. Lay the second metal corner over the niche of the hob and equip the side bases of the arch of the cooking chamber.

Work that is carried out during the laying of the 17th row
- On the 18th row, a domed template is installed and the arched arch of the furnace is laid out.
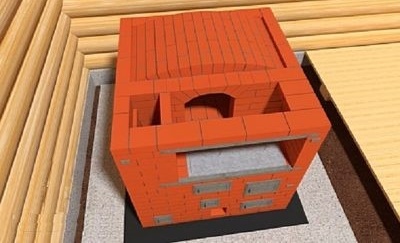
Arched vault of the 18th row
- In the 19th row, a metal strip strengthens the wall at the mouth of the furnace. Continue to build up the side walls that are needed to hold backfill.

Fastening a metal strip in the 19th row
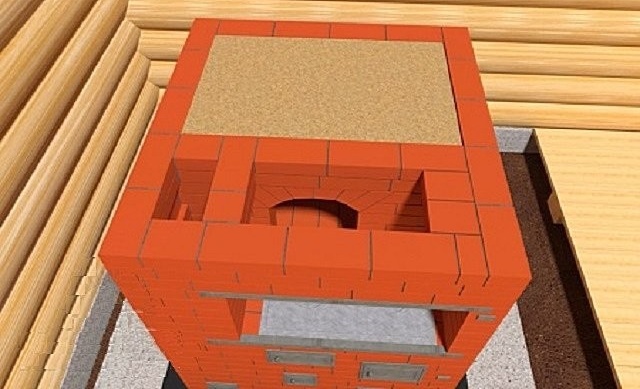
- 20th row. The height of the walls is increased by another brick, after which the arch is covered with sand for better thermal insulation.
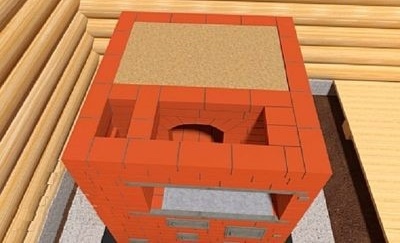
After laying the 20th row, the outer side of the arch of the furnace is covered with sand
- The 21st row forms the overlap of the furnace. Here they begin to narrow the overtube.
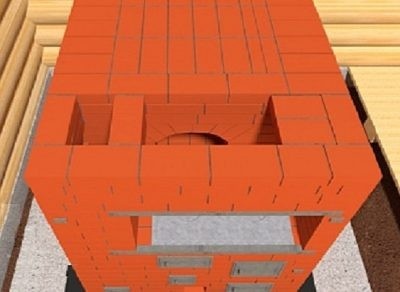
21st row: ceiling covering the furnace backfill
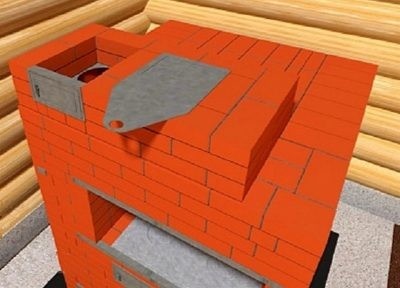
- To reduce the gas flow rate in the 22nd row, a metal sheet with a cut round opening is installed. Continue to reduce the cross section of the annulus.

Features of the construction of the furnace in the 22nd row
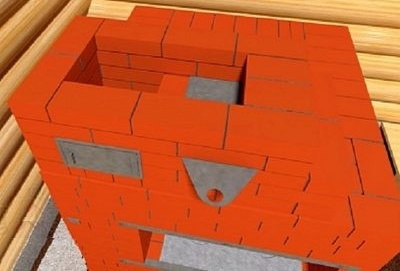
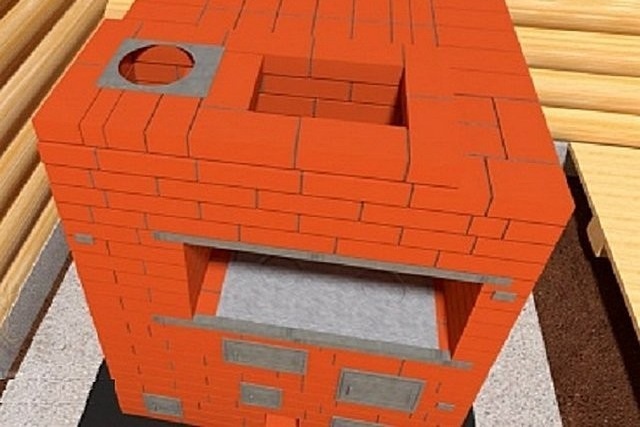
- In the 23rd row, a clean door is mounted in the smoke channel and the output channel is increased.

23rd row: the beginning of the chimney and the arrangement of cleaning the chimney
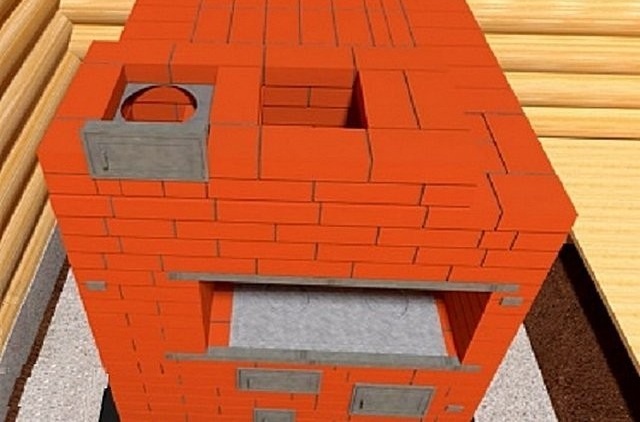
- Starting in the 24th row, install a valve to adjust the traction.
24th row: valve assembly
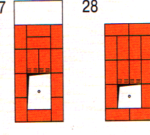
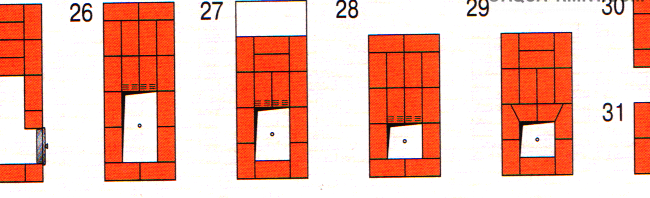
- The 25th and 26th row are needed to overlap the space above the adjustment flap.
Features of the order of the 25th and 26th row
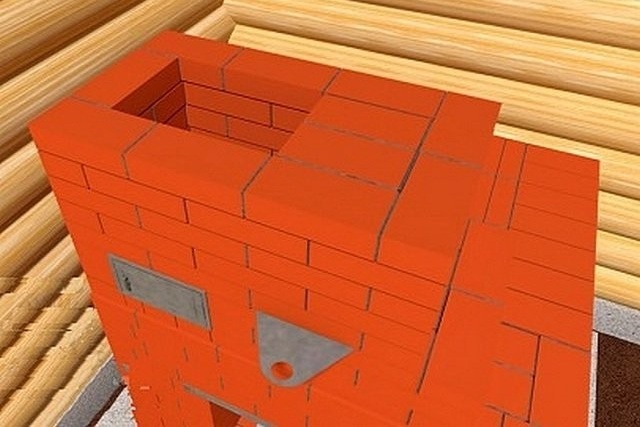
- From the 27th to the 29th row, an overtube and a chimney are combined.

The last rows of the furnace combine a chimney with a chimney


After that, the construction of the furnace is considered completed. It remains to build a chimney, after which it will be possible to conduct a test firebox.
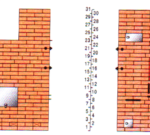
Installation of a chimney
The chimney necessary for the operation of the Russian stove is absolutely no different from the chimney of any stationary solid-fuel unit, whether it be a Dutch, a Swede or some new-fashioned bell-type furnace calculated using computer simulation. The design and orders of the chimney can be taken from the drawing below.
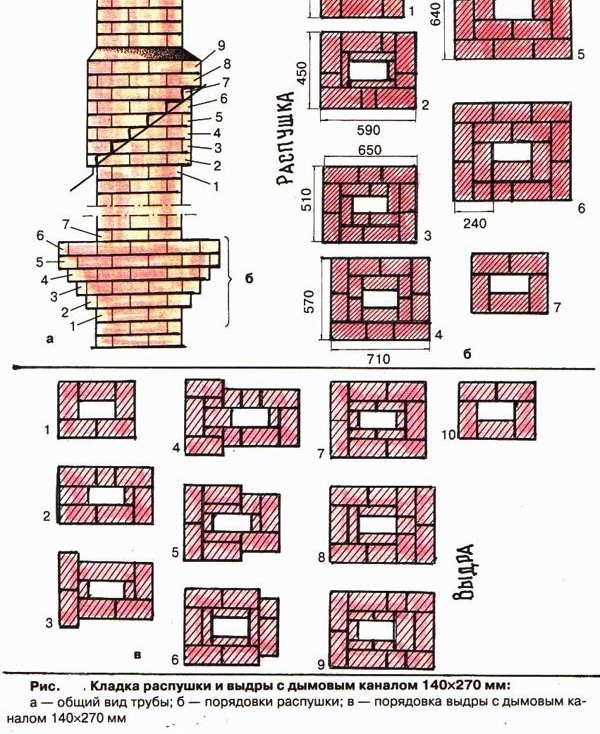
Chimney device for a Russian stove with orders
In the process, we recommend that you follow a few simple rules:
- The device and the installation location of the pipe for the removal of combustion products must meet the standards of the current SNiP.
- At the transition from the ceiling to the attic, the pipe should thicken.
- The lower part of the chimney is laid on the same solution as the stove.
- The internal section of the chimney duct must correspond to the power of the heater.
- Above the roof, a chimney is built on a mortar with the addition of cement.
- The places where the pipe passes through the floors are isolated with non-combustible and waterproofing materials.
In the process, the geometry of the structure and the deviation from the vertical are constantly monitored using a level or plumb.
Methods for decorating Russian stoves
Decorating a Russian stove is done in several ways:
- brickwork masonry;
- plastering;
- ceramic tiles or tiles.
Masonry is the easiest way, which is not bad for modern interiors. The main thing is that such a way of decorating should be planned from the very beginning, since the aesthetics of the design directly depends on the quality of the material and the accuracy of the masonry. As a rule, for laying external walls, facing bricks with smooth side walls are used.
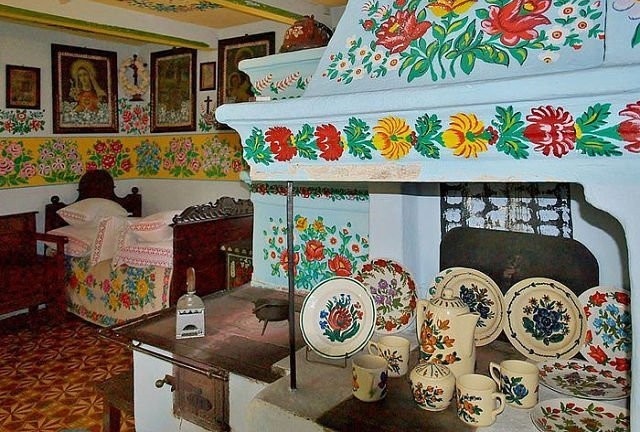
If the goal is to build a Russian stove according to ancient canons, then it should be plastered with a special clay mortar with the addition of chaff. After drying, the outer surfaces are covered with a solution of white clay in water. Such whitewashing is environmentally friendly, safe for others. In addition, thanks to her, the basis is being prepared for the final decoration - painting. The patterns that cover the walls of the stove can repeat the national ornament or scenes from fairy tales, represent floral curls, styling as Gzhel, Khokhloma, etc. - it all depends on the mood and preferences of the owner. A wide selection of stucco mixes allows replacing the old composition with a more modern “bark beetle” or “lamb”.
For ceramic tiles, only heat-resistant types of tiles are used - terracotta, majolica, heat-resistant clinker or porcelain stoneware. In addition, Russian stoves are often laid out with tiles. Note that although decorating with ceramic tiles is one of the most beautiful and practical methods of decoration, after it arrogance and luxury of the “Dutch women” begin to appear in the design, and not everyone will like it.
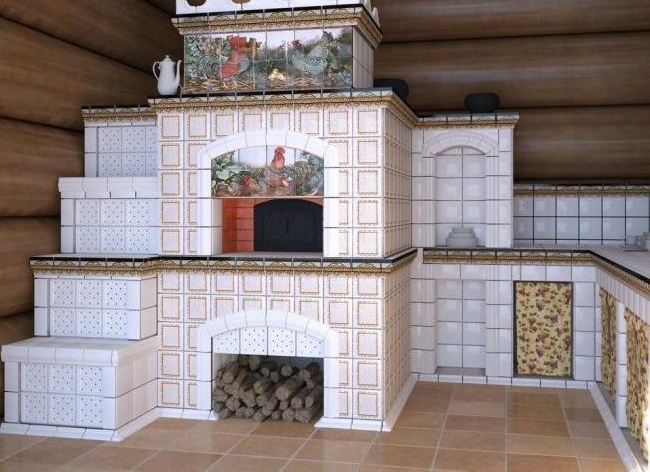
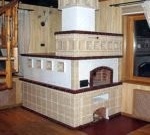
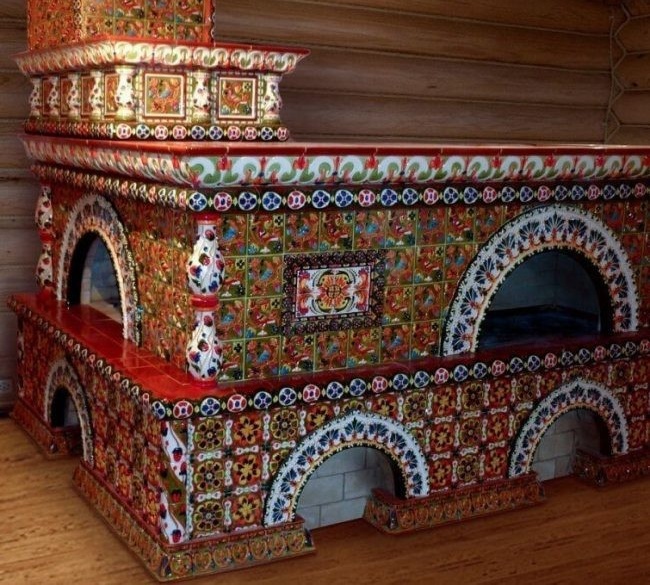
How can I decorate a Russian stove (photo gallery)
-
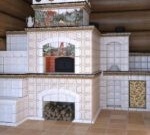
- Decorated with painted ceramic tiles
-
- Laying tiles can be done not wide, but with wide decorative stripes

-

- Tiled finish
-
- The stove, faced with tiles, often begins to resemble a stylish "Dutch"
-

- The traditional way to finish is whitewashing
-
- Mural - a traditional way of decorating a Russian stove
If you plan not to embroider the masonry, but to clad it with ceramic tiles or plaster, then be sure to fix the metal mesh on the surface of the walls. Otherwise, the decorative finish when the structure is heated will fall off.
Procedure for starting the heater
Having built a furnace, in no case should you rush to try its heating abilities at full strength. It must be handled carefully and carefully, since with intensive heating the walls located closer to the hearth will dry out much faster than the removed surfaces. The difference in thermal expansion of wet and dry materials is quite significant, therefore there is a risk of cracks at the joints. To avoid troubles, all openings of the furnace are opened and dried under natural conditions for two weeks.
Due to the need for continuous drying of the furnace, it is recommended to start its construction in the warm season.
To accelerate the process of moisture removal or when drying the structure under adverse weather conditions, a fan heater or a powerful electric lamp can be placed in the furnace and firebox. At the same time, the oven doors are closed, and the channels are left open.
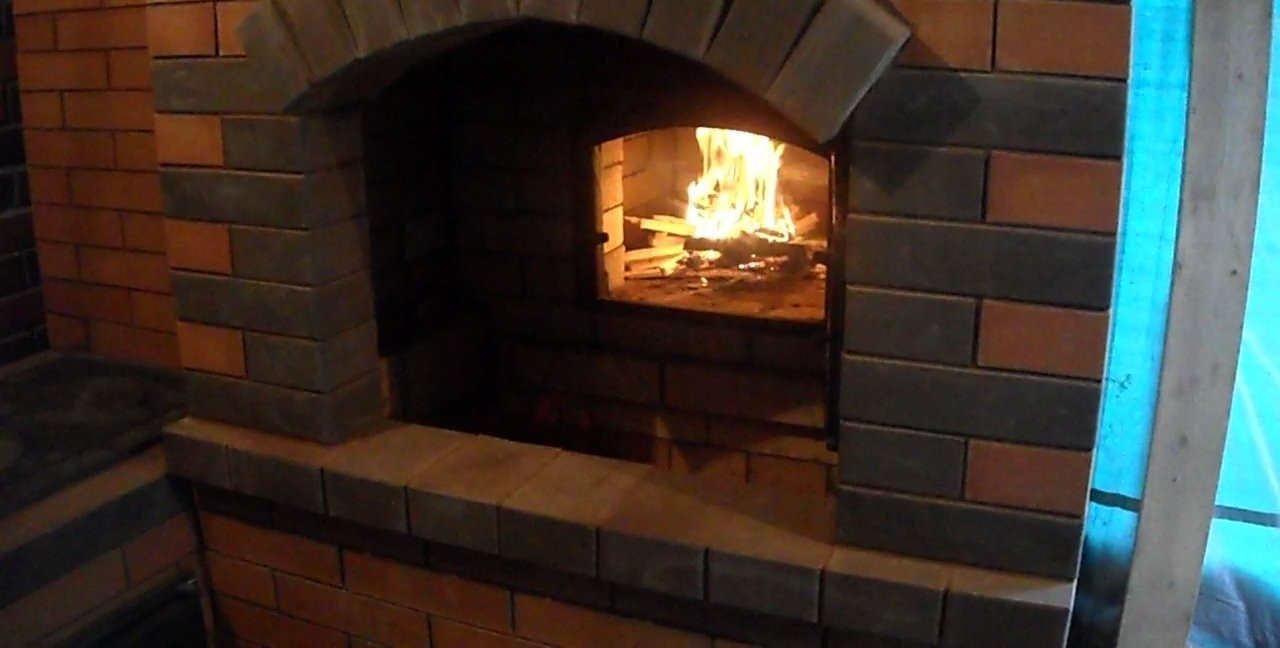
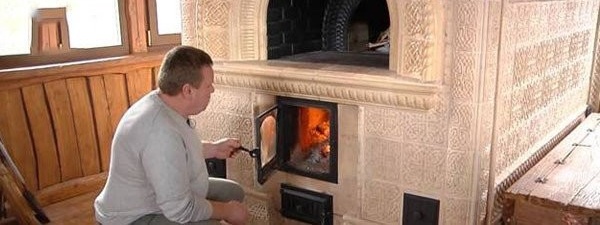
The focus is ignited only after the walls have completely dried
The furnace is only started after the pre-drying period has ended.. For this, during the first two days, no more than 3-4 kg of firewood is laid in the unit, adding 1 kg of fuel every day for a decade. The readiness of the furnace for full operation is judged by the absence of condensate on the internal surfaces of metal parts. The heater is tested several times at half power, and then check the operation of the unit at maximum speed. During the “break-in”, the surface of the walls must be inspected for cracks and their possible increase. Close up the flaws that have appeared only after the furnace is melted several times at full strength.
A few tips for safe operation
- After a long period of inactivity, be sure to check all visible surfaces for tight joints. Cracks that have appeared must be repaired with clay mortar.
- Before each firebox, check for traction.If smoke from the furnace comes to the room, the stove must never be operated. Perhaps one of the valves is closed or chimney cleaning is required.
- You can close the view only after the wood has completely burned.
- It is recommended that soot be removed from the inside of the furnace at the beginning of each season. In fact, the stove is very poorly polluted and after construction will not require cleaning for several years. However, it all depends on the smoke and the quality of the fuel used.
Video: we create a Russian brick oven with our own hands
A correctly and neatly built Russian stove will not only provide the room with comfortable warmth, but also create a unique original style, so dear and close that any guest will be forever enchanted and conquered by the interior of your home. If you also use the heater for cooking, you can fully experience the taste and aroma of real Russian pies, daily cabbage soup or fragrant stewed porridge.