How to choose an installation for the toilet + guide for self-installation
Installing a toilet installation - this topic is relevant primarily for those who have a bathroom in the house does not differ by the presence of excess useful area. Although the design projects created for luxury apartments using such designs are also abundant.
The preference for this particular method of installing the toilet, as a rule, is given by people who are not prone to stereotypes and are not afraid to let creative decisions into their lives. Although today wall hung toilet is no longer something extraordinary, but if you have a certain set of tools and, having minimal skills in metalwork, you can create such a system yourself. For our part, we suggest that you familiarize yourself with the technology for carrying out such events in theory, and this knowledge, in our firm conviction, will be useful to you in practice.
Content
What is a toilet installation?

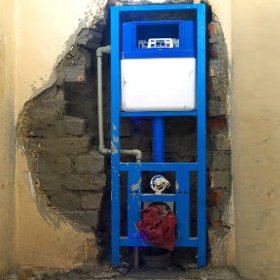
The installation is always based on a metal frame.
Before choosing an installation for the toilet, you need to understand what semantic load this design carries. In fact, we are talking about a special frame for flush mounting. The expediency of its installation is provided by two key conditions:
- Firstly, a hanging toilet is an additional free space in the bathroom (especially relevant for housing of the "Soviet" building).
- Secondly, due to the fact that this plumbing product does not come in contact with the floor surface, it is possible to clean the bathroom faster and more efficiently.
Note! In principle, not only a toilet bowl, but also any other sanitary product can be mounted on such a frame.
What do the installation work suggest?
The correct sequence of installation of the installation itself, and then the toilet is of fundamental importance, because in this future the health and uninterrupted functioning of this plumbing fixture depends. Installation of the installation for the toilet consists of four main points:
- installation of the toilet;
- connection to it of the sewerage and water supply system;
- masking the visible parts of communication;
- exterior finish.
Attention! Installation is carried out before the start of finishing work in the bathroom.
Remember that it’s better to install everything right from the start than to do it toilet installation repair. Below you can read a detailed step-by-step description of the installation process of such a system, and for everything to be more understandable, see how the installation is carried out - a special video clip from professionals.
In the assortment of wall hung toilets there are rimless. About how they are arranged, what advantages they have, are there any disadvantages, read in our article:https://aquatech.tomathouse.com/en/santehnika/unitaz-rakovina/bezobodkovye-unitazy-plyusy-i-minusy-otzyvy-vladelcev.html.
What tools will be needed?
Installing a toilet installation with your own hands, in principle, does not require any expensive professional tools. To cope with the work, it is enough to have the following items in your arsenal:
- Marker or ordinary pencil.
- Building level.
- Measuring tape.
- Hammer drill. At the same time, a drill bit for concrete should be at hand, the diameter of which should be commensurate with the fastener hole, which in turn comes complete with the installation itself.
- Horn spanners, the cross section of which must also correspond to the diameter of the used fasteners.
Installing a toilet installation: step by step
Marking
Before you install a toilet with installation, you need to make markup. First, a line is drawn on the wall, which will serve as the central axis of the device. Then the distance from the installation system to the wall is noted. This size depends on how the sewer pipe will be brought to the installation, but this value cannot be less than 13.5 mm. Next, the location of the drain tank is noted.
As a rule, this element is located at a height of 1 m from the surface of the main floor. Naturally, the installation height for the toilet is also taken into account. On the floor and on the wall points are indicated where it will be necessary to make holes for the mounting elements of the installation.
Fastener system preparation
Regardless of whether an angular installation for the toilet or a simpler version of the design will be performed, fasteners should be given special attention. On the marks made on the walls using a punch, holes are drilled, and dowels are inserted into them.
Attention! In fact, the installation design is not of fundamental importance, it always has a vertical and horizontal fastening system.
Fixing anchors are inserted into the holes with dowels, which will allow to fix the sanitary ware to the vertical plane of the body, in our case the toilet. During the installation process, it is necessary to observe the sequence of installation of structural elements in order to avoid difficulties when adjusting the vertical level.

Wall hung toilet - a great solution for small rooms
Direct installation installation
Here, the sequence of works does not change, depending on whether the narrow installation for the toilet, the corner or its most common modification are in the work.
- So, the installation case is installed on the prepared place and fixed using special screws and adjusting nuts.
- The case must be exposed at the horizontal and vertical levels at the same time - this is the most critical installation moment:
- The horizontal level is adjusted by loosening the well structure of special legs. They must be set at a certain height, after which the final position reached is fixed.
- The vertical level is adjusted during fitting to the thread of the anchor, and the achieved position is fixed with a special plug.
Communication Summary
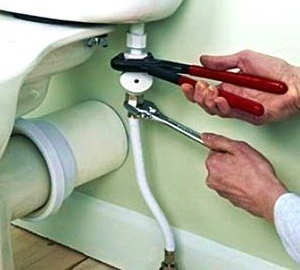
To connect, fixing plastic clamps will be used in the work, where pipes from the drain tank and from the sewer system are attached. Now it remains to check whether the tightening of all elements of the system is performed in a quality manner, once again make sure that the dimensions of the structure correspond to the dimensions of the toilet bowl, and also check that the position of the installation structure corresponds to both levels.Everything, now the installation for the toilet with your own hands is prepared for the installation of the sanitary ware itself.
We bring the work to its logical conclusion
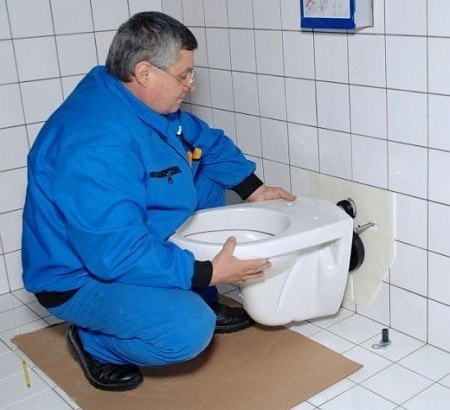
That is, we install the toilet bowl, while the connecting pipes that connect the installation and the toilet should be precisely sized. As you already understood, there are two of them - for water and sewage. These items are non-standard and must come complete with a toilet - they cannot be bought separately.
Immediately before mounting the bowl, the PVC couplings are put on the studs, and a shock-absorbing pad is also installed. The bowl of the toilet with attached nozzles is put on the studs, then the fasteners are crimped with nuts, which are tightened in turn until the bowl is firmly seated in its place.
In our next article, you will learn how to choose and install a hygienic shower for a hanging toilet:https://aquatech.tomathouse.com/en/santehnika/unitaz-rakovina/ustanovka-gigienicheskogo-dusha.html
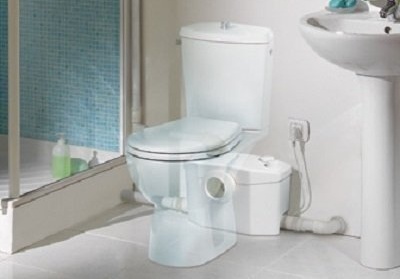
A few words about the exterior

After installing the installation and installing the toilet everything should look just like that
Naturally, the installation should be hidden - they cannot be an element of the interior. For cladding, you can use a variety of materials, here, as they say, who cares. We want to advise the easiest way - covering with double waterproof gypsum board. The front cavity is sheathed in accordance with the template that is attached to the installation itself. All loose sides of the structure are also sutured. Well, the final finish should be in harmony with the general stylistic decision of the wall surfaces of the bathroom.
Installing a toilet with installation - video guide
Familiarization with so much theoretical material needs to be fixed. Now you are ready to understand the actions of a specialist, so we offer you a full-fledged instructional video.
In some cases, forced sewage is required in the bathroom, which involves the installation of a special pump. About the device of this equipment, operating principles and installation methods, read in our article:https://aquatech.tomathouse.com/en/santehnika/unitaz-rakovina/nasos-izmelchitel-dlya-unitaza.html.