Self-installation of the sink in the countertop - analysis of the installation work technology
Arranging your own home is a creative process that has virtually no end. To create the perfect housing, considerable funds have to be invested in the implementation of their creative ideas. Although you can always try to reduce them by doing a certain job without outside help. For example, with the right approach, installing a sink yourself in a countertop will not be an overwhelming task. It’s even interesting - with your own hands to combine two independent faceless objects into a single logical composition.
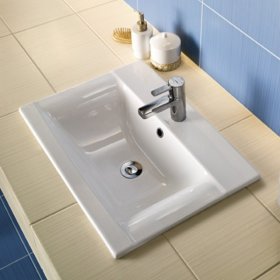
Which sink is suitable for countertops?
Before deciding how to attach the sink to the countertop, you should pay attention to the type of this sanitary ware. Today, manufacturers offer such sinks:
- hanging;
- on a pedestal (shell-tulip);
- built-in;
- waybill.
In this case, we are interested in products of the last two types.
Option # 1 - Built-in washbasin
The sink built into the countertop is an integral element of furniture for the bathroom, and in particular the bedside table, which can come with a mirror, lamp or other accessories. Built-in sink and kitchen furniture. To put it simply, the prototype of such an option for installing a sink in the bathroom is the Moydodyr washbasin, known from Soviet times.
Option # 2 - overhead sink
The installed sink on the countertop is a new word in the arrangement of the bathroom. In this case, the product is simply placed on the countertop, and any flat surface can play its role. Naturally, many special countertops are offered for sale, they differ from ordinary ones in that they have recesses.
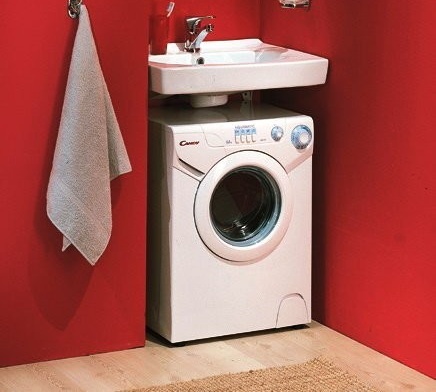
Such a sink installation has both pros and cons. So, due to the absence of joints, problems with water leakage are eliminated, and supplies and accessories can be stored on the surface of the countertop. This design can easily be placed above the washing machine. A pipe is led to the sink in the same way as to a flat hinged sink.
Attention! The overhead sink, with the built-in version, can be installed in several ways: completely recessed in the curbstone, partially elevated, stand on top. In this case, the drain fittings will be located inside the cabinet.
What tools will be required to work?
To do this work, nothing special is needed, all these items are always in the household:
- jigsaw or hacksaw;
- drill;
- screwdriver;
- pliers;
- clamps;
- spatula, brush;
- sealant.
It is worth adding to this list: a ruler, a pencil, a rag.
Recessed sink mounting sequence
Of course, the most interesting is the detailed consideration of how to install a sink in a countertop completely recessed. In principle, there is nothing incomprehensible in this procedure; it is not divided into several stages:
Stage # 1 - marking the installation site

The correct marking will be provided by the template that comes with the sink
The place where the sink for the bathroom with the countertop will be installed is determined. In this case, three conditions must be met:
- the sink cannot be located close to the wall;
- the sink should not be on the very edge
- absolute convenience in use should be at the forefront.
So, the meaning of this work is that the sink should not fall into the created hole, and it should be firmly and conveniently placed on the countertop. The sink under the tabletop is turned over and laid on the surface. The contour is outlined. To do this, use a pencil that is easy to erase. Then measurements are taken to determine the distance from the eyes of the fixtures to the edge of the sink.
The resulting size determines the distance that deviates from the line of the previously outlined contour inward. Based on the dimensions obtained, a new layout of the inner contour is performed. You can do even simpler: inside the contour, simply retreat 1.5 cm across the entire outline and draw a new reduced contour. These simple actions are correctly performed even by a person without artistic talent. But the resulting internal “figure” is to be cut.
Important! Modern plumbing manufacturers are trying to make life easier for consumers of their products. Therefore, as a rule, a template is attached to each sink. It is with its use that it is very simple to cut a hole for the sink.
And if such assistance is not provided by the manufacturer, then you need to act on the technology described above.
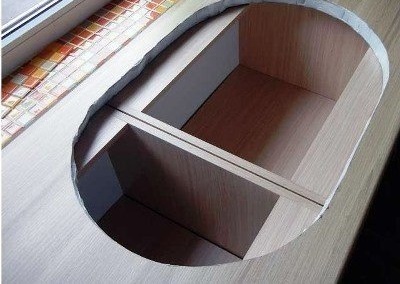
Stage # 2 - cutting along the contour

Use a jigsaw to cut a hole faster and more accurately
Before the built-in sink under the worktop is installed, a hole is prepared. For sawing, ideally you need to have a jigsaw on hand. Although you can use a simple hacksaw, but then you have to trim the edges. If a hacksaw is used, a hole is first drilled inside the outlined contour closer to the marking line. It should be sufficient for the hacksaw blade to enter there. Then, the unnecessary part is carefully cut out. At the same time, it is necessary to minimize the pressure on the decorative coating of the countertop, since when this work is performed, chips may appear.
Stage # 3 - edge treatment with silicone gel
The end surfaces of the resulting hole are sanded with a file and sandpaper. After leveling, these areas are lubricated with silicone sealant. Moreover, this manipulation must be performed with great care, thus avoiding leakage problems when using the sink.

Cut edges must be thoroughly sealed
The sealant should be designed specifically for the material from which the countertop is made. If it is wooden or plastic, then the sealant should be alcohol-based.
As soon as the ends are filled with silicone, it's time to insert the sink into the countertop. Landing should be very tight, if necessary, the product can be rotated.
Now it remains only to install the sink in the countertop
Now installed fasteners are tightened. Silicone, which will be squeezed out in a certain amount when landing the sink, must be removed. The design must be left to dry. Everything, we can assume that the sink under the countertop is finally mounted. But this is not the end of all the work, because the drain valves have yet to be connected.
Stage # 4 - final assembly of all elements
Installation of the mixer requires great accuracy and scrupulousness. Although if a hole for the mixer is made in the sink even at the production stage, then there will not be much trouble. If there is none, it means that you will have to make this hole in the canvas of the countertop.
Naturally, this procedure is carried out during the period when holes for mounting the sink are cut. Hoses are mounted in the mixer, then the product is inserted into the hole in the sink and fixed with special fasteners.
Some more useful tips
Putting a sink into a countertop is both a complex and simple process. If the work is done poorly, then at least the appearance of the bathroom will be spoiled, and as a maximum, the countertop will quickly fail due to the constant ingress of water into the slices.
Of course, you don’t have to rack your brains right away and invite professional plumbing for a bathroom device - this is the right of every homeowner. But to do the work with your own hands is much more pleasant, and frankly, installing the sink is the stage that everyone should go through himself, because even the best master will not do everything perfectly as the homeowner does. In conclusion, we suggest watching a video in which a specialist installs a sink in a countertop.