Installing a sink in the bathroom using the console design as an example
It is hard to imagine that not so long ago the problems of choosing a sink in our country simply did not exist. Identical models occupied almost all bathrooms. The modern variety of shapes, colors and textures allows you to decorate the interior to your own taste and poses a lot of questions to the owner of the plumbing. The selection and installation of the sink in the bathroom must be carried out correctly, otherwise it will not be able to function normally.
What shell designs are there?
The installation method of the device directly depends on the type of sink, and there are several of them.
The most common include:
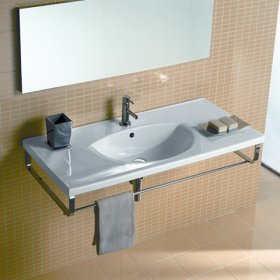
- Console or hanging. As the name implies, it is mounted on brackets to the wall. The size and shape of the device can be any. Very easy to install. The main disadvantage: open communications.
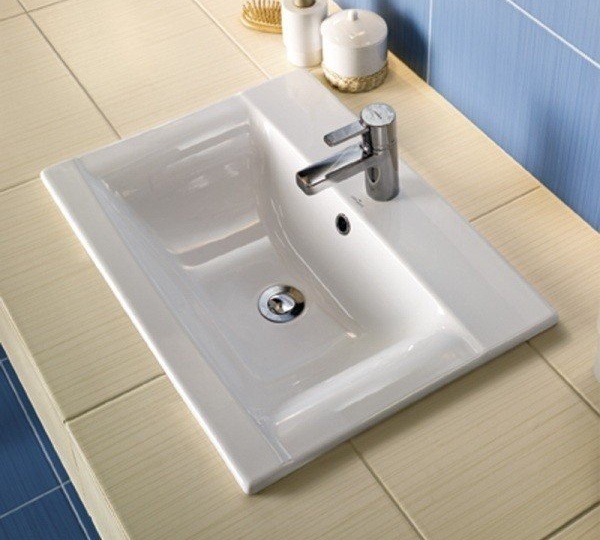
- Built in. Built in countertops or tables. The design completely hides unaesthetic communications and allows you to use the furniture into which the sink is embedded to store the necessary details. The main disadvantage: often takes up a lot of space.
- With a pedestal or, as it is sometimes called, a “tulip”. It is distinguished by the presence of a special design - a pedestal, on which the bowl rests. It is easy to hide all communications in it, which makes the model very aesthetic and popular.
- With a semi-pedestal. The pedestal at such sinks does not reach the floor and should be attached to the wall. Design feature: requires removal of the drain at a strictly defined height.
"Trivia" to consider when buying
Going to the store you need to know exactly what type of sink you have to buy. In addition, it is important to determine the desired dimensions, for which it is worth measuring the area of the room where the equipment will be installed. The shape of the bowl can be any, but the length is at least 55 cm, otherwise the water will splash around the room. Sinks are produced blind and with holes for the mixer, so the method of mounting the mixer should be decided in advance. By the way, it is better to buy it with the sink, so that before they make a purchase, check their compatibility.
Another very important aspect that should not be forgotten: the correspondence of the water supply system to the sink fasteners. In addition to the equipment, a siphon is usually offered, if this is not so, it is worth immediately choosing the right model. The sink you like should be carefully inspected for possible chips and scratches. If you buy built-in equipment or a bowl with a pedestal, you should check how it rises to the places intended for installation and once again make sure that the pedestal has the correct height. And the last caveat: if fasteners are not attached to the equipment, you must immediately purchase them.
Carrying out the installation using the example of a console sink
If you do not want to read the description of the work in print, you can watch the video clip with instructions:
So, before starting work, you need to determine whether the wall can withstand the additional load. If in doubt, it is better to use a special supporting frame for fasteners. The sink installation process consists of several important steps:
- Mark the wall. We select a suitable place on the site where the equipment will be fixed. Draw a horizontal line that marks the top edge of the shell. It should not be forgotten that the height of the sink in the bathroom should be sufficient so that a person of average height can comfortably use the equipment. If the wall is tiled, it is better to consider the location of the seams between the elements, it will turn out more aesthetically. Be sure to check the horizontal line with the help of a level. The following action can be performed in two ways. The first involves measuring the distance from the edges of the equipment to the mounting holes and transferring the results to the wall. You can simply press the sink with the top edge to the intended line and mark the attachment points.

Marking is carried out only with the help of a level, in no case not "by eye"
- Cooking holes. Once again we check how convenient the installation height of the sink is, if it does not suit, it is better to redo everything at this stage.
- In places of future fastenings, we drill holes with a drill or punch. Their diameter should be slightly smaller than that of dowels prepared for operation. Pour a little glue into the holes so that the connection is as strong as possible, and we hammer in them expansion spacers.

Plumbing self-tapping screws are screwed into pre-prepared holes
- Set the bowl. We take the plumbing self-tapping screws and screw them into the prepared holes. We check the strength of the mounts and carefully put the sink on them. Then we install the washers on the screws and begin to slowly spin them. Serious efforts should not be made, otherwise the sink may burst. Tighten the washers so that the bowl does not swing. We put on decorative caps on the places of fastenings.

The washers are tightened very carefully so that the sink does not burst
- We install a siphon. We start by fixing the issue. We insert the mesh, gasket and clamping screw into the drain hole. When installing the release, gaskets are installed that guarantee the tightness of the connection. Make sure that they fit the sink drain very tightly, without gaps and displacements. If everything is installed correctly, tighten the screw and connect the outlet to the siphon. Then we fix in the socket of the sewerage a branch pipe.
- Mount the mixer. It connects to the water supply using a flexible eyeliner. For installation, a fum tape is used, which seals the joints and prevents possible leakage. A hose with fittings or other types of mounting hardware is connected to the faucet and then to the water pipes.

The mixer is connected to the water supply using flexible hoses.
On this installation can be considered completed. Now you should open the water and check the quality of the installation.
If leaks occur, most often the cause is loose connections. They need to be tightened again and lubricated at the joints of the sewer pipes with sealant. There should be no gaps between the sink and the wall. The gap in this area will cause water to flow to the floor and gradually damage the wall finish from dampness. If a gap still forms, the joint should be treated with silicone sealant.
The installation process of the sink usually does not cause much difficulty. If you carry out all the work carefully and carefully, without neglecting the requirements of the instructions, the result will certainly please.Properly installed in the right place, the sink will perfectly serve for a long time.
2 comments